
Toyota Yaris: Interior Panels / Trim / Roof Headlining
Toyota Yaris XP210 (2020-2026) Reapir and Service Manual / Vehicle Interior / Interior Panels / Trim / Roof Headlining
 Installation
INSTALLATION PROCEDURE 1. INSTALL REAR CONSOLE BOX ASSEMBLY (a) Engage the claws and guides to install the rear console box assembly as shown in the illustration...
 Components
COMPONENTS ILLUSTRATION
*1 NO. 2 HEATER TO REGISTER DUCT SUB-ASSEMBLY *2 PACKAGE TRAY TRIM PANEL ASSEMBLY *3 DECK BOARD ASSEMBLY *4 DECK FLOOR BOX RH *5 DECK FLOOR BOX LH *6 FRONT DOOR OPENING TRIM WEATHERSTRIP LH *7 FRONT DOOR OPENING TRIM WEATHERSTRIP RH - - ILLUSTRATION
*1 LAP BELT OUTER ANCHOR COVER *2 FRONT SEAT OUTER BELT ASSEMBLY LH *3 FRONT SEAT OUTER BELT ASSEMBLY RH *4 REAR SEATBACK HINGE SUB-ASSEMBLY LH *5 REAR SEATBACK HINGE SUB-ASSEMBLY RH *6 QUARTER TRIM PANEL ASSEMBLY LH *7 QUARTER TRIM PANEL ASSEMBLY RH *8 CENTER PILLAR UPPER GARNISH LH *9 CENTER PILLAR UPPER GARNISH RH *10 DECK TRIM REAR COVER *11 DECK TRIM SIDE PANEL ASSEMBLY LH *12 DECK TRIM SIDE PANEL ASSEMBLY RH *13 REAR SEAT OUTER BELT ASSEMBLY LH *14 REAR SEAT OUTER BELT ASSEMBLY RH *15 INNER ROOF SIDE GARNISH LH *16 INNER ROOF SIDE GARNISH RH *17 ROOF SIDE INNER GARNISH LH *18 ROOF SIDE INNER GARNISH RH *19 NO...
Other information:
Toyota Yaris XP210 (2020-2026) Reapir and Service Manual: Fail-safe Chart
F..
Toyota Yaris XP210 (2020-2026) Reapir and Service Manual: HO2S Heater Control Bank 1 Sensor 1 Circuit Short to Battery (P003012,P003013,P101A9E)
DESCRIPTION The air fuel ratio sensor (sensor 1) generates current that corresponds to the actual air fuel ratio. This sensor current is used to provide the ECM with feedback so that it can control the air fuel ratio. The ECM determines the deviation from the stoichiometric air fuel ratio level, and regulates the fuel injection duration...
Categories
- Manuals Home
- Toyota Yaris Owners Manual
- Toyota Yaris Service Manual
- Maintenance
- Key Battery Replacement
- Adjustment
- New on site
- Most important about car
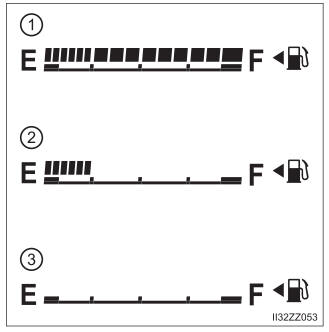
Fuel Gauge
The fuel gauge shows approximately how much fuel is remaining in the tank when the ignition is switched ON. We recommend keeping the tank over 1/4 full.

Copyright © 2026 www.toyaris4.com