Toyota Yaris: Rear Seat Assembly / Removal
REMOVAL
CAUTION / NOTICE / HINT
CAUTION:
Wear protective gloves. Sharp areas on the parts may injure your hands.
PROCEDURE
1. REMOVE REAR SEATBACK ASSEMBLY RH
| (a) Fold the rear seatback assembly RH forward. |
|

(b) Disengage the hook and loop fasteners.
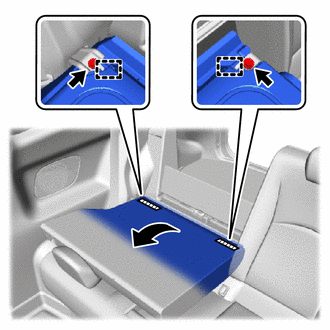
 | Hook and Loop Fastener |
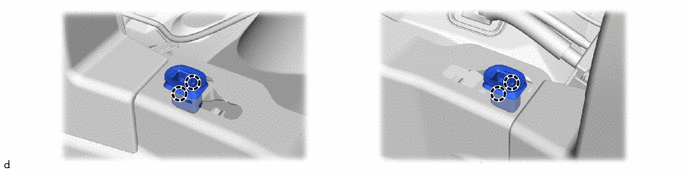
(c) Remove the 2 bolts.
(d) Disengage the guides to remove the rear seatback assembly RH.
NOTICE:
Be careful not to damage the vehicle body.
2. REMOVE REAR SEATBACK ASSEMBLY LH
| (a) Fold the rear seatback assembly LH forward. |
|
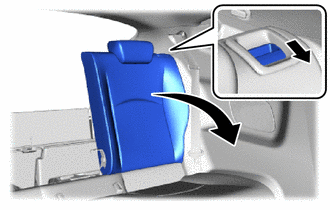
(b) Disengage the hook and loop fasteners.
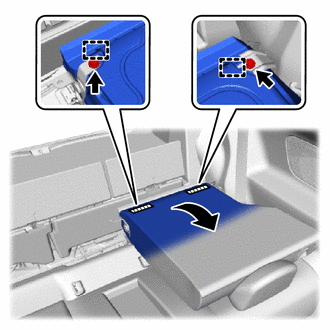
 | Hook and Loop Fastener |
(c) Remove the 2 bolts.
(d) Disengage the guides to remove the rear seatback assembly LH.
NOTICE:
Be careful not to damage the vehicle body.
3. REMOVE BENCH TYPE REAR SEAT CUSHION ASSEMBLY
(a) Lift the front edge of the bench type rear seat cushion assembly as shown in the illustration and disengage the rear seat cushion frame hooks on the front side of the bench type rear seat cushion assembly from the rear seat cushion lock hooks.
NOTICE:
Be sure to hold the parts of the seat cushion assembly directly next to the rear seat cushion frame hooks when lifting it. Lifting a different part of the cushion may deform the rear seat cushion frame.
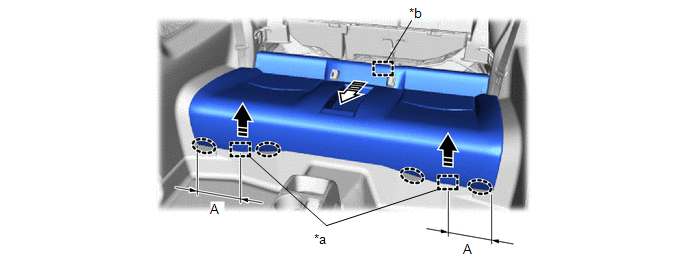
| *a | Rear Seat Cushion Frame Hook Front Side | *b | Rear Seat Cushion Frame Hook Rear Side |
 | Place Hands Here |
 | Remove in this Direction (1) |
 | Remove in this Direction (2) | - | - |
Standard Measurement:
| Area | Measurement |
|---|---|
| A | 0 - 50 mm (0 - 1.9685 in.) |
(b) Disengage the rear seat cushion frame hook on the rear side of the bench type rear seat cushion assembly as shown in the illustration.
NOTICE:
Be careful not to damage the vehicle body.
4. REMOVE REAR SEAT CUSHION LOCK HOOK
(a) Disengage the claws to remove the rear seat cushion lock hook as shown in the illustration.
 Components
COMPONENTS ILLUSTRATION
*1 REAR SEATBACK ASSEMBLY RH *2 REAR SEATBACK ASSEMBLY LH *3 BENCH TYPE REAR SEAT CUSHION ASSEMBLY *4 REAR SEAT CUSHION LOCK HOOK
Tightening torque for "Major areas involving basic vehicle performance such as moving/turning/stopping" : N*m (kgf*cm, ft...
 Disassembly
DISASSEMBLY CAUTION / NOTICE / HINT CAUTION: Wear protective gloves. Sharp areas on the parts may injure your hands. PROCEDURE 1. REMOVE REAR SEAT HEADREST ASSEMBLY (a) Remove the rear seat headrest assembly...
Other information:
Toyota Yaris XP210 (2020-2026) Owner's Manual: How to use AUX mode
Select the icon on the home screen and display the Entertainment screen. Select to switch to the AUX mode. The following icons are displayed in the lower part of the center display. If a device is not connected to the auxiliary jack, the mode does not switch to the AUX mode...
Toyota Yaris XP210 (2020-2026) Reapir and Service Manual: Dtc Check / Clear
DTC CHECK / CLEAR HINT: DTCs, which are stored in the engine stop and start ECU, can be displayed on the GTS. The GTS can display confirmed and pending DTCs. Some DTCs are not stored if the engine stop and start ECU does not detect the same malfunction again during a second consecutive driving cycle...
Categories
- Manuals Home
- Toyota Yaris Owners Manual
- Toyota Yaris Service Manual
- Auto Lock/Unlock Function
- Fuel Gauge
- Engine & Hybrid System
- New on site
- Most important about car
Fuel Gauge
The fuel gauge shows approximately how much fuel is remaining in the tank when the ignition is switched ON. We recommend keeping the tank over 1/4 full.
