Toyota Yaris: Roof Drip Side Finish Moulding / Installation
INSTALLATION
CAUTION / NOTICE / HINT
HINT:
- Use the same procedure for the RH side and LH side.
- The following procedure is for the LH side.
PROCEDURE
1. INSTALL ROOF DRIP SIDE FINISH MOULDING CLIP
NOTICE:
When installing a new roof drip side finish moulding clip, remove any double-sided tape remaining where the roof drip side finish moulding clips will be installed on the vehicle body and clean the vehicle body with a non-residue solvent.
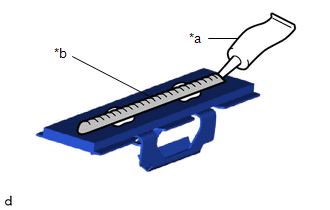
| (a) Apply a 2.0 to 3.0 mm (0.0787 to 0.118 in.) bead of adhesive (3M DP-105 or equivalent) to a new roof drip side finish moulding clip. HINT: Adhesive strength (tensile strength): 13.7 MPa (140.0 kgf/cm2, 1987 psi) or more (when the temperature is 23°C (73°F).) |
|
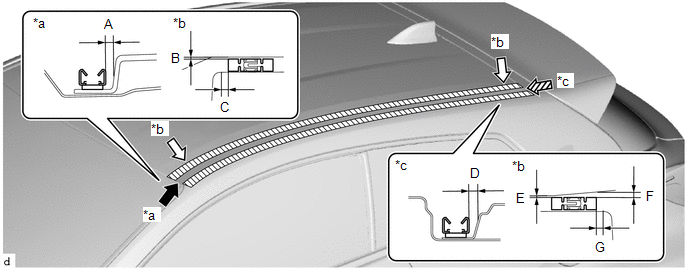
(b) Install the roof drip side finish moulding clips to the positions on the roof panel shown in the illustration. Determine the locations and firmly press and install the roof drip side finish moulding clips.

| *a | View A | *b | View B |
| *c | View C | - | - |
Standard Measurement:
| Area | Measurement | Area | Measurement |
|---|---|---|---|
| A | 1.6 to 2.6 mm (0.063 to 0.102 in.) | B | 1.0 mm (0.0394 in.) |
| C | 5.1 mm (0.201 in.) | D | 2.9 mm (0.114 in.) |
| E | 1.2 mm (0.0472 in.) | F | 4.6 mm (0.181 in.) |
| G | 5.9 mm (0.232 in.) | - | - |
(c) Install the roof drip side finish moulding when 40 minutes or more have elapsed since the roof drip side finish moulding clips were installed.
HINT:
- Initial hardening time: 40 minutes
- Complete hardening time: 24 hours
2. INSTALL ROOF DRIP SIDE MOULDING
(a) Clean the vehicle body surface.
(1) Using a heat light, heat the vehicle body surface.
Heating Temperature:
| Item | Temperature |
|---|---|
| Vehicle Body | 40 to 60°C (104 to 140°F) |
| Roof Drip Side Moulding | 20 to 30°C (68 to 86°F) |
CAUTION:
- Do not touch the heat light and heated parts, touching the heat light may result in burns.
- Touching heated parts for a long time may result in burns.
.png)
| *a | Heated Part |
| *b | Heat Light |
NOTICE:
Do not heat vehicle body and roof drip side moulding or excessively.
(2) Remove any remaining double-sided tape from the vehicle body.
(3) Wipe off any tape adhesive residue with cleaner.
NOTICE:
- Installing the roof drip side moulding with some double-sided tape remaining may cause poor adhesion. Perform this procedure until the tape is sufficiently removed.
- Make sure to use a cloth when removing. Using a screwdriver, etc., may cause damage and poor adhesion.
(b) Using a heat light, heat the vehicle body and a new roof drip side moulding.
Heating Temperature:
| Item | Temperature |
|---|---|
| Vehicle Body | 40 to 60°C (104 to 140°F) |
| Roof Drip Side Moulding | 20 to 30°C (68 to 86°F) |
CAUTION:
- Do not touch the heat light and heated parts, touching the heat light may result in burns.
- Touching heated parts for a long time may result in burns.
NOTICE:
Do not heat vehicle body and roof drip side moulding or excessively.
(c) Remove the release paper from the roof drip side moulding.
HINT:
After removing the release paper, keep the exposed adhesive free from foreign matter.
(d) Engage the clips to install the roof drip side moulding.
.png)
| *a | Double-sided Tape | - | - |
HINT:
Press the roof drip side moulding firmly to install it.
(e) Remove the protective tape.
 Removal
REMOVAL CAUTION / NOTICE / HINT HINT:
Use the same procedure for the RH side and LH side.
The following procedure is for the LH side.
PROCEDURE 1...
 Roof Drip Side Moulding
ComponentsCOMPONENTS ILLUSTRATION
*1 ROOF SIDE RAIL WEATHERSTRIP *2 ROOF SIDE RAIL WEATHERSTRIP RETAINER RemovalREMOVAL CAUTION / NOTICE / HINT HINT:
Use the same procedure for the RH and LH sides...
Other information:
Toyota Yaris XP210 (2020-2026) Reapir and Service Manual: Ignition Coil And Spark Plug
ComponentsCOMPONENTS ILLUSTRATION *1 SPARK PLUG *2 IGNITION COIL ASSEMBLY N*m (kgf*cm, ft.*lbf): Specified torque - - RemovalREMOVAL CAUTION / NOTICE / HINT The necessary procedures (adjustment, calibration, initialization or registration) that must be performed after parts are removed and installed, or replaced during ignition coil assembly or spark plug removal/installation are shown below...
Toyota Yaris XP210 (2020-2026) Reapir and Service Manual: Turbocharger/Supercharger Inlet Pressure Sensor "A" Circuit Low Circuit Short to Ground (P012A11)
DESCRIPTION The internal sensor in the E.F.I. vacuum sensor assembly detects the air inlet duct internal pressure as a voltage. DTC No. Detection Item DTC Detection Condition Trouble Area MIL Note P012A11 Turbocharger/Supercharger Inlet Pressure Sensor "A" Circuit Low Circuit Short to Ground The output voltage from the E...
Categories
- Manuals Home
- Toyota Yaris Owners Manual
- Toyota Yaris Service Manual
- Opening and Closing the Liftgate/Trunk Lid
- How to connect USB port/Auxiliary jack
- To Set Speed
- New on site
- Most important about car
Front Seat Belt Pretensioners
The front seat belt pretensioners are designed to deploy in moderate or severe frontal, near frontal collisions.
In addition, the pretensioners operate when a side collision or a rollover accident is detected. The pretensioners operate differently depending on what types of air bags are equipped. For more details about the seat belt pretensioner operation, refer to the SRS Air Bag Deployment Criteria.

