Toyota Yaris: Roof Drip Side Finish Moulding / Removal
REMOVAL
CAUTION / NOTICE / HINT
HINT:
- Use the same procedure for the RH side and LH side.
- The following procedure is for the LH side.
PROCEDURE
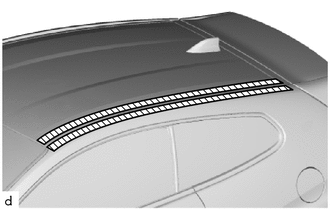
1. REMOVE ROOF DRIP SIDE MOULDING
| (a) Apply protective tape around the roof drip side moulding. |
|
(b) for 1-clip Type:
(1) Disengage the clip.
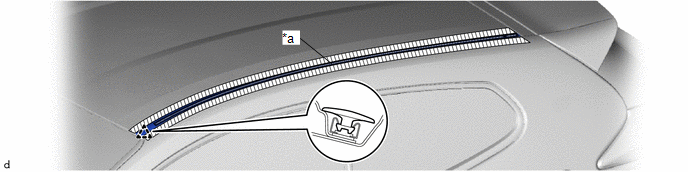
| *a | Double-sided Tape | - | - |
(2) Separate the double-sided tape to remove the roof drip side moulding.
NOTICE:
- Do not remove the roof drip side finish moulding clip.
- If a roof drip side finish moulding clip is damaged or falls off, replace it with a new one.
(c) for 2-clip Type:
(1) Disengage the clips.
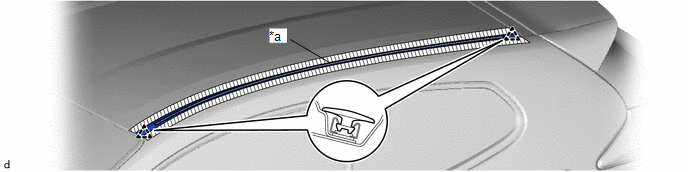
| *a | Double-sided Tape | - | - |
(2) Separate the double-sided tape to remove the roof drip side moulding.
NOTICE:
- Do not remove the roof drip side finish moulding clips.
- If a roof drip side finish moulding clip is damaged falls off, replace it with a new one.
 Components
C..
 Installation
INSTALLATION CAUTION / NOTICE / HINT HINT:
Use the same procedure for the RH side and LH side.
The following procedure is for the LH side.
PROCEDURE 1...
Other information:
Toyota Yaris XP210 (2020-2026) Reapir and Service Manual: Starter Signal Circuit
DESCRIPTION While the engine is being cranked, current flows from terminal STAR of the certification ECU (smart key ECU assembly) to the clutch start switch assembly and to terminal STA of the ECM (STA signal). WIRING DIAGRAM Refer to DTC P061512. Click here CAUTION / NOTICE / HINT NOTICE: Inspect the fuses for circuits related to this system before performing the following procedure...
Toyota Yaris XP210 (2020-2026) Reapir and Service Manual: Problem Symptoms Table
PROBLEM SYMPTOMS TABLE NOTICE: Before replacing the ECM, refer to Service Bulletin. When replacing the millimeter wave radar sensor assembly, always replace it with a new one. If a millimeter wave radar sensor assembly which was installed to another vehicle is used, the information stored in the millimeter wave radar sensor assembly will not match the information from the vehicle and a DTC may be stored...
Categories
- Manuals Home
- Toyota Yaris Owners Manual
- Toyota Yaris Service Manual
- How to use USB mode
- Diagnostic Trouble Code Chart
- Engine Start Function When Key Battery is Dead
- New on site
- Most important about car
Turning the Engine Off
Stop the vehicle completely. Manual transaxle: Shift into neutral and set the parking brake.Automatic transaxle: Shift the selector lever to the P position and set the parking brake.
Press the push button start to turn off the engine. The ignition position is off.
Copyright © 2026 www.toyaris4.com