Toyota Yaris: Exterior Panels / Trim / Roof Drip Side Moulding
Components
COMPONENTS
ILLUSTRATION
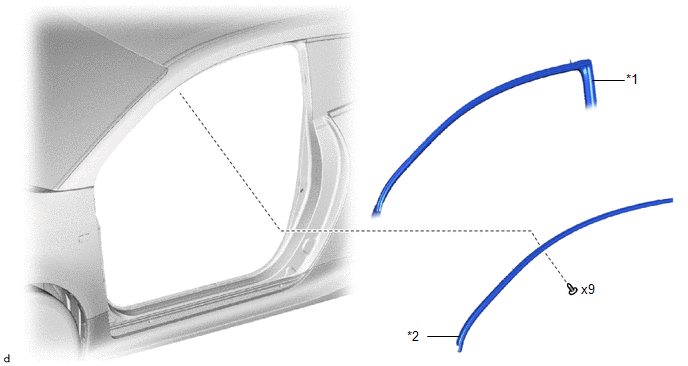
| *1 | ROOF SIDE RAIL WEATHERSTRIP | *2 | ROOF SIDE RAIL WEATHERSTRIP RETAINER |
Removal
REMOVAL
CAUTION / NOTICE / HINT
HINT:
- Use the same procedure for the RH and LH sides.
- The procedure listed below is for the LH side.
PROCEDURE
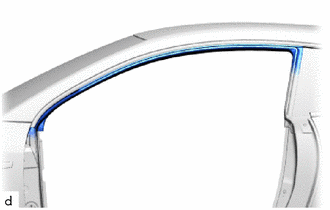
1. SEPARATE ROOF SIDE RAIL WEATHERSTRIP
| (a) Separate the roof side rail weatherstrip. |
|
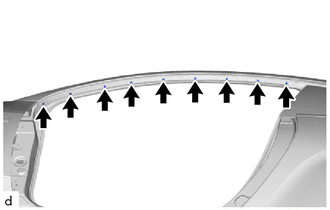
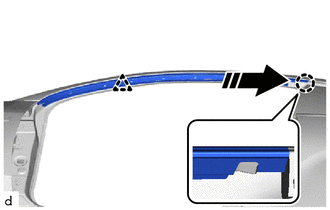
2. REMOVE FRONT ROOF SIDE RAIL WEATHERSTRIP RETAINER
| (a) Remove the 9 screws. |
|
(b) Disengage the clip and claw to remove the front roof side rail weatherstrip retainer as shown in the illustration.
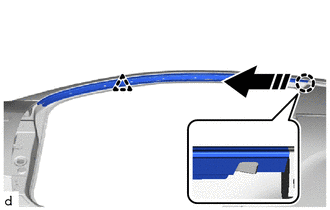
.png) | Remove in this Direction |
Installation
INSTALLATION
CAUTION / NOTICE / HINT
HINT:
- Use the same procedure for the RH and LH sides.
- The procedure listed below is for the LH side.
PROCEDURE
1. INSTALL FRONT ROOF SIDE RAIL WEATHERSTRIP RETAINER
(a) Engage the claw and clip to install the front roof side rail weatherstrip retainer as shown in the illustration.
.png) | Install in this Direction |
(b) Install the 9 screws.
2. INSTALL ROOF SIDE RAIL WEATHERSTRIP
(a) Install the roof side rail weatherstrip.
 Installation
INSTALLATION CAUTION / NOTICE / HINT HINT:
Use the same procedure for the RH side and LH side.
The following procedure is for the LH side.
PROCEDURE 1...
 Roof Garnish
..
Other information:
Toyota Yaris XP210 (2020-2026) Reapir and Service Manual: Problem Symptoms Table
PROBLEM SYMPTOMS TABLE NOTICE: If the auxiliary battery voltage becomes low, auxiliary battery load control will operate in order to ensure sufficient power is supplied to the power steering system. In this case, the window defogger system may not operate...
Toyota Yaris XP210 (2020-2026) Reapir and Service Manual: Components
COMPONENTS ILLUSTRATION *A for Driver Side *B for Front Passenger Side *1 FRONT DOOR LOWER FRAME BRACKET GARNISH *2 MULTIPLEX NETWORK MASTER SWITCH ASSEMBLY WITH FRONT ARMREST BASE UPPER PANEL *3 POWER WINDOW REGULATOR SWITCH ASSEMBLY WITH FRONT ARMREST BASE UPPER PANEL *4 FRONT DOOR TRIM GARNISH *5 FRONT DOOR TRIM BOARD SUB-ASSEMBLY *6 FRONT DOOR GLASS INNER WEATHERSTRIP *7 FRONT DOOR SERVICE HOLE COVER *8 FRONT DOOR SERVICE HOLE COVER CLIP ILLUSTRATION *1 FRONT DOOR GLASS SUB-ASSEMBLY *2 FRONT DOOR WINDOW REGULATOR ASSEMBLY *3 POWER WINDOW REGULATOR MOTOR ASSEMBLY *4 HOLE PLUG *5 FRONT DOOR WINDOW REGULATOR SUB- ASSEMBLY *6 WINDOW REGULATOR SHIM N*m (kgf*cm, ft...
Categories
- Manuals Home
- Toyota Yaris Owners Manual
- Toyota Yaris Service Manual
- Opening and Closing the Liftgate/Trunk Lid
- Power Integration No.1 System Missing Message (B235287,B235587,B235787-B235987)
- Battery Monitor Module General Electrical Failure (P058A01)
- New on site
- Most important about car
Keys

To use the auxiliary key, press the knob and pull out the auxiliary key from the smart key.
