Toyota Yaris: Headlight Assembly / Components
COMPONENTS
ILLUSTRATION
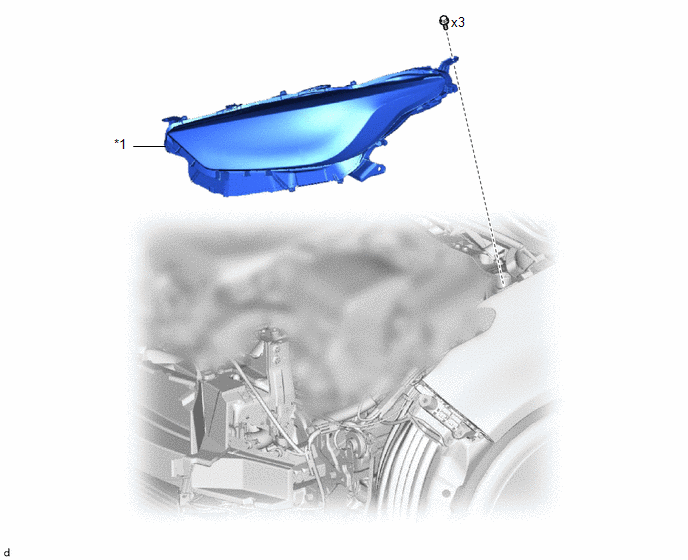
| *1 | HEADLIGHT ASSEMBLY | - | - |
ILLUSTRATION
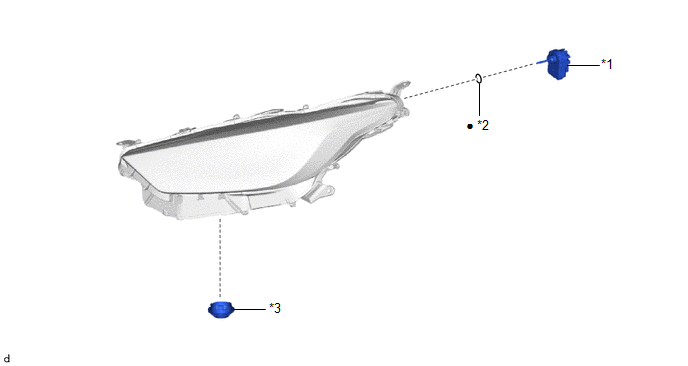
| *1 | HEADLIGHT LEVELING MOTOR | *2 | HEADLIGHT LEVELING MOTOR BASE PACKING |
| *3 | NO. 1 HEADLIGHT COVER | - | - |
| ● | Non-reusable part | - | - |
ILLUSTRATION
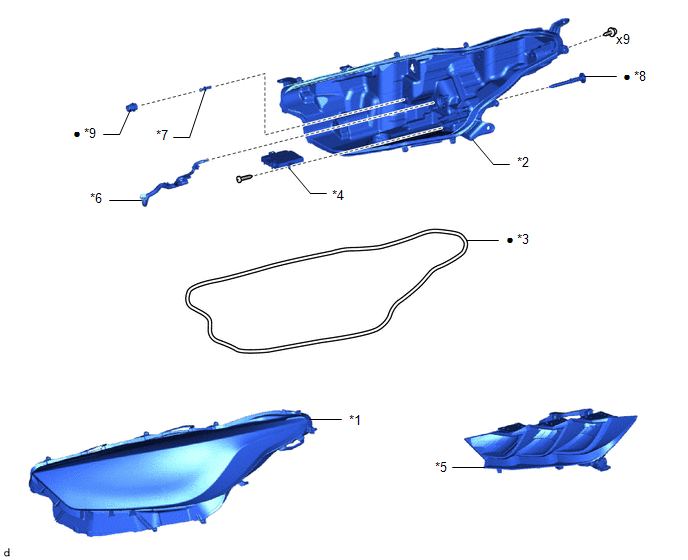
| *1 | HEADLIGHT LENS SUB-ASSEMBLY | *2 | HEADLIGHT HOUSING SUB-ASSEMBLY |
| *3 | HEADLIGHT LENS GASKET | *4 | LIGHT CONTROL LED ECU |
| *5 | HEADLIGHT UNIT ASSEMBLY | *6 | HEADLIGHT CORD |
| *7 | PIVOT SCREW | *8 | AIMING SCREW |
| *9 | PIVOT COLLAR | - | - |
| ● | Non-reusable part | - | - |
 Precaution
PRECAUTION NOTICE: When disassembling the headlight assembly, use static electricity countermeasures SST (desktop anti-static mat set) and observe all precautions to prevent damage to the system by electrostatic discharge (ESD)...
 Removal
REMOVAL CAUTION / NOTICE / HINT HINT:
Use the same procedure for the RH side and LH side.
The following procedure is for the LH side.
PROCEDURE 1...
Other information:
Toyota Yaris XP210 (2020-2026) Reapir and Service Manual: Components
C..
Toyota Yaris XP210 (2020-2026) Reapir and Service Manual: Parts Location
PARTS LOCATION ILLUSTRATION *1 FORWARD RECOGNITION CAMERA *2 MILLIMETER WAVE RADAR SENSOR ASSEMBLY *3 BRAKE ACTUATOR ASSEMBLY - SKID CONTROL ECU *4 ECM ILLUSTRATION *1 POWER DISTRIBUTION BOX ASSEMBLY - ECU-IGR NO. 1 FUSE - ECU-IGR NO...
Categories
- Manuals Home
- Toyota Yaris Owners Manual
- Toyota Yaris Service Manual
- Brake System Control Module "A" System Voltage System Voltage Low (C137BA2)
- Engine Start Function When Key Battery is Dead
- Auto Lock/Unlock Function
- New on site
- Most important about car
Fuel Gauge
The fuel gauge shows approximately how much fuel is remaining in the tank when the ignition is switched ON. We recommend keeping the tank over 1/4 full.

Copyright © 2026 www.toyaris4.com