Toyota Yaris: Headlight Assembly / Removal
REMOVAL
CAUTION / NOTICE / HINT
HINT:
- Use the same procedure for the RH side and LH side.
- The following procedure is for the LH side.
PROCEDURE
1. REMOVE FRONT BUMPER ASSEMBLY
Click here
.gif)
2. REMOVE HEADLIGHT ASSEMBLY
(a) Apply protective tape around the headlight assembly as shown in the illustration.
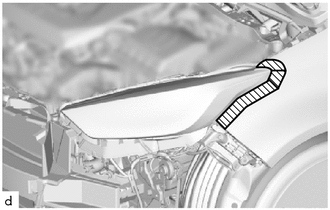
.png) | Protective Tape |
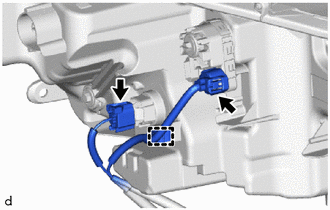
| (b) Disengage the clamp and disconnect the 2 connectors. |
|
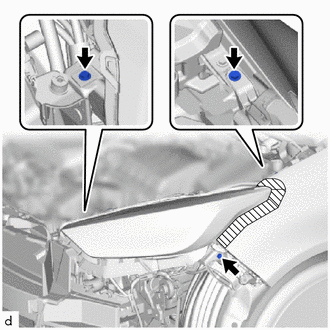
| (c) Remove the 3 screws. |
|
(d) Remove the headlight assembly as shown in the illustration.
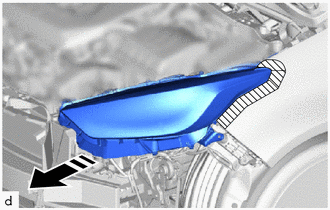
.png) | Remove in this Direction |
 Components
COMPONENTS ILLUSTRATION
*1 HEADLIGHT ASSEMBLY - - ILLUSTRATION
*1 HEADLIGHT LEVELING MOTOR *2 HEADLIGHT LEVELING MOTOR BASE PACKING *3 NO...
 Disassembly
DISASSEMBLY CAUTION / NOTICE / HINT NOTICE:
Be sure to read Precaution thoroughly before servicing.
Click here
Handle components indoors as much as possible to prevent foreign matter from entering and adhering to headlight assembly components...
Other information:
Toyota Yaris XP210 (2020-2026) Reapir and Service Manual: Disassembly
DISASSEMBLY CAUTION / NOTICE / HINT The necessary procedures (adjustment, calibration, initialization, or registration) that must be performed after parts are removed and installed, or replaced during cylinder head removal/installation are shown below...
Toyota Yaris XP210 (2020-2026) Reapir and Service Manual: Parts Location
PARTS LOCATION ILLUSTRATION *1 BRAKE MASTER CYLINDER RESERVOIR ASSEMBLY - BRAKE FLUID LEVEL WARNING SWITCH *2 THERMISTOR ASSEMBLY *3 ECM *4 BRAKE ACTUATOR ASSEMBLY - SKID CONTROL ECU ILLUSTRATION *1 HEADLIGHT ASSEMBLY RH *2 HEADLIGHT ASSEMBLY LH *3 HEADLIGHT UNIT ASSEMBLY RH *4 HEADLIGHT UNIT ASSEMBLY LH *5 HEADLIGHT CORD *6 OUTER REAR VIEW MIRROR ASSEMBLY RH - SIDE TURN SIGNAL LIGHT ASSEMBLY RH *7 OUTER REAR VIEW MIRROR ASSEMBLY LH - SIDE TURN SIGNAL LIGHT ASSEMBLY LH *8 REAR COMBINATION LIGHT ASSEMBLY RH *9 REAR COMBINATION LIGHT ASSEMBLY LH *10 REAR TURN SIGNAL LIGHT LED ILLUSTRATION *1 MAIN BODY ECU (MULTIPLEX NETWORK BODY ECU) *2 POWER DISTRIBUTION BOX ASSEMBLY - ECU-DCC NO...
Categories
- Manuals Home
- Toyota Yaris Owners Manual
- Toyota Yaris Service Manual
- Headlights
- Battery Monitor Module General Electrical Failure (P058A01)
- Fuse Panel Description
- New on site
- Most important about car
Break-In Period
No special break-in is necessary, but a few precautions in the first 600 miles (1,000 km) may add to the performance, economy, and life of the vehicle.
Do not race the engine. Do not maintain one constant speed, either slow or fast, for a long period of time. Do not drive constantly at full-throttle or high engine rpm for extended periods of time. Avoid unnecessary hard stops. Avoid full-throttle starts.
Copyright © 2026 www.toyaris4.com