Toyota Yaris: License Plate Light Assembly / Removal
REMOVAL
CAUTION / NOTICE / HINT
HINT:
- Use the same procedure for the RH and LH sides.
- The procedure listed below is for the LH side.
PROCEDURE
1. REMOVE BACK DOOR TRIM BOARD
Click here
.gif)
2. REMOVE BACK DOOR TRIM COVER
Click here
3. REMOVE LICENSE PLATE LIGHT ASSEMBLY
| (a) Disconnect the connector. |
|
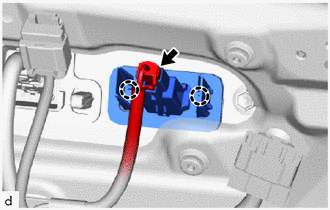
(b) Disengage the claws to separate the license plate light assembly.
(c) Remove the license plate light assembly as shown in the illustration.
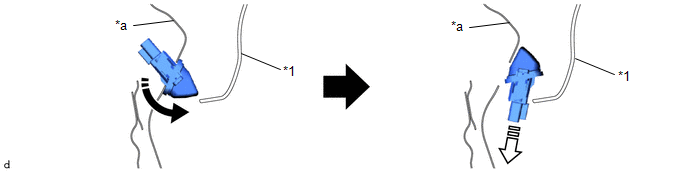
| *1 | Back Door Outside Garnish Sub-assembly | - | - |
| *a | Back Door Panel | - | - |
.png) | Remove in this Direction (1) |
.png) | Remove in this Direction (2) |
 Components
C..
 Disassembly
DISASSEMBLY CAUTION / NOTICE / HINT HINT:
Use the same procedure for the RH and LH sides.
The procedure listed below is for the LH side.
PROCEDURE 1...
Other information:
Toyota Yaris XP210 (2020-2026) Reapir and Service Manual: Crankshaft Position - Camshaft Position Correlation Bank 1 Sensor A (P001600,P001700)
DESCRIPTION In the VVT (Variable Valve Timing) system, the appropriate intake and exhaust valve open and close timing is controlled by the ECM. The ECM performs intake and exhaust valve control by performing the following: 1) controlling the camshaft, cam timing oil control solenoid assembly, camshaft timing gear bolt (camshaft timing oil control valve) and operating the camshaft timing gear; and 2) changing the relative positions of the camshaft and crankshaft...
Toyota Yaris XP210 (2020-2026) Owner's Manual: Removing a Flat Tire
If your vehicle is equipped with a wheel cover, pry off the wheel cover with the beveled end of the jack lever.Force the end of the jack lever firmly between wheel and cover, or removal will be difficult. Loosen the lug nuts by turning them counterclockwise one turn each, but do not remove any lug nuts until the tire has been raised off the ground...
Categories
- Manuals Home
- Toyota Yaris Owners Manual
- Toyota Yaris Service Manual
- Power Integration No.1 System Missing Message (B235287,B235587,B235787-B235987)
- G16e-gts (engine Mechanical)
- How to use USB mode
- New on site
- Most important about car
Fuel-Filler Lid and Cap
WARNING
When removing the fuel-filler cap, loosen the cap slightly and wait for any hissing to stop, then remove it
Fuel spray is dangerous. Fuel can burn skin and eyes and cause illness if ingested. Fuel spray is released when there is pressure in the fuel tank and the fuel-filler cap is removed too quickly.