Toyota Yaris: Rear Spoiler / Reassembly
REASSEMBLY
PROCEDURE
1. INSTALL REAR SPOILER SEAL
HINT:
When installing the rear spoiler seal, heat the rear spoiler assembly using a heat light.
Heating Temperature:
| Item | Temperature |
|---|---|
| Rear Spoiler Assembly | 20 to 30°C (68 to 86°F) |
CAUTION:
- Do not touch the heat light and heated parts, touching the heat light may result in burns.
- Touching heated parts for a long time may result in burns.
.png)
| *a | Heated Part |
| *b | Heat Light |
NOTICE:
Do not heat the rear spoiler assembly excessively.
(a) Clean the rear spoiler assembly surface.
(1) Using a heat light, heat the rear spoiler assembly surface.
(2) Remove the double-sided tape from the rear spoiler assembly.
(3) Wipe off any tape adhesive residue with cleaner.
(b) Using a heat light, heat the rear spoiler assembly.
(c) Remove the release paper from a new rear spoiler seal.
HINT:
After removing the release paper, keep the exposed adhesive free from foreign matter.
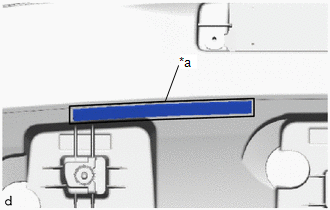
| (d) Install the rear spoiler seal. |
|
.png)
2. INSTALL NO. 4 REAR SPOILER PROTECTOR
HINT:
- Using the same procedure, install every No. 4 rear spoiler protector.
- When installing the No. 4 rear spoiler protector, heat the rear spoiler assembly using a heat light.
| Item | Temperature |
|---|---|
| Rear Spoiler Assembly | 20 to 30°C (68 to 86°F) |
CAUTION:
- Do not touch the heat light and heated parts, touching the heat light may result in burns.
- Touching heated parts for a long time may result in burns.
NOTICE:
Do not heat the rear spoiler assembly excessively.
(a) Clean the rear spoiler assembly surface.
(1) Using a heat light, heat the rear spoiler assembly surface.
(2) Remove the double-sided tape from the rear spoiler assembly.
(3) Wipe off any tape adhesive residue with cleaner.
(b) Using a heat light, heat the rear spoiler assembly.
(c) Remove the release paper from a new No. 4 rear spoiler protector.
HINT:
After removing the release paper, keep the exposed adhesive free from foreign matter.
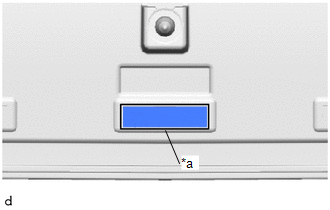
| (d) Install the No. 4 rear spoiler protector. |
|
.png)
3. INSTALL NO. 2 REAR SPOILER PROTECTOR
HINT:
- Using the same procedure, install every No. 2 rear spoiler protector.
- When installing the No. 2 rear spoiler protector, heat the rear spoiler assembly using a heat light.
| Item | Temperature |
|---|---|
| Rear Spoiler Assembly | 20 to 30°C (68 to 86°F) |
CAUTION:
- Do not touch the heat light and heated parts, touching the heat light may result in burns.
- Touching heated parts for a long time may result in burns.
NOTICE:
Do not heat the rear spoiler assembly excessively.
(a) Clean the rear spoiler assembly surface.
(1) Using a heat light, heat the rear spoiler assembly surface.
(2) Remove the double-sided tape from the rear spoiler assembly.
(3) Wipe off any tape adhesive residue with cleaner.
(b) Using a heat light, heat the rear spoiler assembly.
(c) Remove the release paper from a new No. 2 rear spoiler protector.
HINT:
After removing the release paper, keep the exposed adhesive free from foreign matter.
| (d) Install the No. 2 rear spoiler protector as shown in the illustration. HINT: Install the No. 2 rear spoiler protector along the line on the rear spoiler assembly. |
|
4. INSTALL NO. 1 REAR SPOILER PROTECTOR
HINT:
When installing the No. 1 rear spoiler protector, heat the rear spoiler assembly using a heat light.
Heating Temperature| Item | Temperature |
|---|---|
| Rear Spoiler Assembly | 20 to 30°C (68 to 86°F) |
CAUTION:
- Do not touch the heat light and heated parts, touching the heat light may result in burns.
- Touching heated parts for a long time may result in burns.
NOTICE:
Do not heat the rear spoiler assembly excessively.
(a) Clean the rear spoiler assembly surface.
(1) Using a heat light, heat the rear spoiler assembly surface.
(2) Remove the double-sided tape from the rear spoiler assembly.
(3) Wipe off any tape adhesive residue with cleaner.
(b) Using a heat light, heat the rear spoiler assembly.
(c) Remove the release paper from a new No. 1 rear spoiler protector.
HINT:
After removing the release paper, keep the exposed adhesive free from foreign matter.
| (d) Install the No. 1 rear spoiler protector as shown in the illustration. HINT: Install the No. 1 rear spoiler protector along the line on the rear spoiler assembly. |
|
5. INSTALL CENTER STOP LIGHT ASSEMBLY
Click here
.gif)
 Disassembly
DISASSEMBLY PROCEDURE 1. REMOVE CENTER STOP LIGHT ASSEMBLY Click here
2. REMOVE NO. 1 REAR SPOILER PROTECTOR (a) Remove the No. 1 rear spoiler protector...
 Installation
INSTALLATION PROCEDURE 1. INSTALL REAR SPOILER ASSEMBLY (a) Engage the clips to install the rear spoiler assembly.
(b) Install the 2 bolts and 3 nuts...
Other information:
Toyota Yaris XP210 (2020-2026) Reapir and Service Manual: Installation
INSTALLATION PROCEDURE 1. INSTALL CLUTCH MASTER CYLINDER ASSEMBLY (a) Install a new clutch master cylinder gasket to the clutch master cylinder assembly. (b) Install the clutch master cylinder assembly to the vehicle body with the 2 nuts. Torque: 12...
Toyota Yaris XP210 (2020-2026) Owner's Manual: Maintaining the Finish
Washing To help protect the finish from rust and deterioration, wash your Toyota thoroughly and frequently, at least once a month, with lukewarm or cold water. If the vehicle is washed improperly, the paint surface could be scratched. Here are some examples of how scratching could occur...
Categories
- Manuals Home
- Toyota Yaris Owners Manual
- Toyota Yaris Service Manual
- Headlights
- G16e-gts (engine Mechanical)
- Auto Lock/Unlock Function
- New on site
- Most important about car
Refueling
Before refueling, close all the doors, windows, and the liftgate/trunk lid, and switch the ignition OFF.
To open the fuel-filler lid, pull the remote fuel-filler lid release.
