Toyota Yaris: Vacuum Pump / On-vehicle Inspection
Toyota Yaris XP210 (2020-2026) Reapir and Service Manual / Brake / Brake System (other) / Vacuum Pump / On-vehicle Inspection
ON-VEHICLE INSPECTION
PROCEDURE
1. REMOVE NO. 1 ENGINE COVER SUB-ASSEMBLY
Click here

2. DISCONNECT UNION TO CONNECTOR TUBE HOSE
Click here

3. OPERATION CHECK
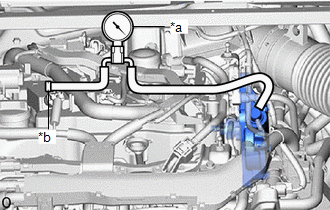
| (a) Connect the hose of the vacuum gauge to the vacuum pump assembly. |
|
(b) Start the engine and warm it up for more than 2 minutes.
(c) With the engine idling, check the vacuum of the vacuum pump assembly.
Standard Pressure:
More than 86.7 kPa (650 mmHg, 25.6 in.Hg)
HINT:
- If the pressure is less than the standard, replace the vacuum pump assembly.
- Always perform this operation check procedure after replacing the vacuum pump assembly.
(d) Remove the vacuum gauge from the vacuum pump assembly.
4. CONNECT UNION TO CONNECTOR TUBE HOSE
Click here

5. INSTALL NO. 1 ENGINE COVER SUB-ASSEMBLY
Click here

 Components
COMPONENTS ILLUSTRATION
*1 NO. 1 ENGINE UNDER COVER ASSEMBLY - -
N*m (kgf*cm, ft.*lbf): Specified torque - - ILLUSTRATION
*1 NO...
 Removal
REMOVAL CAUTION / NOTICE / HINT The necessary procedures (adjustment, calibration, initialization, or registration) that must be performed after parts are removed and installed, or replaced during vacuum pump assembly removal/installation are shown below...
Other information:
Toyota Yaris XP210 (2020-2026) Reapir and Service Manual: Precaution
PRECAUTION HANDLING PRECAUTION FOR DYNAMIC RADAR CRUISE CONTROL SYSTEM Keep in mind the following points when servicing vehicles equipped with the dynamic radar cruise control system. (a) The dynamic radar cruise control system is designed to be used when driving on highways and freeways...
Toyota Yaris XP210 (2020-2026) Reapir and Service Manual: Evaporator Temperature Sensor Circuit Short to Battery or Open (P053515)
DESCRIPTION The No. 1 cooler thermistor is installed to the evaporator in the air conditioner unit to detect the temperature of the cooled air that has passed through the evaporator, which is used to control the air conditioning system. It sends signals to the air conditioning amplifier assembly...
Categories
- Manuals Home
- Toyota Yaris Owners Manual
- Toyota Yaris Service Manual
- Engine & Hybrid System
- Brake System Control Module "A" System Voltage System Voltage Low (C137BA2)
- Headlights
- New on site
- Most important about car
Turning the Engine Off
Stop the vehicle completely. Manual transaxle: Shift into neutral and set the parking brake.Automatic transaxle: Shift the selector lever to the P position and set the parking brake.
Press the push button start to turn off the engine. The ignition position is off.
Copyright © 2026 www.toyaris4.com