Toyota Yaris: Curtain Shield Airbag Assembly / Installation
INSTALLATION
CAUTION / NOTICE / HINT
HINT:
- Use the same procedure for the RH side and LH side.
- The following procedure is for the LH side.
PROCEDURE
1. INSTALL CURTAIN SHIELD AIRBAG ASSEMBLY
NOTICE:
When installing a curtain shield airbag assembly, have assistants hold it to prevent it from bending.
(a) Check that the ignition switch is off.
(b) Check that the cable is disconnected from the negative (-) auxiliary battery terminal.
CAUTION:
- Do not begin this procedure within 90 seconds after disconnecting the cable from the negative (-) auxiliary battery terminal.
- If the airbag deploys for any reason, it may cause a serious accident.
(c) Engage the hooks and claws to temporarily install the curtain shield airbag assembly.
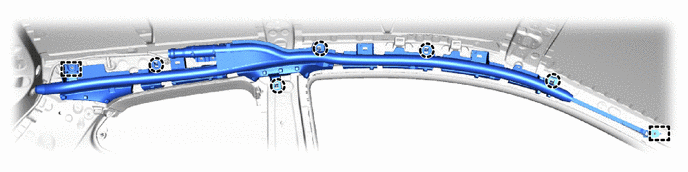
(d) Install the 4 new bolts.
Torque:
9.8 N·m {100 kgf·cm, 87 in·lbf}
NOTICE:
Do not twist the curtain shield airbag assembly when installing it.
(e) Install the curtain shield airbag assembly with a new roof side inner garnish clip and new clips as shown in the illustration.
HINT:
Engage the claws to install each new clip.
(f) Using needle nose pliers, push the pins into the clips.
NOTICE:
- Do not damage the pins.
- Make sure that the pins of the clips are pushed in firmly.
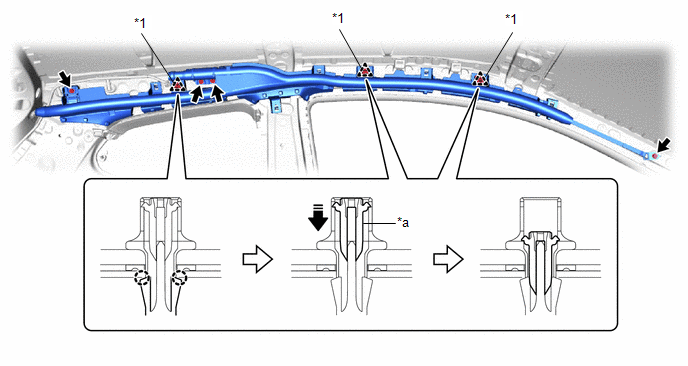
| *1 | Roof Side Inner Garnish Clip | - | - |
| *a | Pin | - | - |
 | Install in this Direction | - | - |
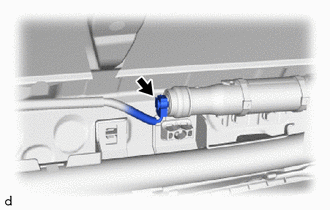
| (g) Connect the airbag connector. NOTICE: When connecting any airbag connector, take care not to damage the airbag wire harness. HINT: Refer to How to Connect or Disconnect Airbag Connector: Click here
|
|

2. INSTALL ROOF HEADLINING
Click here

3. CONNECT CABLE TO NEGATIVE AUXILIARY BATTERY TERMINAL
Click here

4. INITIALIZATION AFTER RECONNECTING AUXILIARY BATTERY TERMINAL
HINT:
When disconnecting and reconnecting the auxiliary battery, there is an automatic learning function that completes learning when the respective system is used.
Click here

5. PERFORM DIAGNOSTIC SYSTEM CHECK
Click here

6. INSPECT SRS WARNING LIGHT
Click here

 Removal
REMOVAL CAUTION / NOTICE / HINT The necessary procedures (adjustment, calibration, initialization, or registration) that must be performed after parts are removed, installed, or replaced during the curtain shield airbag assembly removal/installation are shown below...
 Disposal
DISPOSAL CAUTION / NOTICE / HINT CAUTION: Before performing pre-disposal deployment of any SRS part, review and closely follow all applicable environmental and hazardous material regulations...
Other information:
Toyota Yaris XP210 (2020-2026) Owner's Manual: Operating Tips for Android™
Requires the Android Auto app on Google Play and an Android compatible smartphone running Android™ 5.0 Lollipop or higher. Google, Android, Android Auto and other related marks are trademarks of Google LLC. To prevent loss or damage of stored data, we recommend that you always back up your data...
Toyota Yaris XP210 (2020-2026) Reapir and Service Manual: Diagnostic Trouble Code Chart
D..
Categories
- Manuals Home
- Toyota Yaris Owners Manual
- Toyota Yaris Service Manual
- Fuse Panel Description
- Key Battery Replacement
- Fuel Gauge
- New on site
- Most important about car
Supplemental Restraint System (SRS) Precautions
The front and side supplemental restraint systems (SRS) include different types of air bags. Please verify the different types of air bags which are equipped on your vehicle by locating the “SRS AIRBAG” location indicators. These indicators are visible in the area where the air bags are installed.
The air bags are installed in the following locations:
The steering wheel hub (driver air bag) The front passenger dashboard (front passenger air bag) The outboard sides of the front seatbacks (side air bags) The front and rear window pillars, and the roof edge along both sides (curtain air bags)