Toyota Yaris: Curtain Shield Airbag Assembly / Removal
REMOVAL
CAUTION / NOTICE / HINT
The necessary procedures (adjustment, calibration, initialization, or registration) that must be performed after parts are removed, installed, or replaced during the curtain shield airbag assembly removal/installation are shown below.
HINT:
-
When the cable is disconnected / reconnected to the auxiliary battery terminal, systems temporarily stop operating. However, each system has a function that completes learning the first time the system is used.
-
Learning completes when vehicle is driven
Effect/Inoperative Function When Necessary Procedures are not Performed
Necessary Procedures
Link
Lane tracing assist system
Drive the vehicle straight ahead at 35 km/h (22 mph) or more for 5 seconds or more.

Pre-collision system
Stop and start system
Drive the vehicle until stop and start control is permitted (approximately 5 to 60 minutes)

-
Learning completes when vehicle is operated normally
Effect/Inoperative Function When Necessary Procedures are not Performed
Necessary Procedures
Link
Power door lock control system
- Back door opener
Perform door unlock operation with door control switch or electrical key transmitter sub-assembly switch.

Air conditioning system
After the ignition switch is turned to ON, the servo motor standard position is recognized.
-
-
Learning completes when vehicle is driven
- Use the same procedure for the RH side and LH side.
- The following procedure is for the LH side.
PROCEDURE
1. PRECAUTION
CAUTION:
Be sure to read Precaution thoroughly before servicing.
Click here

NOTICE:
After turning the ignition switch off, waiting time may be required before disconnecting the cable from the negative (-) auxiliary battery terminal.
Click here

2. DISCONNECT CABLE FROM NEGATIVE AUXILIARY BATTERY TERMINAL
Click here

CAUTION:
-
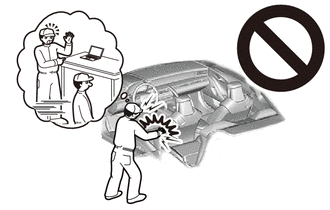
Wait at least 90 seconds after disconnecting the cable from the negative (-) auxiliary battery terminal to disable the SRS system.
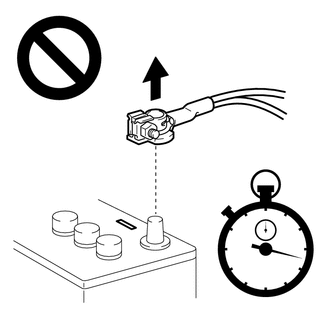
- If the airbag deploys for any reason, it may cause a serious accident.
3. REMOVE ROOF HEADLINING
Click here

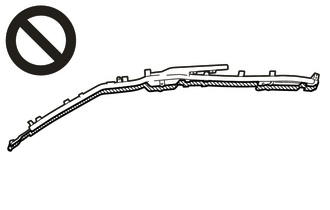
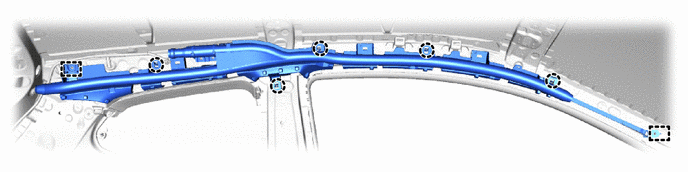
4. REMOVE CURTAIN SHIELD AIRBAG ASSEMBLY
 | Deployment Side |
- When storing the curtain shield airbag assembly, keep the airbag deployment side facing upward.
- If the airbag deploys for any reason, it may cause a serious accident.
(a) Check that the ignition switch is off.
(b) Check that the cable is disconnected from the negative (-) auxiliary battery terminal.
CAUTION:
- Wait at least 90 seconds after disconnecting the cable from the negative (-) auxiliary battery terminal to disable the SRS system.
- If the airbag deploys for any reason, it may cause a serious accident.
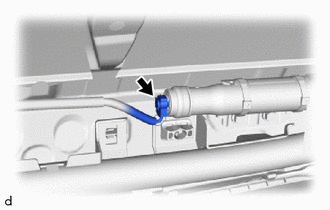
| (c) Disconnect the airbag connector. NOTICE: When disconnecting any airbag connector, take care not to damage the airbag wire harness. HINT: Refer to How to Connect or Disconnect Airbag Connector: Click here
|
|

(d) Using needle nose pliers, remove the pins from the clips as shown in the illustration.
NOTICE:
Do not damage the pins.
(e) Using 2 screwdrivers, disengage the claws of clips to separate the clips and roof side inner garnish clip from the vehicle body as shown in the illustration.
HINT:
Separate the clips and curtain shield airbag assembly from the vehicle body as a unit.
(f) Remove the 4 bolts.
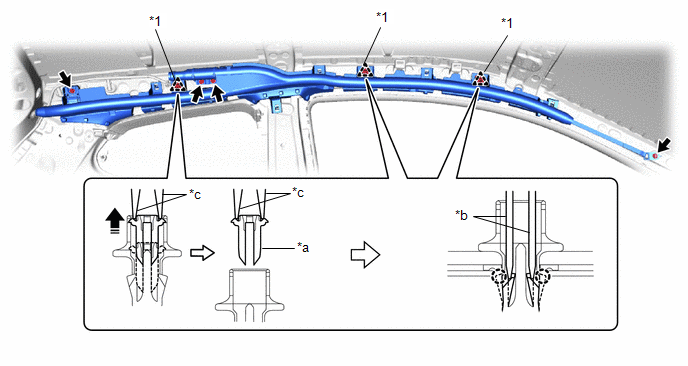
| *1 | Roof Side Inner Garnish Clip | - | - |
| *a | Pin | *b | Screwdriver |
| *c | Needle nose Plier | - | - |
 | Remove in this Direction | - | - |
(g) While holding the curtain shield airbag assembly, disengage the claws and hooks to remove the curtain shield airbag assembly.
| (h) Remove the clips and roof side inner garnish clip from the curtain shield airbag assembly. |
|
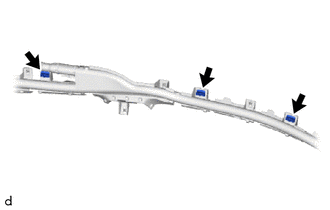
 Components
COMPONENTS ILLUSTRATION
*1 CURTAIN SHIELD AIRBAG ASSEMBLY *2 ROOF SIDE INNER GARNISH CLIP
Tightening torque for "Major areas involving basic vehicle performance such as moving/turning/stopping" : N*m (kgf*cm, ft...
 Installation
INSTALLATION CAUTION / NOTICE / HINT HINT:
Use the same procedure for the RH side and LH side.
The following procedure is for the LH side.
PROCEDURE 1...
Other information:
Toyota Yaris XP210 (2020-2026) Reapir and Service Manual: Certification Ecu
ComponentsCOMPONENTS ILLUSTRATION *1 CERTIFICATION ECU (SMART KEY ECU ASSEMBLY) - - RemovalREMOVAL CAUTION / NOTICE / HINT The necessary procedures (adjustment, calibration, initialization, or registration) that must be performed after parts are removed, installed, or replaced during the certification ECU (smart key ECU assembly) removal/installation are shown below...
Toyota Yaris XP210 (2020-2026) Reapir and Service Manual: Fuel Pump "A" Control Circuit Short to Battery (P062712)
DESCRIPTION The fuel pump control ECU performs PWM (Pulse Width Modulation) control to control the fuel pump (for low pressure side) speed steplessly over a wide range. The fuel pump control ECU controls the speed of the fuel pump (for low pressure side) by switching the current of FPU, FPV and FPW based on operation signals output from the ECM...
Categories
- Manuals Home
- Toyota Yaris Owners Manual
- Toyota Yaris Service Manual
- Immobilizer System
- Maintenance
- Brake System Control Module "A" System Voltage System Voltage Low (C137BA2)
- New on site
- Most important about car
Break-In Period
No special break-in is necessary, but a few precautions in the first 600 miles (1,000 km) may add to the performance, economy, and life of the vehicle.
Do not race the engine. Do not maintain one constant speed, either slow or fast, for a long period of time. Do not drive constantly at full-throttle or high engine rpm for extended periods of time. Avoid unnecessary hard stops. Avoid full-throttle starts.