
Toyota Yaris: Power Mirror Control System / Diagnosis System
Toyota Yaris XP210 (2020-2026) Reapir and Service Manual / Vehicle Exterior / Mirror (ext) / Power Mirror Control System / Diagnosis System
DIAGNOSIS SYSTEM
CHECK DLC3
(a) Check the DLC3.
Click here

INSPECT AUXILIARY BATTERY VOLTAGE
(a) Measure the auxiliary battery voltage with the ignition switch off.
Standard Voltage:
11 to 14 V
If the voltage is below 11 V, recharge or replace the auxiliary battery.
 Problem Symptoms Table
PROBLEM SYMPTOMS TABLE NOTICE: If the auxiliary battery voltage becomes low, auxiliary battery load control will operate in order to ensure sufficient power is supplied to the power steering system...
 Terminals Of Ecu
TERMINALS OF ECU CHECK MAIN BODY ECU (MULTIPLEX NETWORK BODY ECU) AND POWER DISTRIBUTION BOX ASSEMBLY
*1 Power Distribution Box Assembly *2 Main Body ECU (Multiplex Network Body ECU) (a) Remove the main body ECU (multiplex network body ECU) from the power distribution box assembly...
Other information:
Toyota Yaris XP210 (2020-2026) Reapir and Service Manual: Removal
REMOVAL CAUTION / NOTICE / HINT The necessary procedures (adjustment, calibration, initialization, or registration) that must be performed after parts are replaced during millimeter wave radar sensor assembly removal/installation are shown below. Necessary Procedure After Parts Removed/Installed/Replaced Replaced Part or Performed Procedure Necessary Procedure Effect/Inoperative Function when Necessary Procedure not Performed Link Millimeter wave radar sensor assembly Adjust millimeter wave radar sensor assembly Dynamic Radar Cruise Control System Lane Tracing Assist System Front Radar Sensor System Pre-collision System Auto High Beam System Triangle Target: Flat Surface Target: Driving Adjustment: Update ECU security key Vehicle control history (RoB) are stored PROCEDURE 1...
Toyota Yaris XP210 (2020-2026) Reapir and Service Manual: Installation
INSTALLATION CAUTION / NOTICE / HINT HINT: Use the same procedure for the RH side and LH side. The following procedure is for the LH side. PROCEDURE 1. INSTALL REAR DRIVE SHAFT INBOARD JOINT SHAFT SNAP RING (a) Install a new rear drive shaft inboard joint shaft snap ring to the rear drive shaft assembly...
Categories
- Manuals Home
- Toyota Yaris Owners Manual
- Toyota Yaris Service Manual
- G16e-gts (engine Mechanical)
- Headlights
- Removal
- New on site
- Most important about car
Refueling
Before refueling, close all the doors, windows, and the liftgate/trunk lid, and switch the ignition OFF.
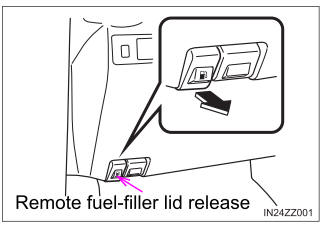
To open the fuel-filler lid, pull the remote fuel-filler lid release.

Copyright © 2026 www.toyaris4.com