Toyota Yaris: Rear Stabilizer Bar / Components
COMPONENTS
ILLUSTRATION
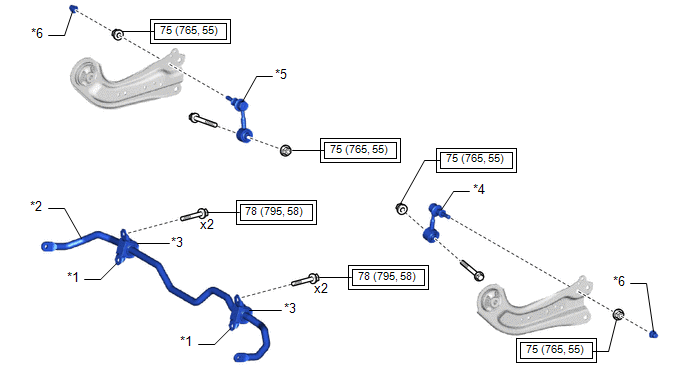
| *1 | REAR NO. 1 STABILIZER BAR BRACKET | *2 | REAR STABILIZER BAR |
| *3 | REAR STABILIZER BUSHING | *4 | REAR STABILIZER LINK ASSEMBLY LH |
| *5 | REAR STABILIZER LINK ASSEMBLY RH | *6 | CAP |
 | Tightening torque for "Major areas involving basic vehicle performance such as moving/turning/stopping" : N*m (kgf*cm, ft.*lbf) | - | - |

 Removal
REMOVAL PROCEDURE 1. REMOVE REAR WHEEL Click here
2. REMOVE REAR STABILIZER LINK ASSEMBLY LH (a) Remove the cap.
(b) Loosen the nut (A) of the rear stabilizer link assembly LH...
Other information:
Toyota Yaris XP210 (2020-2026) Reapir and Service Manual: Removal
REMOVAL PROCEDURE 1. REMOVE FRONT WHEELS Click here 2. REMOVE ENGINE UNDER COVER RH Click here 3. REMOVE NO. 1 ENGINE UNDER COVER ASSEMBLY Click here 4. REMOVE FAN AND GENERATOR V BELT Click here 5. REMOVE COMPRESSOR ASSEMBLY WITH PULLEY Click here 6...
Toyota Yaris XP210 (2020-2026) Reapir and Service Manual: Reassembly
REASSEMBLY CAUTION / NOTICE / HINT NOTICE: This procedure includes the installation of small-head bolts. Refer to Small-Head Bolts of Basic Repair Hint to identify the small-head bolts. Click here PROCEDURE 1. INSTALL RING PIN NOTICE: It is not necessary to remove the ring pins unless they are being replaced...
Categories
- Manuals Home
- Toyota Yaris Owners Manual
- Toyota Yaris Service Manual
- Diagnostic Trouble Code Chart
- To Set Speed
- Brake System Control Module "A" System Voltage System Voltage Low (C137BA2)
- New on site
- Most important about car
Fuel-Filler Lid and Cap
WARNING
When removing the fuel-filler cap, loosen the cap slightly and wait for any hissing to stop, then remove it
Fuel spray is dangerous. Fuel can burn skin and eyes and cause illness if ingested. Fuel spray is released when there is pressure in the fuel tank and the fuel-filler cap is removed too quickly.
Copyright © 2026 www.toyaris4.com