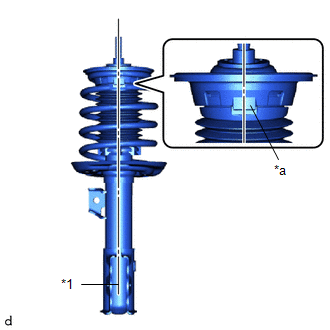
Toyota Yaris: Front Shock Absorber / Installation
INSTALLATION
CAUTION / NOTICE / HINT
HINT:
- Use the same procedure for the RH side and LH side.
- The following procedure is for the LH side.
PROCEDURE
1. INSTALL FRONT LOWER COIL SPRING INSULATOR
(a) Install the front lower coil spring insulator to the front shock absorber assembly.
 | Positioning Pin |
NOTICE:
When installing the front lower coil spring insulator, insert the positioning pin of the spring seat into the hole of the front lower coil spring insulator.
2. INSTALL FRONT SPRING BUMPER
(a) Install the front spring bumper to the front shock absorber assembly.
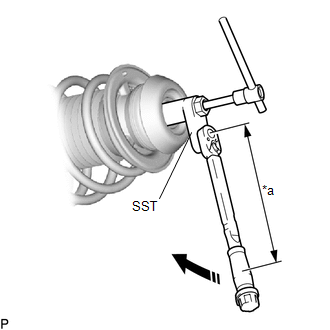
3. INSTALL FRONT COIL SPRING
| (a) Secure SST in a vise. SST: 09727-30022 09727-00010 09727-00022 09727-00031 |
|
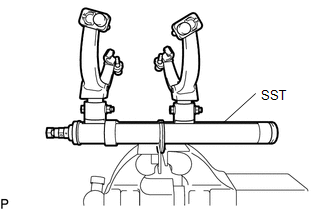
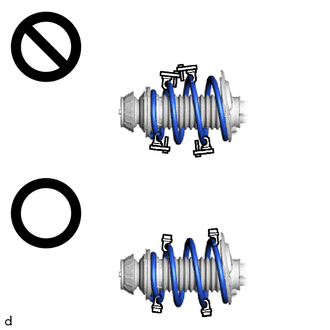
(b) Attach the hooks of each SST arm across the diameter of the front coil spring.
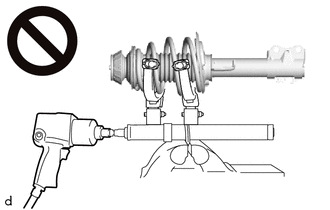
CAUTION:
-
Do not perform the work without checking to make sure that the claws of the hooks are securely engaged.
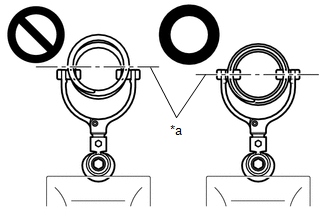
*a
Front Coil Spring Diameter
- It could cause the hook to slip off and the spring to fly out, which could result in an injury.
-
Do not install SST to the front coil spring unless its top and bottom hook distance is set to the widest condition.
- It could cause the hook to slip off and the spring to fly out, which could result in an injury.
-
Do not install SST when the distances between the SST arms or the number of coils of the coil spring between the hooks are not the same.
- It could cause the hook to slip off and the spring to fly out, which could result in an injury.
(c) Install the stopper pins to the hooks of SST.
CAUTION:
-
Do not perform the work if the stopper pin is not securely installed.
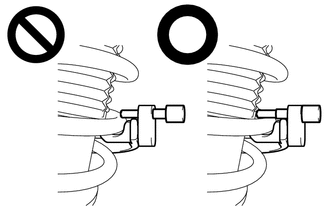
- It could cause the hook to slip off and the spring to fly out, which could result in an injury.
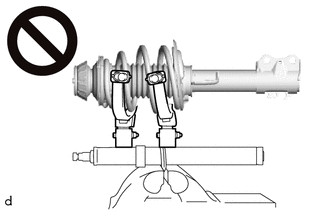
(d) Using SST, compress the front coil spring.
CAUTION:
-
While compressing the spring, if the front coil spring starts to bend into a bow shape, do not continue the work.
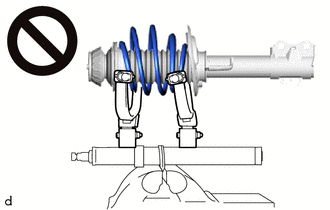
- It could cause the hook to slip off and the spring to fly out, which could result in an injury.
-
Do not compress the springs so far that the coils of the springs touch each other.
- It could cause the hook to slip off and the spring to fly out, which could result in an injury.
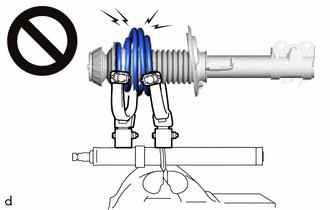
-
Do not use an impact wrench.
- The threads may be stripped, or the sudden compression may result in slack that causes the hooks to slip off, causing the spring to fly out and possibly resulting in injury.
-
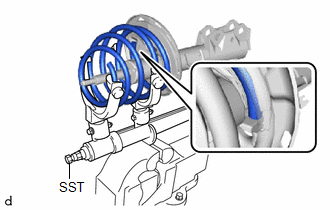
If a stopper pin touches the coil spring while using SST, remove the stopper pin and continue with the procedure.
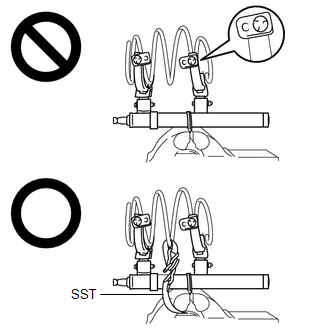
- If a stopper pin is removed, install a coil spring stopper belt as shown in the illustration.
- If a hook disengages from the coil spring, the coil spring may fly out, resulting in injury.
SST: 09727-00110
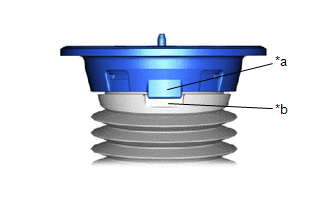
| (e) Install the front coil spring to the front shock absorber assembly. NOTICE: Make sure to fit the end of the front coil spring that has the smaller diameter into the depression of the front lower coil spring insulator. |
|
4. INSTALL FRONT UPPER COIL SPRING INSULATOR
| (a) Install the front upper coil spring insulator to the front No. 1 shock absorber dust cover so that the positioning tab of the front upper coil spring insulator is aligned with the positioning indentation of the front No. 1 shock absorber dust cover. |
|
5. INSTALL FRONT UPPER COIL SPRING SEAT
| (a) Install the front upper coil spring seat to the front upper coil spring insulator. NOTICE: When installing the front upper coil spring seat, fit the front upper coil spring insulator to the depression of the front upper coil spring seat and insert the positioning pin into the hole. |
|

6. INSTALL FRONT NO. 1 SHOCK ABSORBER DUST COVER
| (a) Align the positioning portions of the front No. 1 shock absorber dust cover and the front upper coil spring insulator with the center of the front shock absorber lower bracket and install them. NOTICE:
|
|
7. INSTALL STRUT MOUNTING BEARING
| (a) Install the strut mounting bearing to the front upper coil spring seat. NOTICE:
|
|

8. INSTALL FRONT SUSPENSION SUPPORT SUB-ASSEMBLY
(a) Install the front suspension support sub-assembly to the front shock absorber assembly.
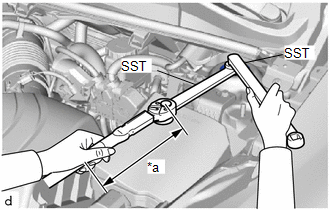
9. INSTALL FRONT SUPPORT TO FRONT SHOCK ABSORBER NUT
(a) Using SST and a 6 mm hexagon socket wrench, fix the front shock absorber rod and tighten the front support to front shock absorber nut.
SST: 09729-97202
| *a | Torque Wrench Fulcrum Length |
 | Turn |
Torque:
Specified tightening torque :
33.3 N·m {340 kgf·cm, 25 ft·lbf}
NOTICE:
Check that front coil spring is not contacting front upper coil spring insulator.
HINT:
-
Calculate the torque wrench reading when changing the fulcrum length of the torque wrench.
Click here

- When using SST (fulcrum length of 40 mm (1.57 in.)) + torque wrench (fulcrum length of 180 mm (7.09 in.)): 27.2 N*m (277 kgf*cm, 20 ft.*lbf)
(b) Remove SST from the front coil spring.
NOTICE:
- Check that front coil spring is installed so that it is aligned with the level difference of front lower coil spring insulator.
- Do not use an impact wrench. It will damage SST.
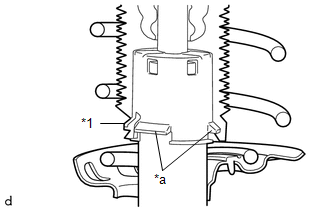
10. CONNECT FRONT NO. 1 SHOCK ABSORBER DUST COVER
| (a) Connect the end of the front No. 1 shock absorber dust cover with the claws of the front shock absorber with coil spring. NOTICE:
|
|
11. INSTALL FRONT SHOCK ABSORBER WITH COIL SPRING
(a) Temporarily install the front No. 2 suspension support and front shock absorber with coil spring to the vehicle body with the nut.
(b) Install the front shock absorber with coil spring to the steering knuckle with the 2 bolts and 2 nuts.
Torque:
270 N·m {2753 kgf·cm, 199 ft·lbf}
NOTICE:
When installing the nuts, keep the bolts from rotating.
HINT:
The bolts can be installed in either direction, however, make sure that they are both installed in the same direction.
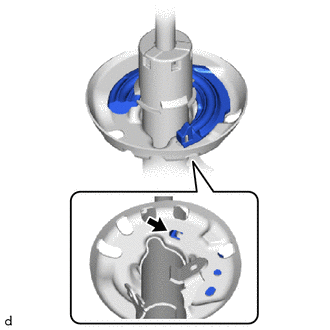
12. INSTALL FRONT SPEED SENSOR
(a) Set the 2 hooks of the front speed sensor to the front shock absorber with coil spring.
NOTICE:
Do not twist the front speed sensor when installing it.
 | Hook |
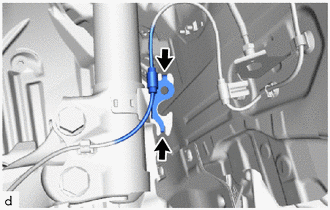
| (b) Install the front flexible hose and front speed sensor to the front shock absorber assembly with coil spring with the bolt. Torque: 29.4 N·m {300 kgf·cm, 22 ft·lbf} NOTICE: Do not kink or damage the front flexible hose and front speed sensor. |
|
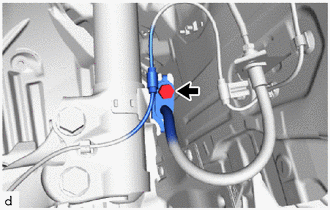
(c) Engage the clamp.
13. INSTALL FRONT STABILIZER LINK ASSEMBLY
(a) Install the front stabilizer link assembly to the front shock absorber with coil spring with the nut.
Torque:
74 N·m {755 kgf·cm, 55 ft·lbf}
HINT:
If the ball joint turns together with the nut, use a 6 mm hexagon socket wrench to hold the stud bolt.
14. INSTALL FRONT WHEEL
Click here

15. STABILIZE SUSPENSION
(a) Press down on the vehicle several times to stabilize the suspension.
16. FULLY TIGHTEN FRONT SHOCK ABSORBER WITH COIL SPRING
| (a) Using SST, fix the front shock absorber rod and tighten the nut. SST: 09729-00170 SST: 09729-38060 Torque: Specified tightening torque : 55 N·m {561 kgf·cm, 41 ft·lbf} HINT:
|
|

17. INSTALL FRONT SUSPENSION SUPPORT DUST COVER
(a) Install the front suspension support dust cover to the front shock absorber with coil spring.
18. INSPECT AND ADJUST FRONT WHEEL ALIGNMENT
Click here

 Inspection
INSPECTION CAUTION / NOTICE / HINT PROCEDURE 1. INSPECT FRONT SHOCK ABSORBER ASSEMBLY (a) Compress and extend the front shock absorber rod 4 times or more...
 Disposal
DISPOSAL CAUTION / NOTICE / HINT CAUTION:
Always use a cloth to prevent shards of metal from flying about due to the release of pressurized gas.
Always wear safety glasses...
Other information:
Toyota Yaris XP210 (2020-2026) Reapir and Service Manual: Problem Symptoms Table
PROBLEM SYMPTOMS TABLE NOTICE: When replacing the combination meter assembly, always replace it with a new one. If a combination meter assembly which was installed to another vehicle is used, the information stored in it will not match the information from the vehicle and a DTC may be stored...
Toyota Yaris XP210 (2020-2026) Reapir and Service Manual: Glass Position Initialization Incomplete (B2313)
DESCRIPTION The power window regulator motor assemblies are operated by the multiplex network master switch assembly or power window regulator switch assembly. The power window regulator motor assemblies have motor, regulator and ECU functions. When the ECU built into a power window regulator motor assembly determines that the power window regulator motor assemblies have not been initialized, DTC B2313 is stored...
Categories
- Manuals Home
- Toyota Yaris Owners Manual
- Toyota Yaris Service Manual
- Headlights
- To Set Speed
- Maintenance
- New on site
- Most important about car
Supplemental Restraint System (SRS) Precautions
The front and side supplemental restraint systems (SRS) include different types of air bags. Please verify the different types of air bags which are equipped on your vehicle by locating the “SRS AIRBAG” location indicators. These indicators are visible in the area where the air bags are installed.
The air bags are installed in the following locations:
The steering wheel hub (driver air bag) The front passenger dashboard (front passenger air bag) The outboard sides of the front seatbacks (side air bags) The front and rear window pillars, and the roof edge along both sides (curtain air bags)