Toyota Yaris: Condenser / Removal
REMOVAL
PROCEDURE
1. RECOVER REFRIGERANT FROM REFRIGERATION SYSTEM
Click here

2. REMOVE HEADLIGHT ASSEMBLY LH
Click here

3. REMOVE HEADLIGHT ASSEMBLY RH
HINT:
Use the same procedure as for the LH side.
4. REMOVE NO. 1 AIR CLEANER INLET
Click here

5. REMOVE RADIATOR UPPER AIR GUIDE PLATE
Click here

6. REMOVE FRONT BUMPER ENERGY ABSORBER
Click here

7. REMOVE FRONT BUMPER REINFORCEMENT
Click here

8. REMOVE HOOD LOCK ASSEMBLY
Click here

9. REMOVE UPPER RADIATOR SUPPORT SUB-ASSEMBLY
Click here

10. REMOVE COOL AIR INTAKE DUCT
Click here

11. REMOVE FRONT RADIATOR SIDE AIR GUIDE PLATE LH
Click here

12. REMOVE FRONT RADIATOR SIDE AIR GUIDE PLATE RH
HINT:
Use the same procedure as for the LH side.
13. REMOVE NO. 1 RADIATOR AIR GUIDE LH
Click here

14. REMOVE NO. 1 RADIATOR AIR GUIDE RH
Click here

15. DISCONNECT NO. 1 COOLER REFRIGERANT DISCHARGE HOSE
| (a) Remove the bolt to disconnect the No. 1 cooler refrigerant discharge hose from the cooler condenser assembly. |
|
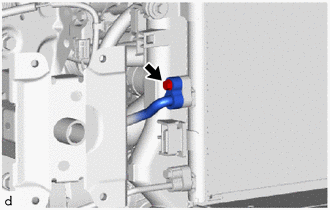
(b) Remove the O-ring from the No. 1 cooler refrigerant discharge hose.
NOTICE:
Seal the openings of the disconnected parts using vinyl tape to prevent entry of moisture and foreign matter.
16. DISCONNECT NO. 2 AIR CONDITIONING TUBE AND ACCESSORY ASSEMBLY
| (a) Remove the bolt to disconnect the No. 2 air conditioner tube and accessory assembly from the cooler condenser assembly. |
|
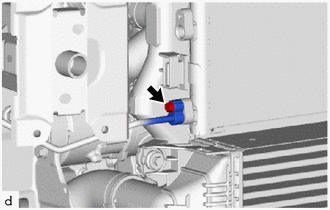
(b) Remove the O-ring from the No. 2 air conditioner tube and accessory assembly.
NOTICE:
Seal the openings of the disconnected parts using vinyl tape to prevent entry of moisture and foreign matter.
17. REMOVE COOLER CONDENSER ASSEMBLY
| (a) Remove the 3 bolts. |
|
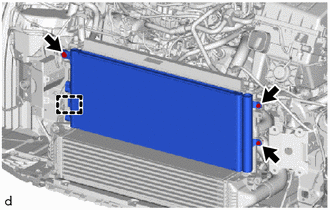
(b) Disengage the guide to remove the cooler condenser assembly.
NOTICE:
Do not damage the cooler condenser assembly or radiator assembly when removing the cooler condenser assembly.
 On-vehicle Inspection
ON-VEHICLE INSPECTION PROCEDURE 1. INSPECT COOLER CONDENSER ASSEMBLY (a) If the cooler condenser assembly fins are dirty, clean them with water and dry them with compressed air...
 Disassembly
DISASSEMBLY PROCEDURE 1. REMOVE COOLER DRYER (a) Using a 14 mm straight hexagon, remove the cap from the modulator.
*a Modulator (b) Using needle-nose pliers, remove the cooler dryer from the modulator...
Other information:
Toyota Yaris XP210 (2020-2026) Owner's Manual: DSC OFF Switch
Press the DSC OFF switch to turn off the TCS/DSC. The DSC OFF indicator light in the combination meter will illuminate. Press the switch again to turn the TCS/DSC back on. The DSC OFF indicator light will turn off. When DSC is on and you attempt to free the vehicle when it is stuck, or drive it out of freshly fallen snow, the TCS (part of the DSC system) will activate...
Toyota Yaris XP210 (2020-2026) Reapir and Service Manual: Lost Communication with Image Processing Module "A" Missing Message (U023A87)
DESCRIPTION The millimeter wave radar sensor assembly is connected to the forward recognition camera via the CAN communication line. If the millimeter wave radar sensor assembly receives signals indicating that its communication with the forward recognition camera is abnormal, the millimeter wave radar sensor assembly stores DTC U023A87...
Categories
- Manuals Home
- Toyota Yaris Owners Manual
- Toyota Yaris Service Manual
- Opening and Closing the Liftgate/Trunk Lid
- Brake System Control Module "A" System Voltage System Voltage Low (C137BA2)
- Fuse Panel Description
- New on site
- Most important about car
Fuel Gauge
The fuel gauge shows approximately how much fuel is remaining in the tank when the ignition is switched ON. We recommend keeping the tank over 1/4 full.
