Toyota Yaris: Power Window Regulator Motor / Removal
REMOVAL
CAUTION / NOTICE / HINT
The necessary procedures (adjustment, calibration, initialization or registration) that must be performed after parts are removed and installed, or replaced during the power window regulator motor removal/installation are shown below.
Necessary Procedure After Parts Removed/Installed/Replaced| Replaced Part or Performed Procedure | Necessary Procedures | Effect/Inoperative Function When Necessary Procedures are not Performed | Link |
|---|---|---|---|
| Initialize power window control system |
|
|
HINT:
-
When the cable is disconnected/reconnected to the auxiliary battery terminal, systems temporarily stop operating. However, each system has a function that completes learning the first time the system is used.
-
Learning completes when vehicle is driven
Effect/Inoperative Function When Necessary Procedures are not Performed
Necessary Procedures
Link
Lane tracing assist system
Drive the vehicle straight ahead at 35 km/h (22 mph) or more for 5 second or more.
.gif)
Pre-collision system
Stop and start system
Drive the vehicle until stop and start control is permitted (approximately 5 to 60 minutes)
-
Learning completes when vehicle is operated normally
Effect/Inoperative Function When Necessary Procedures are not Performed
Necessary Procedures
Link
Power door lock control system
- Back door opener
Perform door unlock operation with door control switch or electrical key transmitter sub-assembly switch.
Air conditioning system
After the ignition switch is turned to ON, the servo motor standard position is recognized.
-
-
Learning completes when vehicle is driven
- Use the same procedure for the RH side and LH side.
- The following procedure is for the LH side.
PROCEDURE
1. PRECAUTION
NOTICE:
After the ignition switch is turned off, there may be a waiting time before disconnecting the negative (-) auxiliary battery terminal.
Click here
2. DISCONNECT CABLE FROM NEGATIVE AUXILIARY BATTERY TERMINAL
Click here
3. REMOVE FRONT DOOR LOWER FRAME BRACKET GARNISH
Click here
4. REMOVE MULTIPLEX NETWORK MASTER SWITCH ASSEMBLY WITH FRONT ARMREST BASE UPPER PANEL (for Driver Side)
Click here
5. REMOVE POWER WINDOW REGULATOR SWITCH ASSEMBLY WITH FRONT ARMREST BASE UPPER PANEL (for Front Passenger Side)
Click here
6. REMOVE FRONT DOOR TRIM GARNISH
Click here
7. REMOVE FRONT DOOR TRIM BOARD SUB-ASSEMBLY
Click here
8. REMOVE FRONT DOOR GLASS INNER WEATHERSTRIP
Click here
9. REMOVE FRONT DOOR SERVICE HOLE COVER
Click here
10. REMOVE HOLE PLUG
Click here
11. REMOVE WINDOW REGULATOR SHIM
Click here
12. REMOVE FRONT DOOR GLASS SUB-ASSEMBLY
Click here
13. REMOVE FRONT DOOR WINDOW REGULATOR ASSEMBLY
Click here
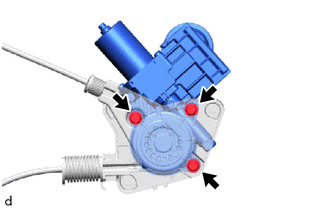
14. REMOVE POWER WINDOW REGULATOR MOTOR ASSEMBLY
(a) Remove the 3 bolts and power window regulator motor assembly.
NOTICE:
Using a screwdriver with its tip wrapped in protective tape, carefully remove the power window regulator motor assembly while holding down the drum.
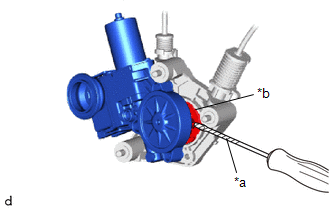
| *a | Protective Tape |
| *b | Drum |
 Components
COMPONENTS ILLUSTRATION
*A for Driver Side *B for Front Passenger Side *1 FRONT DOOR LOWER FRAME BRACKET GARNISH *2 MULTIPLEX NETWORK MASTER SWITCH ASSEMBLY WITH FRONT ARMREST BASE UPPER PANEL *3 POWER WINDOW REGULATOR SWITCH ASSEMBLY WITH FRONT ARMREST BASE UPPER PANEL *4 FRONT DOOR TRIM GARNISH *5 FRONT DOOR TRIM BOARD SUB-ASSEMBLY *6 FRONT DOOR GLASS INNER WEATHERSTRIP *7 FRONT DOOR SERVICE HOLE COVER *8 FRONT DOOR SERVICE HOLE COVER CLIP ILLUSTRATION
*1 FRONT DOOR GLASS SUB-ASSEMBLY *2 FRONT DOOR WINDOW REGULATOR ASSEMBLY *3 POWER WINDOW REGULATOR MOTOR ASSEMBLY *4 HOLE PLUG *5 FRONT DOOR WINDOW REGULATOR SUB- ASSEMBLY *6 WINDOW REGULATOR SHIM
N*m (kgf*cm, ft...
 Inspection
INSPECTION CAUTION / NOTICE / HINT NOTICE:
Do not apply positive (+) auxiliary battery voltage to any terminals, except terminal K7-2 (B) or L7-2 (B), to avoid damaging the pulse sensor inside the motor...
Other information:
Toyota Yaris XP210 (2020-2026) Reapir and Service Manual: Brake Warning Light does not Come ON
DESCRIPTION The skid control ECU (brake actuator assembly) controls the brake system warning light in the combination meter assembly via CAN communication. CAUTION / NOTICE / HINT NOTICE: After replacing the skid control ECU (brake actuator assembly), perform "Calibration"...
Toyota Yaris XP210 (2020-2026) Reapir and Service Manual: Road Test
ROAD TEST HINT: The dynamic radar cruise control system has 2 cruise control modes: constant speed control mode and vehicle-to-vehicle distance control mode. Vehicle-to-vehicle distance control mode is selected by default when the dynamic radar cruise control system is turned on using the cruise control main switch...
Categories
- Manuals Home
- Toyota Yaris Owners Manual
- Toyota Yaris Service Manual
- Removal
- How to connect USB port/Auxiliary jack
- Key Battery Replacement
- New on site
- Most important about car
Turning the Engine Off
Stop the vehicle completely. Manual transaxle: Shift into neutral and set the parking brake.Automatic transaxle: Shift the selector lever to the P position and set the parking brake.
Press the push button start to turn off the engine. The ignition position is off.