Toyota Yaris: Rear Trailing Arm / Removal
REMOVAL
CAUTION / NOTICE / HINT
The necessary procedures (adjustment, calibration, initialization, or registration) that must be performed after parts are removed and installed, or replaced during rear trailing arm assembly removal/installation are shown below.
Necessary Procedures After Parts Removed/Installed/Replaced| Replaced Part or Performed Procedure | Necessary Procedure | Effect/Inoperative Function when Necessary Procedure not Performed | Link |
|---|---|---|---|
| Rear wheel alignment adjustment | ECU Data Initialization | Active torque split AWD system |
|
| Calibration |
|
|


HINT:
- Use the same procedure for the RH side and LH side.
- The following procedure is for the LH side.
PROCEDURE
1. REMOVE REAR WHEEL
Click here

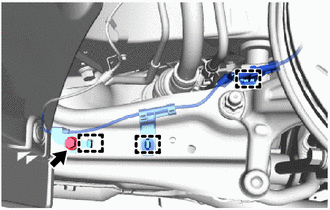
2. SEPARATE NO. 3 PARKING BRAKE CABLE ASSEMBLY
| (a) Remove the nut to separate the No. 3 parking brake cable assembly from the rear trailing arm assembly. |
|
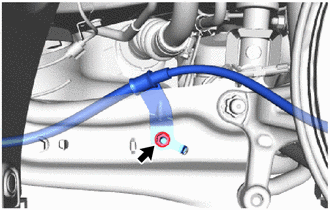
3. SEPARATE REAR SPEED SENSOR
| (a) Disengage the 3 clamps. |
|
(b) Remove the bolt and separate the rear speed sensor from the rear trailing arm assembly.
4. REMOVE REAR STABILIZER LINK ASSEMBLY
Click here

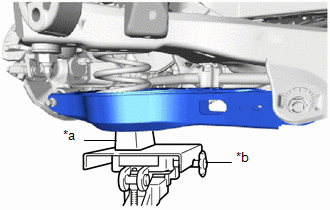
5. REMOVE REAR TRAILING ARM ASSEMBLY
| (a) Using a transmission jack and a wooden block, support the rear No. 2 suspension arm assembly. NOTICE:
|
|
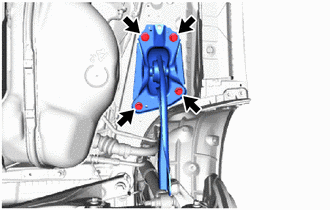
| (b) Remove the 2 bolts to separate the rear trailing arm assembly from the rear axle carrier sub-assembly. |
|
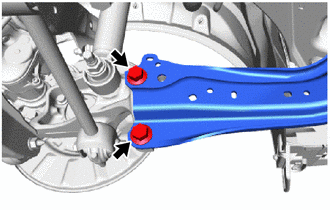
| (c) Remove the 4 bolts and rear trailing arm assembly. |
|
6. REMOVE REAR NO. 1 SUSPENSION SUPPORT COVER
| (a) Secure the rear trailing arm assembly in a vise using aluminum plates. NOTICE: Do not overtighten the vise. |
|
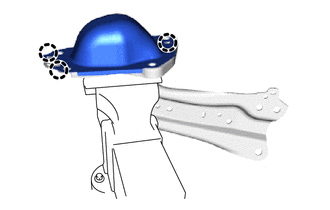
(b) Disengage the 3 claws to remove the rear No. 1 suspension support cover.
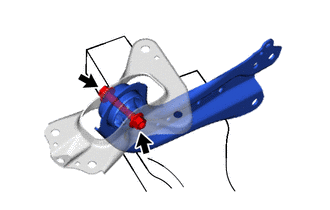
7. REMOVE REAR SUSPENSION ARM BRACKET
| (a) Remove the bolt, nut and rear suspension arm bracket from the rear trailing arm assembly. NOTICE: Loosen the nut with the bolt secured. |
|
 Components
COMPONENTS ILLUSTRATION
*1 REAR TRAILING ARM ASSEMBLY *2 REAR STABILIZER LINK ASSEMBLY *3 REAR SPEED SENSOR *4 NO. 3 PARKING BRAKE CABLE ASSEMBLY *5 REAR STABILIZER BAR *6 CAP
Tightening torque for "Major areas involving basic vehicle performance such as moving/turning/stopping" : N*m (kgf*cm, ft...
 Installation
INSTALLATION CAUTION / NOTICE / HINT HINT:
Use the same procedure for the RH side and LH side.
The following procedure is for the LH side.
PROCEDURE 1...
Other information:
Toyota Yaris XP210 (2020-2026) Reapir and Service Manual: Installation
INSTALLATION PROCEDURE 1. INSTALL NO. 1 CONVERTER CONTROL BRACKET (a) Install the No. 1 converter control bracket to the eco run vehicle converter assembly with the 2 bolts. 2. INSTALL ECO RUN VEHICLE CONVERTER ASSEMBLY (a) Install the eco run vehicle converter assembly with the bolt and nut...
Toyota Yaris XP210 (2020-2026) Reapir and Service Manual: Installation
INSTALLATION PROCEDURE 1. INSTALL INNER REAR VIEW MIRROR ASSEMBLY (w/o Pre-collision System) (a) Install the inner rear view mirror assembly as shown in the illustration. Install in this Direction (b) Using a T20 ''TORX'' socket wrench, install the screw...
Categories
- Manuals Home
- Toyota Yaris Owners Manual
- Toyota Yaris Service Manual
- How to connect USB port/Auxiliary jack
- How to use USB mode
- Power Integration No.1 System Missing Message (B235287,B235587,B235787-B235987)
- New on site
- Most important about car
Fuel-Filler Lid and Cap
WARNING
When removing the fuel-filler cap, loosen the cap slightly and wait for any hissing to stop, then remove it
Fuel spray is dangerous. Fuel can burn skin and eyes and cause illness if ingested. Fuel spray is released when there is pressure in the fuel tank and the fuel-filler cap is removed too quickly.