Toyota Yaris: Parking Brake / Parking Brake Cable
Components
COMPONENTS
ILLUSTRATION
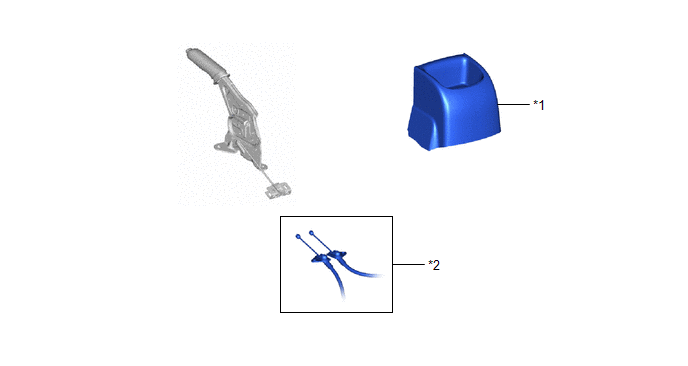
| *1 | CONSOLE REAR END PANEL SUB-ASSEMBLY | *2 | PARKING BRAKE CABLE ASSEMBLY |
ILLUSTRATION
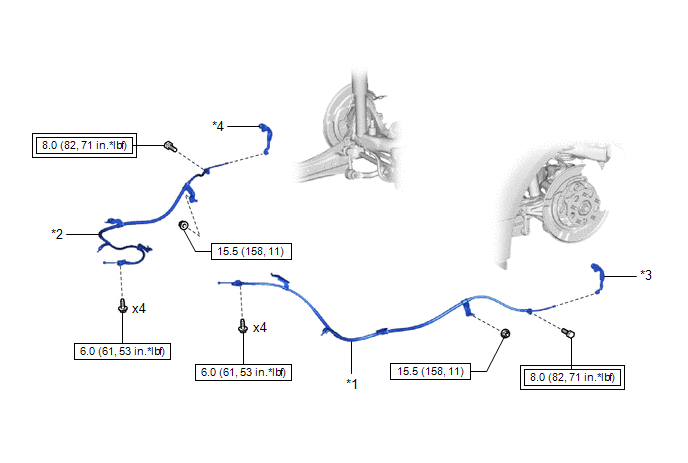
| *1 | NO. 3 PARKING BRAKE CABLE ASSEMBLY | *2 | NO. 2 PARKING BRAKE CABLE ASSEMBLY |
| *3 | PARKING BRAKE SHOE LEVER LH | *4 | PARKING BRAKE SHOE LEVER RH |
 | Tightening torque for "Major areas involving basic vehicle performance such as moving/turning/stopping": N*m (kgf*cm, ft.*lbf) |
 | N*m (kgf*cm, ft.*lbf): Specified torque |
Installation
INSTALLATION
PROCEDURE
1. INSTALL NO. 3 PARKING BRAKE CABLE ASSEMBLY
(a) Install the No. 3 parking brake cable assembly with the 5 bolts and nut.

Torque:
Bolt A :
6.0 N·m {61 kgf·cm, 53 in·lbf}
Bolt B :
8.0 N·m {82 kgf·cm, 71 in·lbf}
Nut :
15.5 N·m {158 kgf·cm, 11 ft·lbf}
2. INSTALL NO. 2 PARKING BRAKE CABLE ASSEMBLY
(a) Install the No. 2 parking brake cable assembly with the 5 bolts and nut.
Torque:
Bolt A :
6.0 N·m {61 kgf·cm, 53 in·lbf}
Bolt B :
8.0 N·m {82 kgf·cm, 71 in·lbf}
Nut :
15.5 N·m {158 kgf·cm, 11 ft·lbf}
3. INSTALL PARKING BRAKE SHOE LEVER LH
Click here

4. INSTALL PARKING BRAKE SHOE LEVER RH
HINT:
Use the same procedure as for the LH side.
5. INSTALL PROPELLER SHAFT WITH CENTER BEARING ASSEMBLY
Click here

6. CONNECT PARKING BRAKE CABLE ASSEMBLY
Click here

7. ADJUST PARKING BRAKE SHOE CLEARANCE
Click here

8. ADJUST PARKING BRAKE LEVER TRAVEL
Click here

9. INSTALL CONSOLE REAR END PANEL SUB-ASSEMBLY
Click here

Removal
REMOVAL
PROCEDURE
1. REMOVE CONSOLE REAR END PANEL SUB-ASSEMBLY
Click here

2. LOOSEN PARKING BRAKE CABLE ASSEMBLY
Click here

3. DISCONNECT PARKING BRAKE CABLE ASSEMBLY
Click here

4. REMOVE PROPELLER SHAFT WITH CENTER BEARING ASSEMBLY
Click here

5. REMOVE PARKING BRAKE SHOE LEVER LH
Click here

6. REMOVE PARKING BRAKE SHOE LEVER RH
HINT:
Use the same procedure as for the LH side.
7. REMOVE NO. 3 PARKING BRAKE CABLE ASSEMBLY
(a) Remove the 5 bolts, nut and No. 3 parking brake cable assembly.

8. REMOVE NO. 2 PARKING BRAKE CABLE ASSEMBLY
(a) Remove the 5 bolts, nut and No. 2 parking brake cable assembly.

 Reassembly
REASSEMBLY CAUTION / NOTICE / HINT HINT:
Use the same procedure for the LH side and RH side.
The following procedure is for the LH side.
PROCEDURE 1...
 Parking Brake Lever
ComponentsCOMPONENTS ILLUSTRATION
*1 PARKING BRAKE CABLE ASSEMBLY *2 PARKING BRAKE LEVER SUB-ASSEMBLY *3 NO. 1 PARKING BRAKE CABLE ASSEMBLY *4 PARKING BRAKE SWITCH ASSEMBLY *5 NO...
Other information:
Toyota Yaris XP210 (2020-2026) Reapir and Service Manual: How To Proceed With Troubleshooting
CAUTION / NOTICE / HINT NOTICE: Because the order of diagnosis is important to allow correct diagnosis, make sure to begin troubleshooting using How to Proceed with Troubleshooting when CAN communication system related DTCs are output. If the CAN communication system is malfunctioning, check the contact pressure of the terminals in connectors, as insufficient terminal contact pressure may be the cause...
Toyota Yaris XP210 (2020-2026) Reapir and Service Manual: Removal
REMOVAL CAUTION / NOTICE / HINT CAUTION: Be sure to read Precaution thoroughly before servicing. Click here Wear protective gloves. Sharp areas on the parts may injure your hands. HINT: When the cable is disconnected / reconnected to the auxiliary battery terminal, systems temporarily stop operating...
Categories
- Manuals Home
- Toyota Yaris Owners Manual
- Toyota Yaris Service Manual
- Removal
- G16e-gts (engine Mechanical)
- Power Integration No.1 System Missing Message (B235287,B235587,B235787-B235987)
- New on site
- Most important about car
Supplemental Restraint System (SRS) Precautions
The front and side supplemental restraint systems (SRS) include different types of air bags. Please verify the different types of air bags which are equipped on your vehicle by locating the “SRS AIRBAG” location indicators. These indicators are visible in the area where the air bags are installed.
The air bags are installed in the following locations:
The steering wheel hub (driver air bag) The front passenger dashboard (front passenger air bag) The outboard sides of the front seatbacks (side air bags) The front and rear window pillars, and the roof edge along both sides (curtain air bags)