Toyota Yaris: Transmission Control Cable / Installation
INSTALLATION
PROCEDURE
1. INSTALL TRANSMISSION CONTROL CABLE ASSEMBLY
(a) Pass the transmission control cable assembly through the hole to the outside of the vehicle and install the transmission control cable assembly to the vehicle body with the 2 bolts.
Torque:
6.0 N·m {61 kgf·cm, 53 in·lbf}
(b) Install the nut.
Torque:
6.0 N·m {61 kgf·cm, 53 in·lbf}
| (c) Install the transmission control cable assembly to the control cable bracket assembly with 2 new clips (B). NOTICE: Make sure that the paint marks on the transmission control cable assembly are aligned with the slits in the control cable bracket assembly before installing the clips. |
|
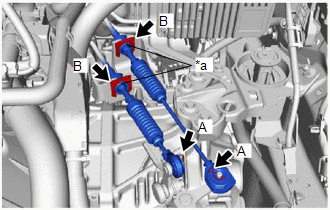
(d) Connect the transmission control cable assembly to the manual transaxle assembly with the 2 clips (A).
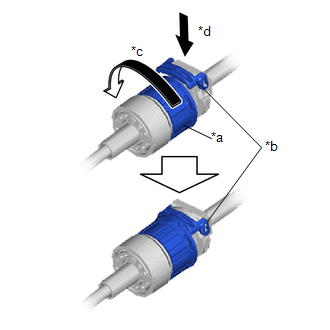
| (e) Rotate the nut counterclockwise approximately 180° and, while holding the nut in that position, press in the stopper. |
|
| (f) Install the transmission control shift cable to the floor shift shift lever assembly, check that the position of the stopper is the same as shown in the illustration. NOTICE: Do not forcibly pull the transmission control cable assembly into the cabin. |
|
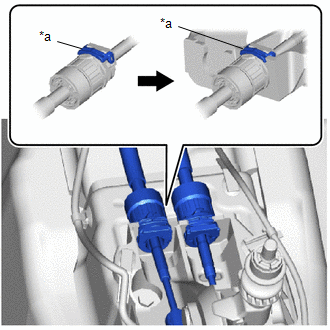
(g) Install the transmission control select cable to the floor shift shift lever assembly, check that the position of the stopper is the same as shown in the illustration.
NOTICE:
Do not forcibly pull the transmission control cable assembly into the cabin.
| (h) Connect the transmission control shift cable to the floor shift shift lever assembly. |
|
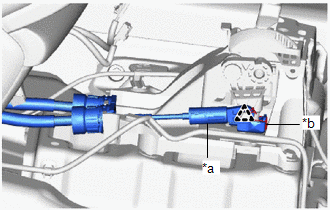
(i) Connect the transmission control select cable to the floor shift shift lever assembly with the clip.
2. ADJUST TRANSMISSION CONTROL CABLE ASSEMBLY
Click here

3. INSTALL AIR CLEANER CASE SUB-ASSEMBLY
Click here

4. INSTALL AIR CONDITIONER UNIT ASSEMBLY
Click here

 Adjustment
ADJUSTMENT PROCEDURE 1. SECURE VEHICLE (a) Fully apply the parking brake and chock a wheel. CAUTION:
Make sure to apply the parking brake and chock a wheel before performing this procedure...

Other information:
Toyota Yaris XP210 (2020-2026) Reapir and Service Manual: Starter Inrush Current Reduction Relay Circuit
DESCRIPTION The starter inrush current reduction relay prevents the auxiliary battery voltage from becoming dropping excessively while the starter assembly is operating. If the auxiliary battery voltage drops below the threshold, stop and start control will be prohibited...
Toyota Yaris XP210 (2020-2026) Reapir and Service Manual: Right Front Wheel Speed Sensor Signal Stuck Low (C050623)
DESCRIPTION Refer to DTC C05061F. Click here DTC No. Detection Item DTC Detection Condition Trouble Area DTC Output from C050623 Right Front Wheel Speed Sensor Signal Stuck Low Any of the following is detected: When the +BS terminal voltage is 17...
Categories
- Manuals Home
- Toyota Yaris Owners Manual
- Toyota Yaris Service Manual
- Removal
- Diagnostic Trouble Code Chart
- Key Battery Replacement
- New on site
- Most important about car
Break-In Period
No special break-in is necessary, but a few precautions in the first 600 miles (1,000 km) may add to the performance, economy, and life of the vehicle.
Do not race the engine. Do not maintain one constant speed, either slow or fast, for a long period of time. Do not drive constantly at full-throttle or high engine rpm for extended periods of time. Avoid unnecessary hard stops. Avoid full-throttle starts.