Toyota Yaris: Maintenance / G16e-gts Oil And Oil Filter
Components
COMPONENTS
ILLUSTRATION
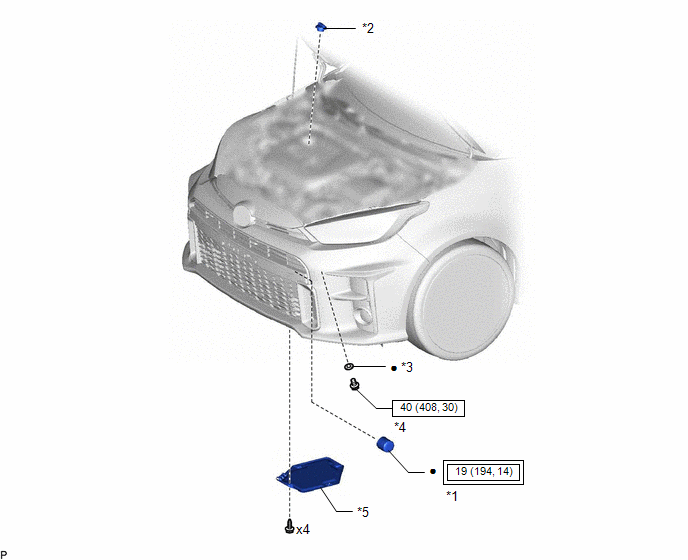
| *1 | OIL FILTER SUB-ASSEMBLY | *2 | OIL FILLER CAP ASSEMBLY |
| *3 | GASKET | *4 | OIL PAN DRAIN PLUG |
| *5 | REAR ENGINE UNDER COVER RH | - | - |
 | Tightening torque for "Major areas involving basic vehicle performance such as moving/turning/stopping": N*m (kgf*cm, ft.*lbf) |
 | N*m (kgf*cm, ft.*lbf): Specified torque |
| ● | Non-reusable part | - | - |
Replacement
REPLACEMENT
CAUTION / NOTICE / HINT
CAUTION:
- Prolonged and repeated contact with engine oil will result in the removal of natural oils from the skin, leading to dryness, irritation and dermatitis. In addition, used engine oil contains potentially harmful contaminants which may cause skin cancer.
- Wear protective clothing and gloves. Avoid contact with used oil. If contact occurs, wash your skin thoroughly with soap or waterless hand cleaner. Never use gasoline, thinners, or solvents to wash the skin.
- In order to protect the environment, dispose of used oil and used oil filters at designated disposal sites only.
PROCEDURE
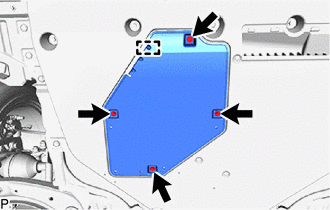
1. REMOVE REAR ENGINE UNDER COVER RH
| (a) Remove the 4 screws and disengage the guide to remove the rear engine under cover RH. |
|
2. DRAIN ENGINE OIL
(a) Remove the oil filler cap sub-assembly.
(b) Remove the oil pan drain plug and gasket, and drain the engine oil into a container.
(c) Clean the oil pan drain plug.
(d) Install a new gasket to the oil pan drain plug.
(e) Install the oil pan drain plug.
Torque:
40 N·m {408 kgf·cm, 30 ft·lbf}
3. REMOVE OIL FILTER SUB-ASSEMBLY
(a) Using SST, remove the oil filter sub-assembly.
SST: 09228-06502
4. INSTALL OIL FILTER SUB-ASSEMBLY
(a) Check and clean the oil filter sub-assembly installation surface.
(b) Apply clean engine oil to the gasket of a new oil filter sub-assembly.
(c) Lightly screw the oil filter sub-assembly into place by hand. Tighten it until the gasket contacts the seat.
(d) Using SST, tighten the oil filter sub-assembly.
SST: 09228-06502
(1) Depending on the work space available, choose from the following:
- If enough space is available, use a torque wrench to tighten the oil filter sub-assembly.
Torque:
19 N·m {194 kgf·cm, 14 ft·lbf}
- If not enough space is available to use a torque wrench, tighten the oil filter sub-assembly 3/4 of a turn by hand or using a common wrench.
5. ADD ENGINE OIL
(a) Add new engine oil and install the oil filler cap sub-assembly.
Standard Oil Grade:| Oil Grade | Oil Viscosity (SAE) |
|---|---|
| API grade SN PLUS "Resource-Conserving" or SP "Resource-Conserving" or ILSAC GF-6A multigrade engine oil | 0W-20 |
| Item | Standard Condition |
|---|---|
| Drain and refill with oil filter change | 4.3 liters (4.5 US qts, 3.7 Imp. qts) |
| Drain and refill without oil filter change | 4.0 liters (4.2 US qts, 3.5 Imp. qts) |
| Dry fill | 5.1 liters (5.4 US qts, 4.5 Imp. qts) |
6. INSPECT FOR ENGINE OIL LEAK
(a) Start the engine. Make sure that there are no engine oil leaks from the area that was worked on.
7. CHECK ENGINE OIL LEVEL
Click here

8. INSTALL REAR ENGINE UNDER COVER RH
(a) Engage the guide to install the rear engine under cover RH with the 4 screws.
 G16e-gts Drive Belt
ComponentsCOMPONENTS ILLUSTRATION
*1 FAN AND GENERATOR V BELT *2 ENGINE UNDER COVER RH *3 NO. 1 ENGINE UNDER COVER ASSEMBLY - -
N*m (kgf*cm, ft...
 G16e-gts Spark Plug
ComponentsCOMPONENTS ILLUSTRATION
*1 IGNITION COIL ASSEMBLY *2 SPARK PLUG
N*m (kgf*cm, ft.*lbf): Specified torque - - RemovalREMOVAL CAUTION / NOTICE / HINT The necessary procedures (adjustment, calibration, initialization or registration) that must be performed after parts are removed and installed, or replaced during ignition coil assembly or spark plug removal/installation are shown below...
Other information:
Toyota Yaris XP210 (2020-2026) Reapir and Service Manual: Camshaft Position "B" - Actuator Bank 1 Circuit Open (P001313)
DESCRIPTION The Variable Valve Timing (VVT) system adjusts the exhaust valve timing to improve driveability. The engine oil pressure turns the VVT controller (camshaft timing exhaust gear assembly) to adjust the valve timing. The cam timing oil control solenoid assembly (for exhaust camshaft) operates according to signals received from the ECM to control the position of the camshaft timing oil control valve assembly (exhaust camshaft timing gear bolt assembly) and supply engine oil...
Toyota Yaris XP210 (2020-2026) Reapir and Service Manual: Inspection
INSPECTION PROCEDURE 1. INSPECT NO. 1 VALVE ROCKER ARM SUB-ASSEMBLY (a) Turn the roller by hand to check that it turns smoothly. HINT: If the roller does not turn smoothly, replace the No. 1 valve rocker arm sub-assembly. 2. INSPECT VALVE LASH ADJUSTER ASSEMBLY NOTICE: Keep the valve lash adjuster assembly free from dirt and foreign matter...
Categories
- Manuals Home
- Toyota Yaris Owners Manual
- Toyota Yaris Service Manual
- G16e-gts (engine Mechanical)
- Fuel Gauge
- Brake System Control Module "A" System Voltage System Voltage Low (C137BA2)
- New on site
- Most important about car
Front Seat Belt Pretensioners
The front seat belt pretensioners are designed to deploy in moderate or severe frontal, near frontal collisions.
In addition, the pretensioners operate when a side collision or a rollover accident is detected. The pretensioners operate differently depending on what types of air bags are equipped. For more details about the seat belt pretensioner operation, refer to the SRS Air Bag Deployment Criteria.