
Toyota Yaris: Door Lock / Door Control Receiver
Toyota Yaris XP210 (2020-2026) Reapir and Service Manual / Vehicle Interior / Door Lock / Door Control Receiver
Components
COMPONENTS
ILLUSTRATION
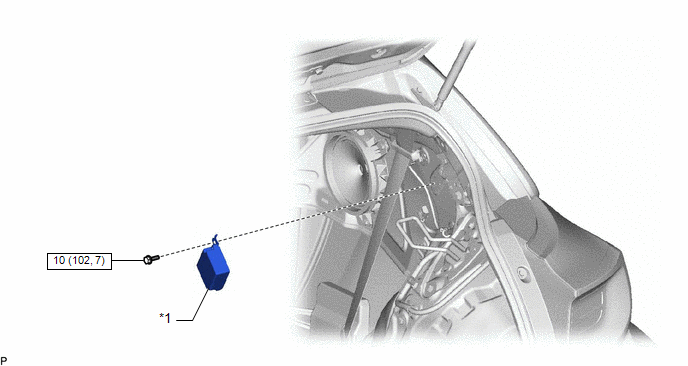
| *1 | DOOR CONTROL RECEIVER | - | - |
 | N*m (kgf*cm, ft.*lbf): Specified torque | - | - |
Removal
REMOVAL
PROCEDURE
1. REMOVE DECK TRIM SIDE PANEL ASSEMBLY
Click here

2. REMOVE DOOR CONTROL RECEIVER
NOTICE:
- Do not drop, strike or otherwise subject the door control receiver to impact.
- If the door control receiver is subjected to an impact, replace it with a new one.
| (a) Remove the bolt. |
|
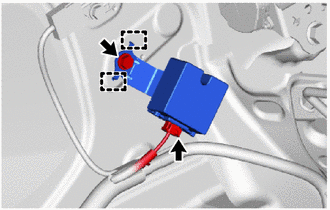
(b) Disengage the guides.
(c) Disconnect the connector to remove the door control receiver.
 Back Door Lock
ComponentsCOMPONENTS ILLUSTRATION
*1 BACK DOOR TRIM BOARD *2 BACK DOOR LOCK ASSEMBLY W/COURTESY LIGHT SWITCH
N*m (kgf*cm, ft.*lbf): Specified torque
MP grease RemovalREMOVAL PROCEDURE 1...
 Door Control Switch
ComponentsCOMPONENTS ILLUSTRATION
*1 MULTIPLEX NETWORK MASTER SWITCH ASSEMBLY WITH FRONT ARMREST BASE UPPER PANEL *2 MULTIPLEX NETWORK MASTER SWITCH ASSEMBLY *3 FRONT ARMREST BASE UPPER PANEL RH - - RemovalREMOVAL PROCEDURE 1...
Other information:
Toyota Yaris XP210 (2020-2026) Reapir and Service Manual: All Doors LOCK/UNLOCK Functions do not Operate Via Door Key Cylinder
DESCRIPTION The main body ECU (multiplex network body ECU) receives door key cylinder lock or unlock switch signals from the front door lock with motor assembly LH. The main body ECU (multiplex network body ECU) activates the door lock motor on each door according to these signals...
Toyota Yaris XP210 (2020-2026) Reapir and Service Manual: Installation
INSTALLATION PROCEDURE 1. INSTALL ROOF HEADLINING (a) Tilt the roof headlining diagonally and insert it into the cabin through the passenger side door as shown in the illustration. Insert in this Direction NOTICE: Check that the corners of the roof headlining are not folded, twisted or otherwise deformed and that none of the mounted parts have fallen off...
Categories
- Manuals Home
- Toyota Yaris Owners Manual
- Toyota Yaris Service Manual
- To Set Speed
- Fuse Panel Description
- Battery Monitor Module General Electrical Failure (P058A01)
- New on site
- Most important about car
Fuel-Filler Lid and Cap
WARNING
When removing the fuel-filler cap, loosen the cap slightly and wait for any hissing to stop, then remove it
Fuel spray is dangerous. Fuel can burn skin and eyes and cause illness if ingested. Fuel spray is released when there is pressure in the fuel tank and the fuel-filler cap is removed too quickly.

Copyright © 2026 www.toyaris4.com