Toyota Yaris: Rear Combination Light Assembly / Disassembly
DISASSEMBLY
CAUTION / NOTICE / HINT
HINT:
- Use the same procedure for the RH and LH sides.
- The procedure listed below is for the LH side.
PROCEDURE
1. REMOVE REAR TURN SIGNAL LIGHT LED
(a) Remove the rear turn signal light LED as shown in the illustration.
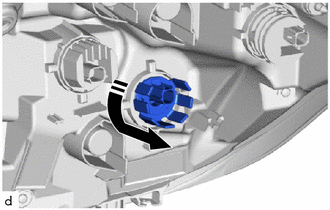
.png) | Remove in this Direction |
2. REMOVE TAIL LIGHT LED
(a) Remove the tail light LED as shown in the illustration.
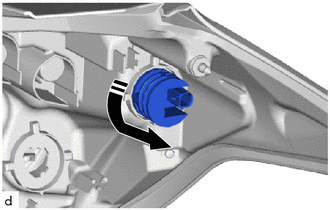
|
| Remove in this Direction |
3. REMOVE STOP LIGHT LED
(a) Remove the stop light LED as shown in the illustration.
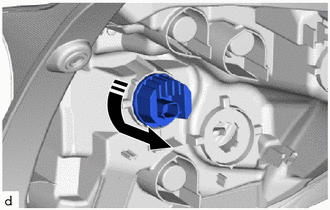
|
| Remove in this Direction |
 Removal
REMOVAL CAUTION / NOTICE / HINT HINT:
Use the same procedure for the RH and LH sides.
The procedure listed below is for the LH side.
PROCEDURE 1...
 Inspection
INSPECTION PROCEDURE 1. INSPECT STOP LIGHT LED (for LH Side) (a) Check that the stop light LED. (1) Apply auxiliary battery voltage to the stop light LED and check that the light comes on...
Other information:
Toyota Yaris XP210 (2020-2026) Reapir and Service Manual: Problem Symptoms Table
PROBLEM SYMPTOMS TABLE HINT: Use the table below to help determine the cause of problem symptoms. If multiple suspected areas are listed, the potential causes of the symptoms are listed in order of probability in the "Suspected Area" column of the table...
Toyota Yaris XP210 (2020-2026) Reapir and Service Manual: Components
COMPONENTS ILLUSTRATION *1 FRONT DOOR OPENING TRIM WEATHERSTRIP LH *2 FRONT DOOR OPENING TRIM WEATHERSTRIP RH *3 FRONT PILLAR GARNISH LH *4 FRONT PILLAR GARNISH RH *5 FRONT PILLAR GARNISH CLIP - - ● Non-reusable part - - ILLUSTRATION *A w/ Pre-collision System - - *1 VISOR ASSEMBLY LH *2 VISOR ASSEMBLY RH *3 VISOR HOLDER LH *4 VISOR HOLDER RH *5 ASSIST GRIP COVER *6 ASSIST GRIP SUB-ASSEMBLY *7 ROOF HEADLINING *8 FORWARD RECOGNITION WITH HEATER HOOD SUB-ASSEMBLY ILLUSTRATION *1 WINDSHIELD GLASS *2 WINDSHIELD OUTSIDE MOULDING *3 NO...
Categories
- Manuals Home
- Toyota Yaris Owners Manual
- Toyota Yaris Service Manual
- Auto Lock/Unlock Function
- Engine Start Function When Key Battery is Dead
- Opening and Closing the Liftgate/Trunk Lid
- New on site
- Most important about car
Fuel-Filler Lid and Cap
WARNING
When removing the fuel-filler cap, loosen the cap slightly and wait for any hissing to stop, then remove it
Fuel spray is dangerous. Fuel can burn skin and eyes and cause illness if ingested. Fuel spray is released when there is pressure in the fuel tank and the fuel-filler cap is removed too quickly.
Copyright © 2026 www.toyaris4.com