Toyota Yaris: Rear Combination Light Assembly / Inspection
INSPECTION
PROCEDURE
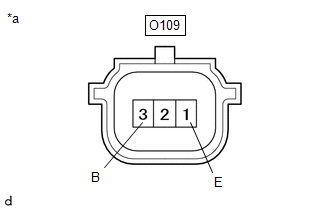
1. INSPECT STOP LIGHT LED (for LH Side)
(a) Check that the stop light LED.
| (1) Apply auxiliary battery voltage to the stop light LED and check that the light comes on. OK:
If the result is not as specified, replace the stop light LED. |
|
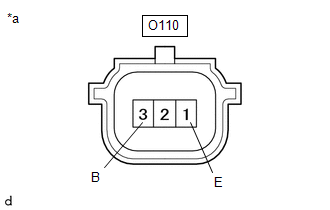
2. INSPECT STOP LIGHT LED (for RH Side)
(a) Check that the stop light LED.
| (1) Apply auxiliary battery voltage to the stop light LED and check that the light comes on. OK:
If the result is not as specified, replace the stop light LED. |
|
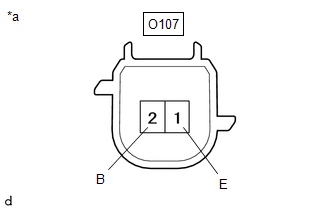
3. INSPECT TAIL LIGHT LED (for LH Side)
(a) Check that the tail light LED.
| (1) Apply auxiliary battery voltage to the tail light LED and check that the light comes on. OK:
If the result is not as specified, replace the tail light LED. |
|
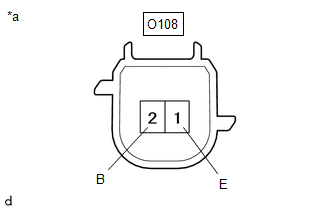
4. INSPECT TAIL LIGHT LED (for RH Side)
(a) Check that the tail light LED.
| (1) Apply auxiliary battery voltage to the tail light LED and check that the light comes on. OK:
If the result is not as specified, replace the tail light LED. |
|
5. INSPECT REAR TURN SIGNAL LIGHT LED (for LH Side)
(a) Check that the rear turn signal light LED.
| (1) Apply auxiliary battery voltage to the rear turn signal light LED and check that the light comes on. OK:
If the result is not as specified, replace the rear turn signal light LED. |
|

6. INSPECT REAR TURN SIGNAL LIGHT LED (for RH Side)
(a) Check that the rear turn signal light LED.
| (1) Apply auxiliary battery voltage to the rear turn signal light LED and check that the light comes on. OK:
If the result is not as specified, replace the rear turn signal light LED. |
|
 Disassembly
DISASSEMBLY CAUTION / NOTICE / HINT HINT:
Use the same procedure for the RH and LH sides.
The procedure listed below is for the LH side.
PROCEDURE 1...
 Reassembly
REASSEMBLY CAUTION / NOTICE / HINT HINT:
Use the same procedure for the RH and LH sides.
The procedure listed below is for the LH side.
PROCEDURE 1...
Other information:
Toyota Yaris XP210 (2020-2026) Reapir and Service Manual: Adjustment
ADJUSTMENT PROCEDURE 1. PREPARE VEHICLE FOR HEADLIGHT AIM ADJUSTMENT (a) Prepare the vehicle: Ensure that the vehicle body is not damaged or deformed around the headlights. Fill the fuel tank. Make sure that the oil is filled to the specified level...
Toyota Yaris XP210 (2020-2026) Reapir and Service Manual: Software Incompatibility with Body Control Module Not Programmed (U032251)
DESCRIPTION The forward recognition camera receives vehicle information from the main body ECU (multiplex network body ECU) via CAN communication. DTC U032251 is stored when the forward recognition camera cannot confirm the vehicle information from the main body ECU (multiplex network body ECU)...
Categories
- Manuals Home
- Toyota Yaris Owners Manual
- Toyota Yaris Service Manual
- Power Integration No.1 System Missing Message (B235287,B235587,B235787-B235987)
- Diagnostic Trouble Code Chart
- Headlights
- New on site
- Most important about car
Fuel Gauge
The fuel gauge shows approximately how much fuel is remaining in the tank when the ignition is switched ON. We recommend keeping the tank over 1/4 full.
