Toyota Yaris: Rear Combination Light Assembly / Removal
REMOVAL
CAUTION / NOTICE / HINT
HINT:
- Use the same procedure for the RH and LH sides.
- The procedure listed below is for the LH side.
PROCEDURE
1. REMOVE REAR COMBINATION LIGHT ASSEMBLY
(a) Apply protective tape around the rear combination light assembly as shown in the illustration.
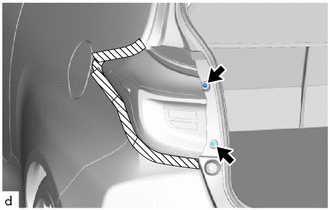
.png) | Protective Tape |
(b) Remove the 2 screws.
(c) Disengage the pin and guide to separate the rear combination light assembly as shown in the illustration.
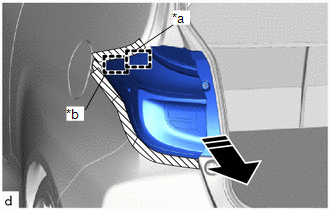
| *a | Pin |
| *b | Guide |
.png) | Separate in this Direction |
| (d) Disengage the clamp. |
|
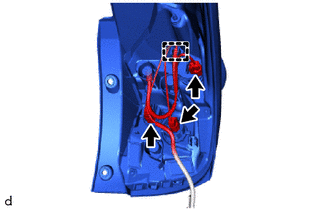
(e) Disconnect the 3 connectors to remove the rear combination light assembly.
 Components
C..
 Disassembly
DISASSEMBLY CAUTION / NOTICE / HINT HINT:
Use the same procedure for the RH and LH sides.
The procedure listed below is for the LH side.
PROCEDURE 1...
Other information:
Toyota Yaris XP210 (2020-2026) Reapir and Service Manual: Invalid Data Received from Brake System Control Module Invalid Serial Data Received (U041881)
DESCRIPTION The millimeter wave radar sensor assembly receives signals related to the brake control condition from the skid control ECU (brake actuator assembly) via the CAN communication line. If the millimeter wave radar sensor assembly receives signals from the skid control ECU (brake actuator assembly) indicating a brake control system malfunction, the millimeter wave radar sensor assembly stores DTC U041881...
Toyota Yaris XP210 (2020-2026) Reapir and Service Manual: Charging Failure
PROCEDURE 1. CHECK GENERATOR PULLEY WITH CLUTCH (ON-VEHICLE INSPECTION) (a) Start the engine and visually check that the generator rotor assembly (fan) in the generator assembly is operating. OK: The generator rotor assembly (fan) is operating...
Categories
- Manuals Home
- Toyota Yaris Owners Manual
- Toyota Yaris Service Manual
- Removal
- Auto Lock/Unlock Function
- Battery Monitor Module General Electrical Failure (P058A01)
- New on site
- Most important about car
Key Suspend Function
If a key is left in the vehicle, the functions of the key left in the vehicle are temporarily suspended to prevent theft of the vehicle.
To restore the functions, press the unlock button on the functions-suspended key in the vehicle.
Copyright © 2026 www.toyaris4.com