Toyota Yaris: Front Bumper / Disassembly
DISASSEMBLY
PROCEDURE
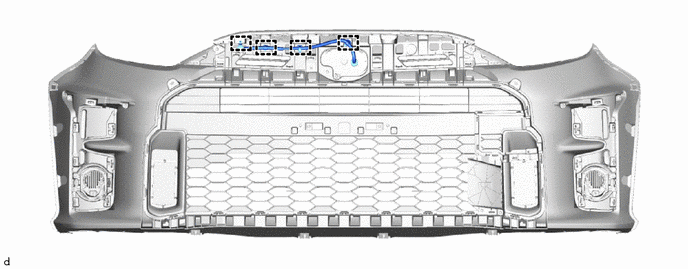
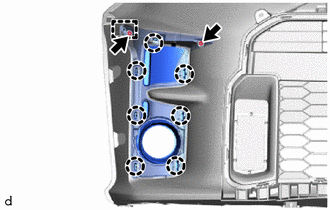
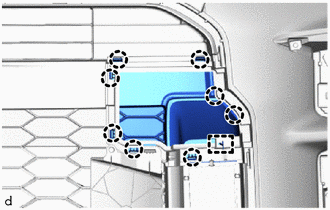
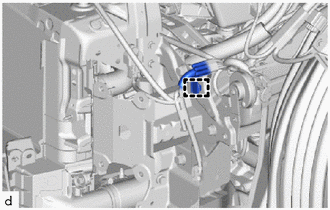
1. REMOVE MILLIMETER WAVE RADAR SENSOR ASSEMBLY (w/ Pre-collision System)
Click here
.gif)
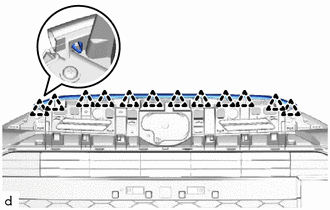
2. REMOVE NO. 3 ENGINE ROOM WIRE (w/ Pre-collision System)
(a) Disengage the clamps to remove the No. 3 engine room wire.
3. REMOVE FOG LIGHT ASSEMBLY LH
Click here
4. REMOVE FOG LIGHT ASSEMBLY RH
HINT:
Use the same procedure as for the LH side.
5. REMOVE FOG LIGHT COVER LH
| (a) Remove the 2 screws. |
|
(b) Disengage the claws and guide to remove the fog light cover LH.
6. REMOVE FOG LIGHT COVER RH
HINT:
Use the same procedure as for the LH side.
7. REMOVE FRONT BUMPER HOLE COVER
| (a) Disengage the claws. |
|
(b) Disengage the hook to remove the front bumper hole cover.
8. REMOVE HOOD TO FRONT END PANEL SEAL
| (a) Disengage the clips to remove the hood to front end panel seal. |
|
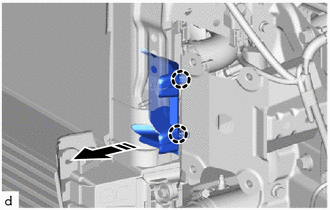
9. REMOVE FRONT BUMPER EXTENSION MOUNTING BRACKET
| (a) Remove the 2 screws. |
|
(b) Disengage the claws and guides to remove the front bumper extension mounting bracket.
10. REMOVE LOWER RADIATOR GRILLE SUB-ASSEMBLY
| (a) Remove the 3 screws and 4 clips. |
|
(b) Disengage the claws to remove the lower radiator grille sub-assembly.
11. REMOVE RADIATOR GRILLE SIDE MOULDING LH
| (a) Remove the screw. |
|
(b) Disengage the claws to remove the radiator grille side moulding LH.
12. REMOVE RADIATOR GRILLE SIDE MOULDING RH
HINT:
Use the same procedure as for the LH side.
13. REMOVE RADIATOR GRILLE EMBLEM ASSEMBLY
| (a) Remove the screw. |
|
(b) Disengage the claws to remove the radiator grille emblem assembly.
14. REMOVE HEADLIGHT ASSEMBLY LH
Click here
15. REMOVE HEADLIGHT ASSEMBLY RH
HINT:
Use the same procedure as for the LH side.
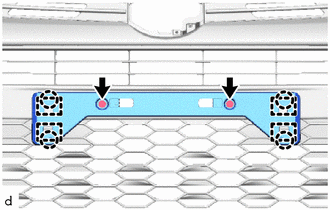
16. REMOVE FRONT BUMPER SIDE RETAINER LH
| (a) Disengage the clip and claw to remove the front bumper side retainer LH as shown in the illustration. |
|
17. REMOVE FRONT BUMPER SIDE RETAINER RH
HINT:
Use the same procedure as for the LH side.
18. REMOVE RADIATOR UPPER AIR GUIDE PLATE
| (a) Remove the 2 clips and radiator upper air guide plate. |
|
19. REMOVE FRONT BUMPER ENERGY ABSORBER
| (a) Disengage the guides to remove the front bumper energy absorber. |
|
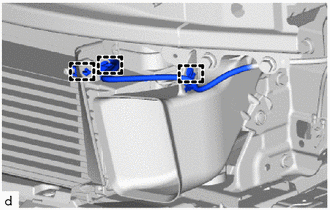
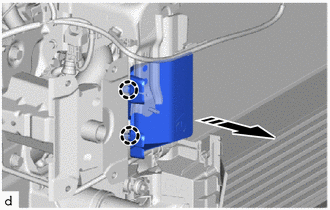
20. SEPARATE THERMISTOR ASSEMBLY
| (a) Disengage the clamps to separate the thermistor assembly. |
|
21. REMOVE COOL AIR INTAKE DUCT
| (a) Remove the 3 clips and cool air intake duct. |
|
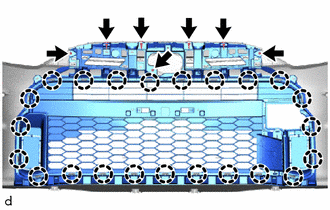
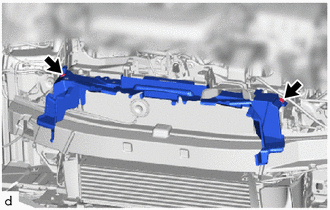
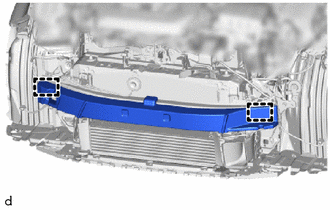
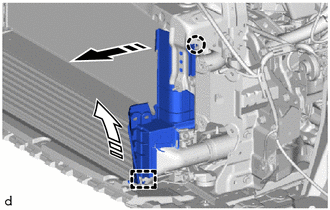
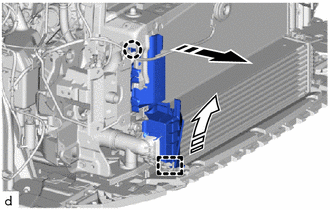
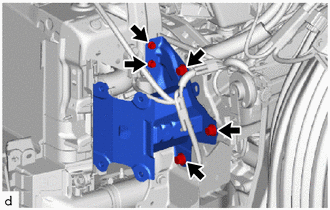
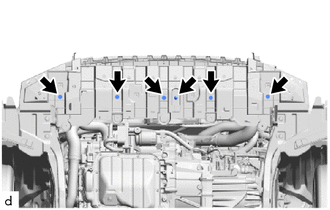
22. REMOVE FRONT BUMPER REINFORCEMENT
| (a) Disengage the clamp to separate the wire harness. |
|
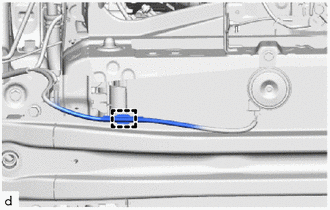
| (b) Remove the 8 bolts. |
|
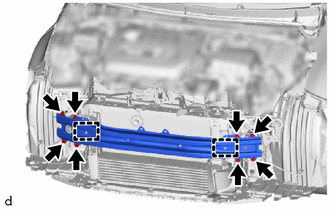
(c) Disengage the guides to remove the front bumper reinforcement.
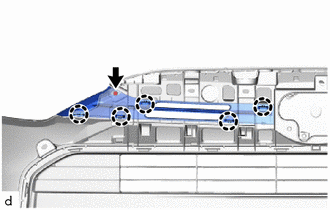
23. REMOVE FRONT RADIATOR SIDE AIR GUIDE PLATE LH
(a) Disengage the claws to remove the front radiator side air guide plate LH as shown in the illustration.
.png) | Remove in this Direction |
24. REMOVE FRONT RADIATOR SIDE AIR GUIDE PLATE RH
(a) Disengage the claws to remove the front radiator side air guide plate RH as shown in the illustration.
|
| Remove in this Direction |
25. REMOVE NO. 1 RADIATOR AIR GUIDE LH
(a) Disengage the claw and guide to remove the No. 1 radiator air guide LH as shown in the illustration.
|
| Remove in this Direction (1) |
.png) | Remove in this Direction (2) |
26. REMOVE NO. 1 RADIATOR AIR GUIDE RH
(a) Disengage the claw and guide to remove the No. 1 radiator air guide RH as shown in the illustration.
|
| Remove in this Direction (1) |
|
| Remove in this Direction (2) |
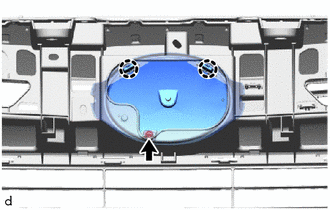
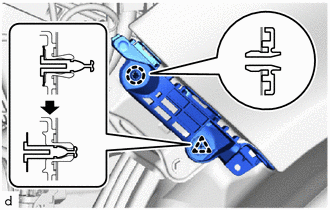
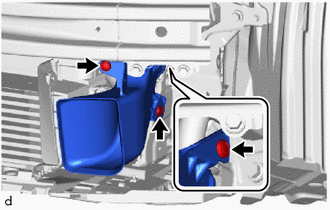
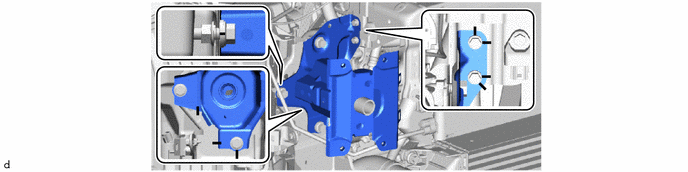
27. REMOVE FRONT SIDE MEMBER BRACKET SUB-ASSEMBLY LH
(a) If reusing the front side member bracket sub-assembly LH:
(1) Put matchmarks on the front side member bracket sub-assembly LH as shown in the illustration.
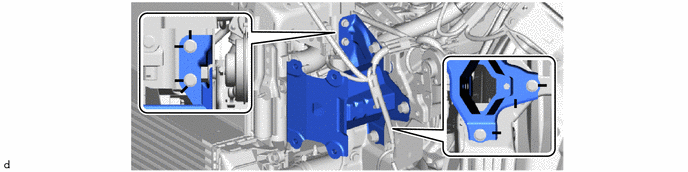
| (b) Disengage the clamp. |
|
| (c) Remove the 5 bolts and front side member bracket sub-assembly LH. |
|
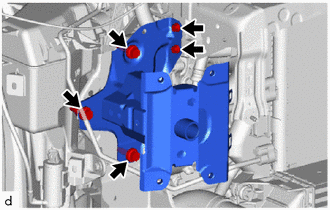
28. REMOVE FRONT SIDE MEMBER BRACKET SUB-ASSEMBLY RH
(a) If reusing the front side member bracket sub-assembly RH:
(1) Put matchmarks on the front side member bracket sub-assembly RH as shown in the illustration.
| (b) Remove the 5 bolts and front side member bracket sub-assembly RH. |
|
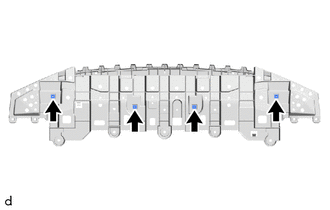
29. REMOVE NO. 1 ENGINE UNDER COVER ASSEMBLY
Click here
30. REMOVE FRONT BUMPER LOWER ABSORBER
| (a) Remove the clip and 5 screws. |
|
| (b) Disengage the claws to remove the front bumper lower absorber. |
|

| (c) Remove the 4 grommets. |
|
 Removal
REMOVAL PROCEDURE 1. REMOVE PIN HOLD CLIP (a) Apply protective tape around the front bumper assembly. HINT: Use the same procedure for the RH side and LH side...
 Reassembly
REASSEMBLY PROCEDURE 1. INSTALL FRONT BUMPER LOWER ABSORBER (a) Install the 4 grommets.
(b) Engage the claws to install the front bumper lower absorber...
Other information:
Toyota Yaris XP210 (2020-2026) Owner's Manual: Locking, Unlocking with Smart Key and Door-Lock Switch
Locking, Unlocking with Smart Key All doors and the liftgate can be locked/unlocked by operating the keyless entry system smart key, refer to Keyless Entry System Locking, Unlocking with Door-Lock Switch All doors and the liftgate lock automatically when the lock side is pressed...
Toyota Yaris XP210 (2020-2026) Owner's Manual: Fuel Economy Data Reset and Trip Meter (TRIP A) Synchronization (Linking)
Because the average fuel economy indication on the instrument cluster display is linked with the “Average Fuel Economy History” (Current) indication on the center display, when one is reset the other is also reset. In addition, switching between reset and no reset of the average fuel economy indication on the instrument cluster display and the “Average Fuel Economy History” (Current) indication on the center display when resetting the trip meter (Trip A) is possible...
Categories
- Manuals Home
- Toyota Yaris Owners Manual
- Toyota Yaris Service Manual
- Opening and Closing the Liftgate/Trunk Lid
- G16e-gts (engine Mechanical)
- Battery Monitor Module General Electrical Failure (P058A01)
- New on site
- Most important about car
Refueling
Before refueling, close all the doors, windows, and the liftgate/trunk lid, and switch the ignition OFF.
To open the fuel-filler lid, pull the remote fuel-filler lid release.
