Toyota Yaris: Solar Sensor / Removal
REMOVAL
PROCEDURE
1. DISCONNECT NO. 1 ROOF HEADLINING MOULDING LH
Click here

2. DISCONNECT NO. 1 ROOF HEADLINING MOULDING RH
HINT:
Use the same procedure as for the LH side.
3. REMOVE FRONT PILLAR GARNISH LH
Click here

4. REMOVE FRONT PILLAR GARNISH RH
HINT:
Use the same procedure as for the LH side.
5. REMOVE INSTRUMENT MAIN PANEL
Click here

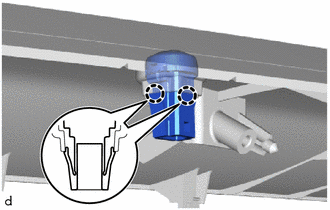
6. REMOVE AUTOMATIC LIGHT CONTROL SENSOR
| (a) Disengage the claws to remove the automatic light control sensor. |
|
 On-vehicle Inspection
ON-VEHICLE INSPECTION PROCEDURE 1. INSPECT AUTOMATIC LIGHT CONTROL SENSOR (a) Check the wire harness. (1) Disconnect the automatic light control sensor...
 Installation
INSTALLATION PROCEDURE 1. INSTALL AUTOMATIC LIGHT CONTROL SENSOR (a) Engage the claws to install the automatic light control sensor.
2...
Other information:
Toyota Yaris XP210 (2020-2026) Reapir and Service Manual: Components
COMPONENTS ILLUSTRATION *1 REAR SPOILER ASSEMBLY *2 REAR SPOILER HOLE COVER *3 CENTER STOP LIGHT COVER - - N*m (kgf*cm, ft.*lbf): Specified torque - - ILLUSTRATION *1 CENTER STOP LIGHT ASSEMBLY *2 NO. 1 REAR SPOILER PROTECTOR *3 NO...
Toyota Yaris XP210 (2020-2026) Reapir and Service Manual: Lost Communication with Image Processing Module "A" Missing Message (U023A87)
DESCRIPTION The millimeter wave radar sensor assembly is connected to the forward recognition camera via the CAN communication line. If the millimeter wave radar sensor assembly receives signals indicating that its communication with the forward recognition camera is abnormal, the millimeter wave radar sensor assembly stores DTC U023A87...
Categories
- Manuals Home
- Toyota Yaris Owners Manual
- Toyota Yaris Service Manual
- Removal
- Maintenance
- Auto Lock/Unlock Function
- New on site
- Most important about car
Liftgate/Trunk Lid
WARNING
Never allow a person to ride in the luggage compartment/trunk
Allowing a person to ride in the luggage compartment/trunk is dangerous. The person in the luggage compartment/trunk could be seriously injured or killed during sudden braking or a collision.
Do not drive with the liftgate/trunk lid open