Toyota Yaris: Solar Sensor / Installation
INSTALLATION
PROCEDURE
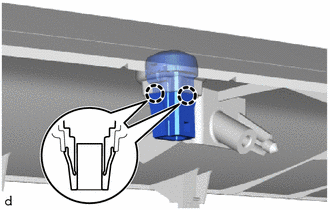
1. INSTALL AUTOMATIC LIGHT CONTROL SENSOR
| (a) Engage the claws to install the automatic light control sensor. |
|
2. INSTALL INSTRUMENT MAIN PANEL
Click here

3. INSTALL FRONT PILLAR GARNISH LH
Click here

4. INSTALL FRONT PILLAR GARNISH RH
HINT:
Use the same procedure as for the LH side.
5. CONNECT NO. 1 ROOF HEADLINING MOULDING LH
Click here

6. CONNECT NO. 1 ROOF HEADLINING MOULDING RH
HINT:
Use the same procedure as for the LH side.
 Removal
REMOVAL PROCEDURE 1. DISCONNECT NO. 1 ROOF HEADLINING MOULDING LH Click here
2. DISCONNECT NO. 1 ROOF HEADLINING MOULDING RH HINT: Use the same procedure as for the LH side...

Other information:
Toyota Yaris XP210 (2020-2026) Reapir and Service Manual: Components
COMPONENTS ILLUSTRATION *1 TURBINE OUTLET ELBOW GASKET *2 EXHAUST PIPE CLAMP *3 EXHAUST MANIFOLD CONVERTER SUB-ASSEMBLY *4 ENGINE WIRE *5 NO. 2 CLUTCH FLEXIBLE HOSE BRACKET *6 STARTER ASSEMBLY *7 FLYWHEEL HOUSING SIDE COVER *8 ENGINE ASSEMBLY WITH TRANSAXLE Tightening torque for "Major areas involving basic vehicle performance such as moving/turning/stopping": N*m (kgf*cm, ft...
Toyota Yaris XP210 (2020-2026) Owner's Manual: Vehicle Engine Control Unit Reset Procedure
After replacing the engine oil, have a repair shop such as your Toyota dealer perform the initialization (engine oil data resetting) of the recorded value. If the value recorded by the computer is not initialized, the wrench indicator light may not turn off or it may turn on earlier than normal...
Categories
- Manuals Home
- Toyota Yaris Owners Manual
- Toyota Yaris Service Manual
- Diagnostic Trouble Code Chart
- Adjustment
- Brake System Control Module "A" System Voltage System Voltage Low (C137BA2)
- New on site
- Most important about car
Refueling
Before refueling, close all the doors, windows, and the liftgate/trunk lid, and switch the ignition OFF.
To open the fuel-filler lid, pull the remote fuel-filler lid release.

Copyright © 2026 www.toyaris4.com