Toyota Yaris: Fog Light Assembly / Removal
REMOVAL
CAUTION / NOTICE / HINT
HINT:
- Use the same procedure for the RH side and LH side.
- The following procedure is for the LH side.
PROCEDURE
1. REMOVE FRONT BUMPER ASSEMBLY
Click here
.gif)
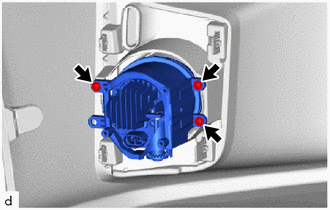
2. REMOVE FOG LIGHT ASSEMBLY
| (a) Remove the 3 screws and fog light assembly. |
|
 Components
C..
 Inspection
INSPECTION PROCEDURE 1. INSPECT FOG LIGHT ASSEMBLY LH (a) Check that the fog light assembly LH. (1) Apply auxiliary battery voltage to the fog light assembly LH and check that the light comes on...
Other information:
Toyota Yaris XP210 (2020-2026) Reapir and Service Manual: License Plate Light Bulb
C..
Toyota Yaris XP210 (2020-2026) Reapir and Service Manual: Disposal
DISPOSAL CAUTION / NOTICE / HINT CAUTION: Before performing pre-disposal deployment of any SRS part, review and closely follow all applicable environmental and hazardous material regulations. Pre-disposal deployment may be considered hazardous material treatment...
Categories
- Manuals Home
- Toyota Yaris Owners Manual
- Toyota Yaris Service Manual
- Auto Lock/Unlock Function
- Immobilizer System
- How to connect USB port/Auxiliary jack
- New on site
- Most important about car
Turning the Engine Off
Stop the vehicle completely. Manual transaxle: Shift into neutral and set the parking brake.Automatic transaxle: Shift the selector lever to the P position and set the parking brake.
Press the push button start to turn off the engine. The ignition position is off.
Copyright © 2026 www.toyaris4.com

