Toyota Yaris: Automatic Light Control Sensor / Removal
REMOVAL
PROCEDURE
1. DISCONNECT NO. 1 ROOF HEADLINING MOULDING LH
Click here
.gif)
2. DISCONNECT NO. 1 ROOF HEADLINING MOULDING RH
HINT:
Use the same procedure as for the LH side.
3. REMOVE FRONT PILLAR GARNISH LH
Click here
4. REMOVE FRONT PILLAR GARNISH RH
HINT:
Use the same procedure as for the LH side.
5. REMOVE INSTRUMENT MAIN PANEL
Click here
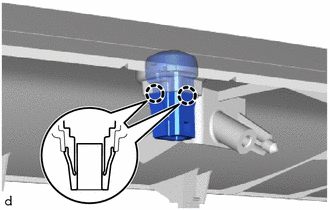
6. REMOVE AUTOMATIC LIGHT CONTROL SENSOR
| (a) Disengage the claws to remove the automatic light control sensor. |
|
 On-vehicle Inspection
ON-VEHICLE INSPECTION PROCEDURE 1. INSPECT AUTOMATIC LIGHT CONTROL SENSOR (a) Check the wire harness. (1) Disconnect the automatic light control sensor...
 Installation
INSTALLATION PROCEDURE 1. INSTALL AUTOMATIC LIGHT CONTROL SENSOR (a) Engage the claws to install the automatic light control sensor.
2...
Other information:
Toyota Yaris XP210 (2020-2026) Reapir and Service Manual: Initialization
INITIALIZATION INITIALIZE POWER WINDOW CONTROL SYSTEM (ALL DOORS) NOTICE: When a power window regulator motor assembly, door window regulator sub-assembly, door belt moulding or door glass weatherstrip inner have been removed and installed, or if a power window regulator motor assembly was reused when a door glass or door glass run was replaced, the power window control system must be initialized...
Toyota Yaris XP210 (2020-2026) Reapir and Service Manual: Fuel Pump "A" Control Circuit Short to Ground or Open (P062714)
DESCRIPTION Refer to DTC P062712. Click here DTC No. Detection Item DTC Detection Condition Trouble Area MIL Note P062714 Fuel Pump "A" Control Circuit Short to Ground or Open When the fuel pump control ECU operation duty ratio is 3 to 65%, the FPC terminal voltage is a certain value or less for 3 seconds or more (1 trip detection logic)...
Categories
- Manuals Home
- Toyota Yaris Owners Manual
- Toyota Yaris Service Manual
- Brake System Control Module "A" System Voltage System Voltage Low (C137BA2)
- Immobilizer System
- Battery Monitor Module General Electrical Failure (P058A01)
- New on site
- Most important about car
Key Suspend Function
If a key is left in the vehicle, the functions of the key left in the vehicle are temporarily suspended to prevent theft of the vehicle.
To restore the functions, press the unlock button on the functions-suspended key in the vehicle.
Copyright © 2026 www.toyaris4.com