Toyota Yaris: Automatic Light Control Sensor / On-vehicle Inspection
ON-VEHICLE INSPECTION
PROCEDURE
1. INSPECT AUTOMATIC LIGHT CONTROL SENSOR
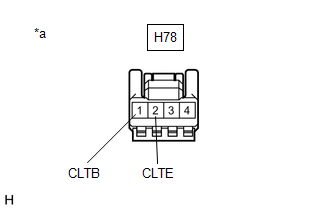
(a) Check the wire harness.
(1) Disconnect the automatic light control sensor.
| (2) Measure the voltage according to the value(s) in the table below. Standard Voltage:
If the specified condition is not met, replace the vehicle wire harness. |
|
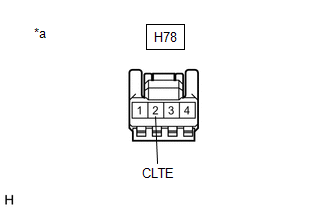
(b) Check the resistance.
| (1) Measure the resistance according to the value(s) in the table below. Standard Resistance:
If the specified condition is not met, replace the vehicle wire harness. |
|
(c) Check the automatic light control sensor.
(1) Connect the automatic light control sensor.
(2) Check the waveform. Use the oscilloscope and check the waveform in the terminal spaces.
NOTICE:
With the connector connected as is, check from the rear side of the connector.
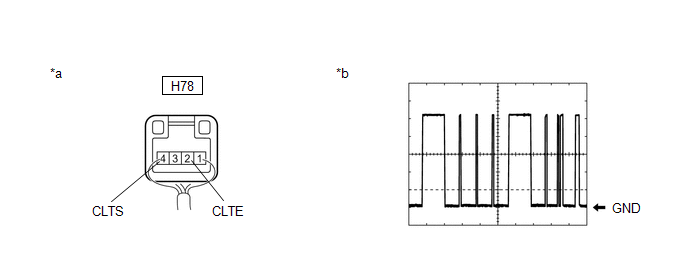
| *a | Component with harness connected (Automatic Light Control Sensor) | *b | Waveform |
OK:
| Tester Connection | Condition | Tool Setting | Specified Condition |
|---|---|---|---|
| H78-4 (CLTS) - H78-2 (CLTE) | Ignition switch on (IG) | 2 V/DIV.,10 ms/DIV. | Pulse generation (See waveform) |
HINT:
The communication waveform changes according to the surrounding brightness.
If the result is not as specified, the automatic light control sensor may be malfunctioning.
 Components
C..
 Removal
REMOVAL PROCEDURE 1. DISCONNECT NO. 1 ROOF HEADLINING MOULDING LH Click here
2. DISCONNECT NO. 1 ROOF HEADLINING MOULDING RH HINT: Use the same procedure as for the LH side...
Other information:
Toyota Yaris XP210 (2020-2026) Reapir and Service Manual: Components
COMPONENTS ILLUSTRATION *1 MANUAL TRANSAXLE ASSEMBLY *2 TRANSFER ASSEMBLY *3 TRANSFER AND TRANSAXLE SETTING STUD BOLT - - Tightening torque for "Major areas involving basic vehicle performance such as moving/turning/stopping" : N*m (kgf*cm, ft...
Toyota Yaris XP210 (2020-2026) Owner's Manual: Light Bulbs
Front With Halogen Headlights Headlights (Low/High beam)/Daytime running lights Front side-marker lights Overhead lights/Map lights Side turn signal lights (if equipped) Front turn signal lights/Parking lights Fog lights (if equipped) With LED Headlights Headlights (High beam) Headlights (Low beam) Front side-marker lights Overhead lights/Map lights Side turn signal lights (if equipped) Front turn signal lights/Parking lights Daytime running light/Parking light Fog lights Rear 4-Door Trunk light High-mount brake lights License plate lights Reverse lights Rear turn signal lights Brake lights/Taillights/Rear side-marker lights 5-Door High-mount brake light License plate lights Reverse lights Rear turn signal lights Brake lights/Tail lights Rear side-marker lights Luggage compartment light To replace the bulb, contact your Toyota dealer...
Categories
- Manuals Home
- Toyota Yaris Owners Manual
- Toyota Yaris Service Manual
- Adjustment
- Power Integration No.1 System Missing Message (B235287,B235587,B235787-B235987)
- How to connect USB port/Auxiliary jack
- New on site
- Most important about car
Refueling
Before refueling, close all the doors, windows, and the liftgate/trunk lid, and switch the ignition OFF.
To open the fuel-filler lid, pull the remote fuel-filler lid release.
