Toyota Yaris: Windshield Outside Moulding / Removal
REMOVAL
CAUTION / NOTICE / HINT
HINT:
- Use the same procedure for the RH side and LH side.
- The following procedure is for the LH side.
PROCEDURE
1. REMOVE WINDSHIELD OUTSIDE MOULDING
(a) Apply protective tape around the windshield outside moulding.
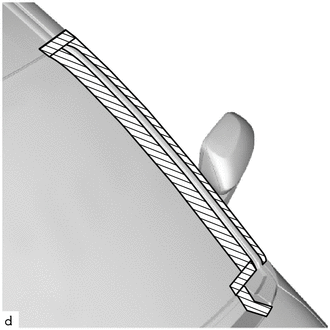
.png) | Protective Tape |
| (b) Using a moulding remover D, disengage the claws to remove the windshield outside moulding. |
|
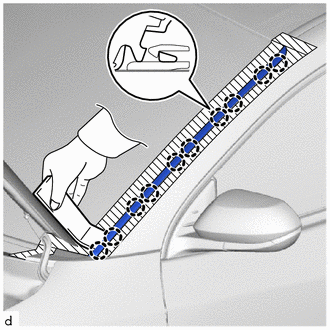
2. REMOVE NO. 1 WINDSHIELD OUTSIDE MOULDING CLIP
HINT:
Perform the following procedure only when replacement of a No. 1 windshield outside moulding clip is necessary.
(a) Disengage the claws to remove the 5 No. 1 windshield outside moulding clips as shown in the illustration.
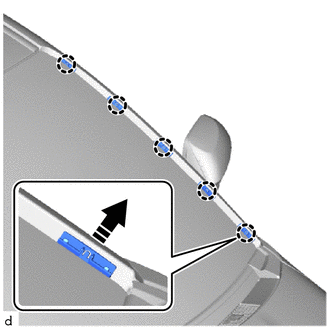
.png) | Remove in this Direction |
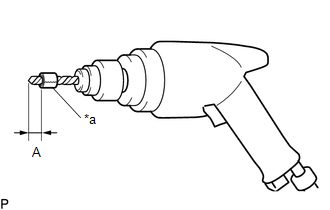
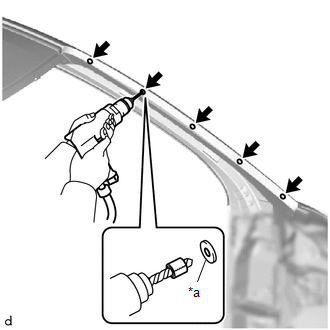
3. REMOVE NO. 4 WINDSHIELD OUTSIDE MOULDING CLIP
HINT:
Perform the following procedure only when replacement of a No. 4 windshield outside moulding clip is necessary.
(a) Remove the windshield glass sub-assembly.
Click here
.gif)
(b) Insert a 4.0 mm (0.157 in.) drill bit into a drill.
| (c) Tape the 4.0 mm (0.157 in.) drill bit 5.0 mm (0.197 in.) from the tip as shown in the illustration. Standard Measurement:
NOTICE: Tape the 4.0 mm (0.157 in.) drill bit to prevent the drill bit from going too deep. |
|
| (d) Lightly press the drill bit against the No. 4 windshield outside moulding clips to drill off the No. 4 windshield outside moulding clip flanges, and remove the 5 No. 4 windshield outside moulding clips. CAUTION: Be careful of the drilled No. 4 windshield outside moulding clips, as they may be hot. NOTICE:
|
|
(e) Using a vacuum cleaner, remove the No. 4 windshield outside moulding clip fragments and shavings from the drilled areas.
 Components
C..
 Installation
INSTALLATION CAUTION / NOTICE / HINT HINT:
Use the same procedure for the RH side and LH side.
The following procedure is for the LH side.
PROCEDURE 1...
Other information:
Toyota Yaris XP210 (2020-2026) Reapir and Service Manual: Components
COMPONENTS ILLUSTRATION *1 STEERING WHEEL ASSEMBLY - - Tightening torque for "Major areas involving basic vehicle performance such as moving/turning/stopping" : N*m (kgf*cm, ft.*lbf) - - ILLUSTRATION *1 LOWER STEERING COLUMN COVER *2 TURN SIGNAL SWITCH ASSEMBLY WITH SPIRAL CABLE SUB-ASSEMBLY *3 UPPER STEERING COLUMN COVER - - ILLUSTRATION *1 FRONT DOOR SCUFF PLATE LH *2 COWL SIDE TRIM BOARD LH *3 NO...
Toyota Yaris XP210 (2020-2026) Owner's Manual: Cruise Main Indication (White), Cruise Set Indication (White)/Indicator Light (Green)
Cruise main indication (white) The cruise main indication (white) is displayed in the instrument cluster when the cruise control system is activated. Cruise set indication (white)/indicator light (green) The cruise set indication (white) is displayed in the instrument cluster and the cruise set indicator light (green) turns on when a cruising speed has been set...
Categories
- Manuals Home
- Toyota Yaris Owners Manual
- Toyota Yaris Service Manual
- Key Battery Replacement
- To Set Speed
- Power Integration No.1 System Missing Message (B235287,B235587,B235787-B235987)
- New on site
- Most important about car
Turning the Engine Off
Stop the vehicle completely. Manual transaxle: Shift into neutral and set the parking brake.Automatic transaxle: Shift the selector lever to the P position and set the parking brake.
Press the push button start to turn off the engine. The ignition position is off.