Toyota Yaris: Back Door Outside Garnish / Removal
REMOVAL
PROCEDURE
1. REMOVE BACK DOOR TRIM BOARD
Click here
.gif)
2. REMOVE BACK DOOR TRIM COVER
Click here
3. REMOVE BACK DOOR OUTSIDE GARNISH SUB-ASSEMBLY
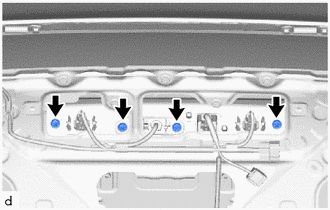
| (a) Remove the 4 bolts. |
|
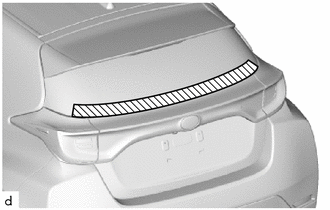
| (b) Apply protective tape around the back door outside garnish sub-assembly. |
|
(c) Disengage the clips to remove the back door outside garnish sub-assembly as shown in the illustration.
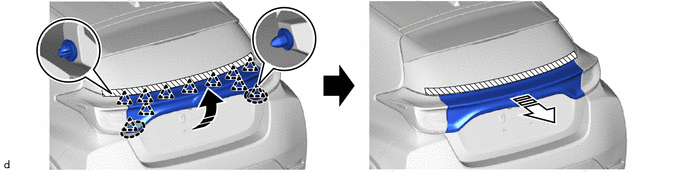
.png) | Place Hands Here |
.png) | Remove in this Direction (1) |
.png) | Remove in this Direction (2) | - | - |
 Components
COMPONENTS ILLUSTRATION
*1 BACK DOOR TRIM COVER *2 BACK DOOR TRIM BOARD *3 BACK DOOR OUTSIDE GARNISH SUB-ASSEMBLY - -
N*m (kgf*cm, ft...
 Disassembly
D..
Other information:
Toyota Yaris XP210 (2020-2026) Reapir and Service Manual: Components
COMPONENTS ILLUSTRATION *1 FUEL PRESSURE SENSOR *2 NO. 1 FUEL PRESSURE SENSOR HOLDER *3 NO. 1 ENGINE COVER SUB-ASSEMBLY - - Tightening torque for "Major areas involving basic vehicle performance such as moving/turning/stopping": N*m (kgf*cm, ft...
Toyota Yaris XP210 (2020-2026) Owner's Manual: Tire Pressure Monitoring System (If equipped)
The Tire Pressure Monitoring System (TPMS) monitors the air pressure of all four tires. If the air pressure of one or more tires is too low, the system warns the driver by indicating the tire pressure monitoring system warning light in the combination meter and operating a beep sound...
Categories
- Manuals Home
- Toyota Yaris Owners Manual
- Toyota Yaris Service Manual
- Diagnostic Trouble Code Chart
- Brake System Control Module "A" System Voltage System Voltage Low (C137BA2)
- Opening and Closing the Liftgate/Trunk Lid
- New on site
- Most important about car
Fuel Gauge
The fuel gauge shows approximately how much fuel is remaining in the tank when the ignition is switched ON. We recommend keeping the tank over 1/4 full.

Copyright © 2026 www.toyaris4.com