Toyota Yaris: Headlight Dimmer Switch / Installation
INSTALLATION
PROCEDURE
1. INSTALL TURN SIGNAL SWITCH
(a) Engage the claw to install the turn signal switch as shown in the illustration.
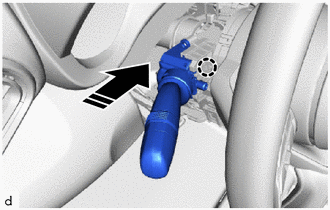
.png) | Install in this Direction |
(b) Install the 2 screws.
2. INSTALL UPPER STEERING COLUMN COVER
Click here
.gif)
3. INSTALL LOWER STEERING COLUMN COVER
Click here
 Inspection
INSPECTION PROCEDURE 1. INSPECT TURN SIGNAL SWITCH (a) Check the resistance. (1) Measure the resistance according to the value(s) in the table below...

Other information:
Toyota Yaris XP210 (2020-2026) Reapir and Service Manual: Freeze Frame Data
FREEZE FRAME DATA DESCRIPTION (a) Whenever a front radar sensor system DTC is stored, the millimeter wave radar sensor assembly stores the current vehicle state as Freeze Frame Data. CHECK FREEZE FRAME DATA (a) According to the display on the GTS, select a DTC with freeze frame data...
Toyota Yaris XP210 (2020-2026) Reapir and Service Manual: Removal
REMOVAL CAUTION / NOTICE / HINT CAUTION: Be sure to read Precaution thoroughly before servicing. Click here Wear protective gloves. Sharp areas on the parts may injure your hands. HINT: When the cable is disconnected / reconnected to the auxiliary battery terminal, systems temporarily stop operating...
Categories
- Manuals Home
- Toyota Yaris Owners Manual
- Toyota Yaris Service Manual
- Auto Lock/Unlock Function
- How to connect USB port/Auxiliary jack
- How to use USB mode
- New on site
- Most important about car
Fuel Gauge
The fuel gauge shows approximately how much fuel is remaining in the tank when the ignition is switched ON. We recommend keeping the tank over 1/4 full.

Copyright © 2026 www.toyaris4.com