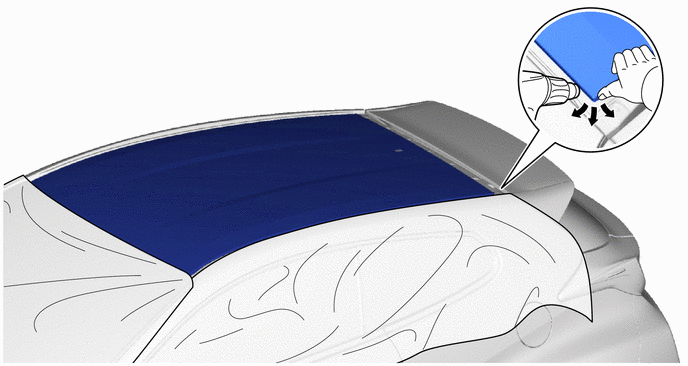
Toyota Yaris: Roof Garnish / Installation
INSTALLATION
CAUTION / NOTICE / HINT
NOTICE:
- Work indoors with less dust and wind.
- Install the roof outside cover in an environment where the temperature is 20 to 30°C (68 to 86°F).
- Do not leave dirt such as old adhesive, bumps, dust and oil on the adhesive surface.
- Be sure to use a new felt attached to the squeegee (with a scratch-proof felt).
- Do not bend the roof outside cover or leave it in a place with high temperature.
- If the roof outside cover is bent or damaged, be sure to replace it with a new one.
- After attaching the roof outside cover, peel it off and do not attach it again.
- Perform the work of attaching the roof outside cover with an accuracy of +/- 1 mm, and be careful of appearance and peeling.
- Completely remove the isopropyl alcohol or equivalent that was used when removing the roof outside cover.
- Do not scratch the vehicle with the sleeve of work clothes.
- The panel around the roof panel is easily dented, so do not apply excessive load.
- When replacing the roof outside cover, it is necessary to apply a clear coating to the roof panel surface in order to smooth the unevenness of the roof panel.
- As for the work procedure for clear coating, check the work procedure included in the roof outside cover supply parts and perform the work.
PROCEDURE
1. INSTALL ROOF OUTSIDE COVER
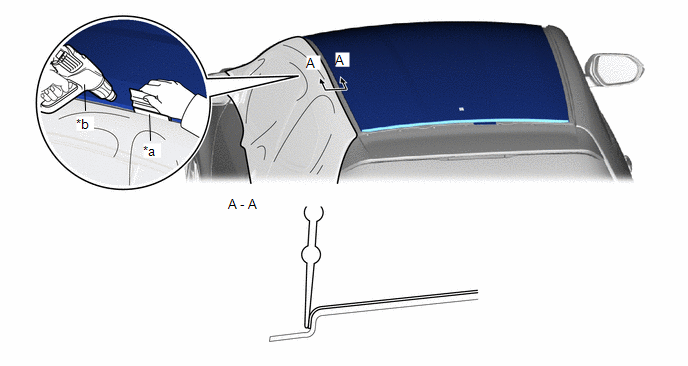
(a) Install the trim tape or equivalent.
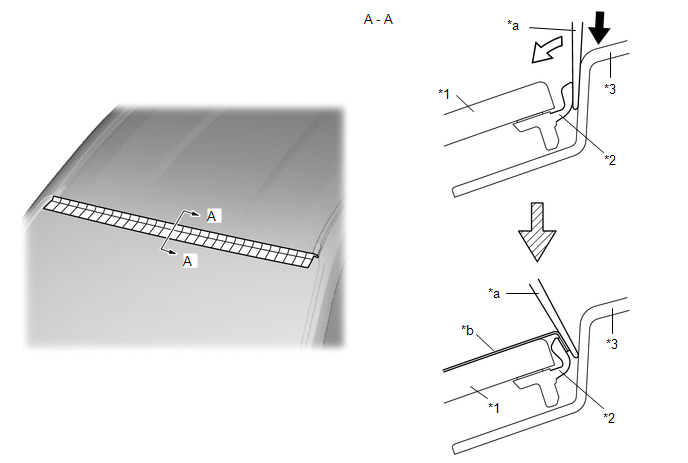
| *1 | Windshield Glass | *2 | Windshield Outside Moulding |
| *3 | Roof Panel | - | - |
| *a | Squeegee | *b | Trim Tape or equivalent |
(1) Insert the squeegee between the windshield outside moulding and the roof panel.
(2) Insert the trim tape or equivalent between the squeegee and the roof panel and pull out the squeegee.
(3) Insert the squeegee between the trim tape or equivalent and the roof panel and attach the trim tape or equivalent with the windshield outside moulding raised.
HINT:
Widen the gap between the windshield outside moulding and the roof panel to secure a working space.
(b) Clean the front and back of a new roof outside cover with an antistatic sheet.

| *a | Roof Outside Cover Surface | *b | Back of Roof Outside Cover |
| *c | Antistatic Sheet | - | - |
NOTICE:
Also clean the roof panel with an antistatic sheet.
(c) When install the roof outside cover to the roof panel, remove the release paper in the order shown.
| *a | Back of Roof Outside Cover | - | - |
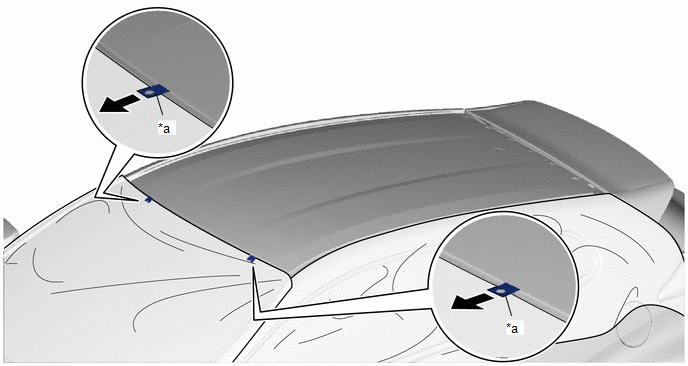
(d) Measure the center of the roof panel to position the roof outside cover.
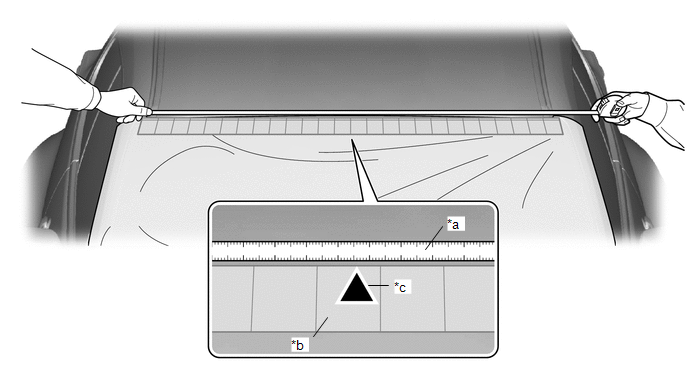
| *a | Convex | *b | Trim Tape or equivalent |
| *c | Roof Panel Center Marking Position | - | - |
(e) Mark the center of the roof panel.
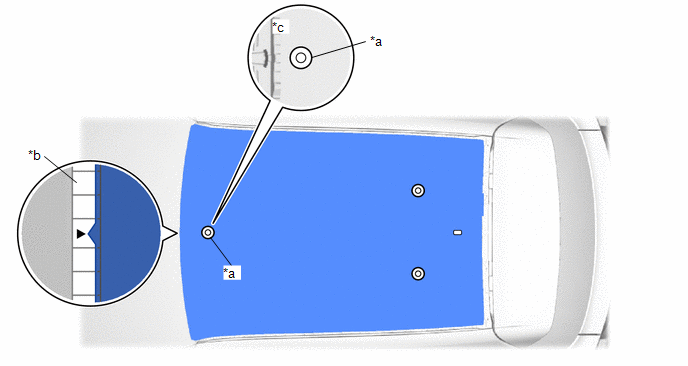
(f) Align the roof outside cover with the roof antenna assembly mounting holes so that wrinkles and slack are not generated, and fix it to the roof panel with the 4 magnets near the roof antenna assembly mounting holes.
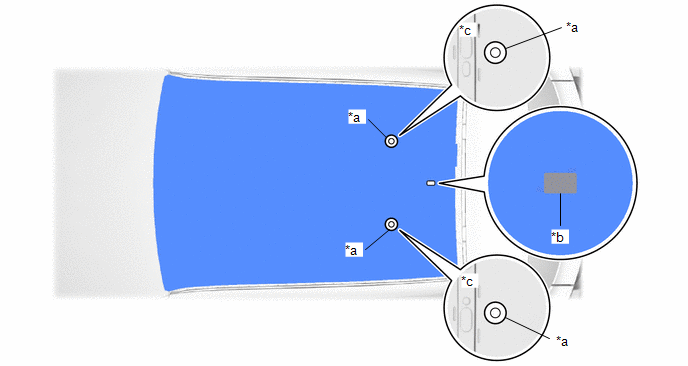
| *a | Magnet | *b | Roof Antenna Assembly Mounting Hole |
| *c | Inside the Vehicle | - | - |
NOTICE:
- Positioning at the start of the sticking work affects the appearance and peeling, so the accuracy is +/- 1 mm.
- When placing the magnet for fixing the roof outside cover on the roof panel, install it gently so as not to damage the roof panel.
- When moving the magnet for fixing the roof outside cover, remove it once and move it, otherwise the roof outside cover will be damaged.
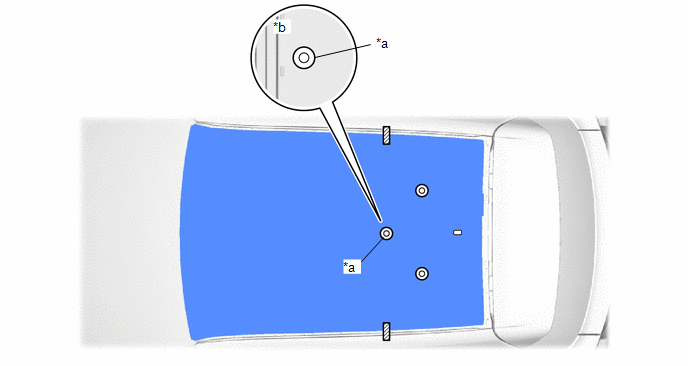
(g) Align the protrusions on the tip of the roof outside cover with the marking position on the roof panel center so that wrinkles and slacks are not generated, and fix them to the roof panel with the 2 magnets near the marking position on the roof panel center.
| *a | Magnet | *b | Roof Panel Center Marking Position |
| *c | Inside the Vehicle | - | - |
NOTICE:
- Positioning at the start of the sticking work affects the appearance and peeling, so the accuracy is +/- 1 mm.
- When placing the magnet for fixing the roof outside cover on the roof panel, install it gently so as not to damage the roof panel.
- When moving the magnet for fixing the roof outside cover, remove it once and move it, otherwise the roof outside cover will be damaged.
(h) Attach the tape to the position shown in the figure, and move the 2 magnets near the marking position at the center of the roof panel to a position parallel to the tape so as not to cause wrinkles or slack.
| *a | Magnet | *b | Inside the Vehicle |
.png) | Tape | - | - |
NOTICE:
- Positioning at the start of the sticking work affects the appearance and peeling, so the accuracy is +/- 1 mm.
- When placing the magnet for fixing the roof outside cover on the roof panel, install it gently so as not to damage the roof panel.
- When moving the magnet for fixing the roof outside cover, remove it once and move it, otherwise the roof outside cover will be damaged.
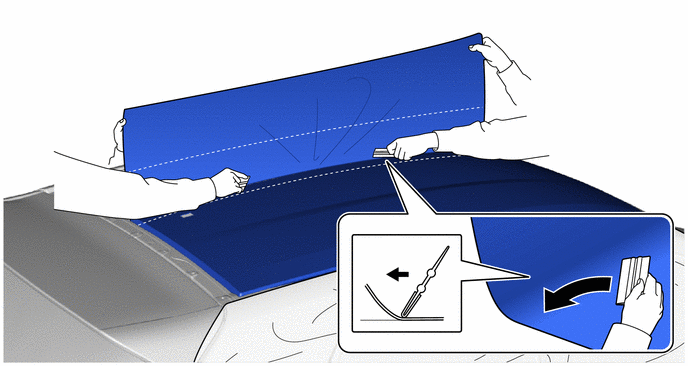
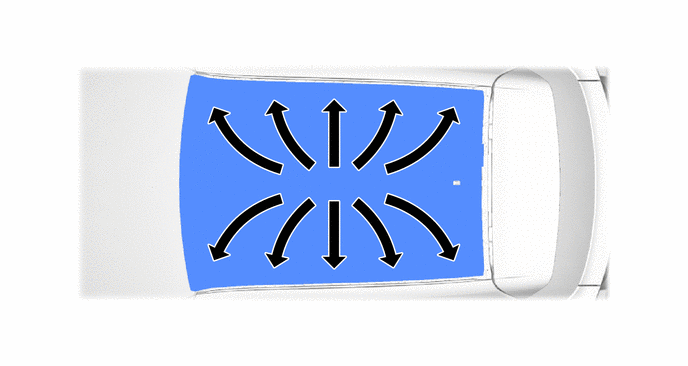
(i) Install the roof outside cover to the front center of the vehicle.
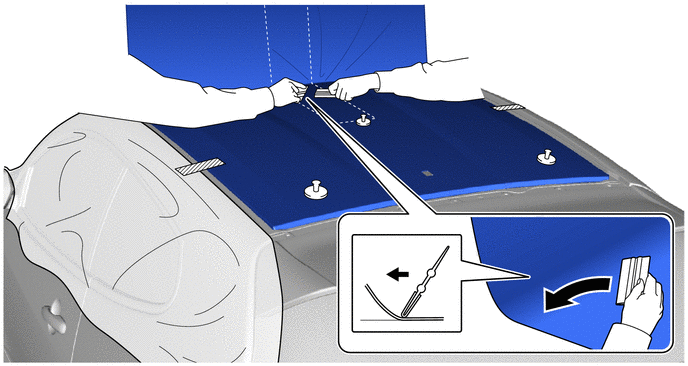
.png) | Move | - | - |
(1) While lifting the tip of the roof outside cover, remove all the release paper, move it in the direction of the arrow in the figure, and press the squeegee (with scratch-proof felt) with a pressing force of 20 to 80 N (2 to 8 kgf) at a slow and constant speed to install it from the center of the roof outside cover to the front of the vehicle.
NOTICE:
- Hold down the roof outside cover and slowly move the squeegee (with scratch-prevention felt) to prevent misalignment.
- The roof outside cover may be deformed once it is peeled off.
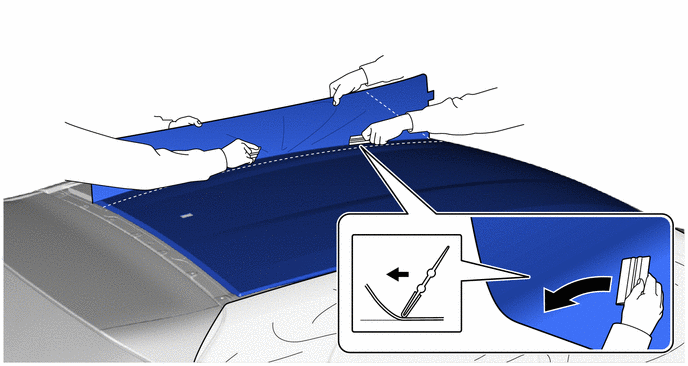
(j) Install the roof outside cover to the rear center of the vehicle.
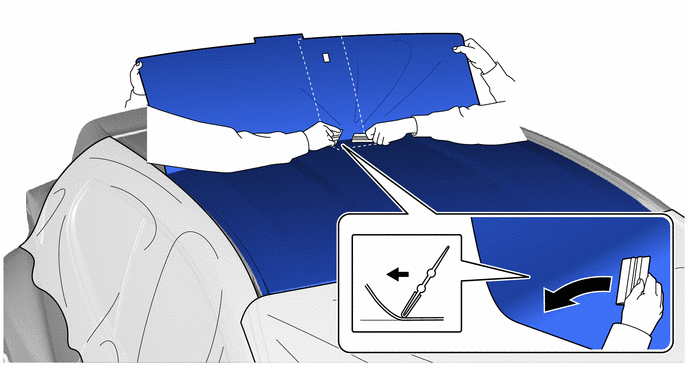
|
| Move | - | - |
(1) Remove the tape and 6 magnets.
(2) While lifting the rear edge of the roof outside cover, remove all the release paper, move it in the direction of the arrow in the figure, and press the squeegee (with scratch protection felt) with a force of 20 to 80 N (2 to 8 kgf) at a constant speed to install it from the center of the roof outside cover to the rear of the vehicle.
NOTICE:
The roof outside cover may be deformed once it is peeled off.
(k) Install the center of the left side of the roof outside cover.
|
| Move | - | - |
(1) While lifting the left side of the roof outside cover, remove all the release paper, move it in the direction of the arrow in the figure, and press the squeegee (with scratch-prevention felt) on the roof at a slow and constant speed with a force of 20 to 80 N (2 to 8 kgf) to install it from the center of the outside cover to the left side of the vehicle.
NOTICE:
The roof outside cover may be deformed once it is peeled off.
(l) Install the center of the right side of the roof outside cover.
(1) Use the same procedure as for the center of the left side of the roof outside cover.
(m) Install the left side of the roof outside cover.
|
| Move | - | - |
(1) While lifting the left side of the roof outside cover, remove all the release paper, move it in the direction of the arrow in the figure, and press the squeegee (with scratch-prevention felt) on the roof at a slow and constant speed with a force of 20 to 80 N (2 to 8 kgf) to install it from the center of the outside cover to the left side of the vehicle.
NOTICE:
The roof outside cover may be deformed once it is peeled off.
(n) Install the left side of the roof outside cover.
(1) Use the same procedure as for the center of the left side of the roof outside cover.
(o) Install the left end of the roof outside cover.
|
| Move | - | - |
(1) While lifting the left edge of the roof outside cover, remove all the release paper, move it in the direction of the arrow in the figure, and press the squeegee (with scratch-prevention felt) with a force of 20 to 80 N (2 to 8 kgf) at a constant speed to install it from the center of the roof outside cover to the front left of the vehicle.
NOTICE:
The roof outside cover may be deformed once it is peeled off.
(p) Install the right end of the roof outside cover.
(1) Use the same procedure as for the left end of the roof outside cover.
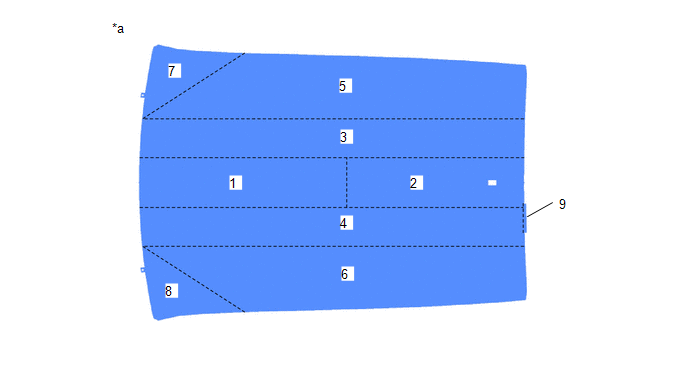
(q) Cut out the 2 front ribs of the roof outside cover along the perforations.
| *a | Rib | - | - |
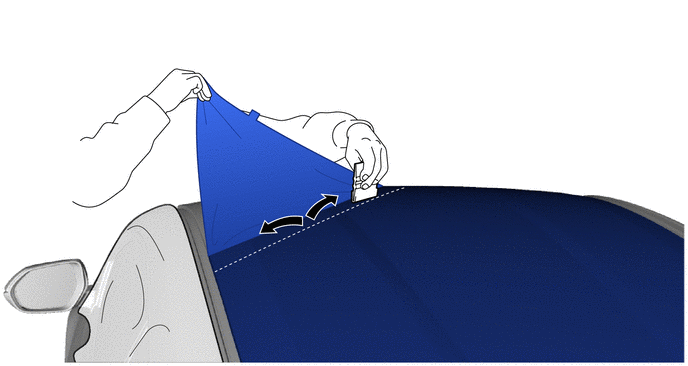
(r) Install the roof outside cover end.
(1) While heating each end of the roof outside cover with a heat gun at 65 to 70 °C (149 to 158 °F), firmly install it to the body panel as shown in the illustration.
CAUTION:
Touching heated parts for a long time may result in burns.
NOTICE:
If stretch or pull the rear edge of the roof outside cover to install it, air will be caught or floated.
(s) Install the left side edge of the roof outside cover.
| *a | Squeegee | *b | Heat Gun |
(1) While heating the left side edge of the roof outside cover with a heat gun at 65 to 70°C, firmly install it to the body panel as shown in the illustration.
CAUTION:
Touching heated parts for a long time may result in burns.
NOTICE:
If the roof outside cover is not attached properly, the air will expand and the roof outside cover will stretch when heated, so be sure to perform confirmation work.
(t) Install the right side edge of the roof outside cover.
(1) Use the same procedure as for the left side edge of the roof outside cover.
(u) Crimp the entire roof outside cover.
|
| Move | - | - |
(1) Using a squeegee, move it in the direction of the arrow in the figure, and press the squeegee with a force of 20 to 80 N (2 to 8 kgf) at a slow and constant speed to crimp the whole roof panel evenly and let it fit into the body panel.
NOTICE:
If the roof outside cover is not attached properly, the air will expand and the roof outside cover will stretch when heated, so be sure to perform confirmation work.
(v) Install the tab of the roof outside cover.

|
| Move | - | - |
(1) Using a squeegee, peel off all roof outside cover release paper and stick the tab of the roof outside cover toward the rear of the vehicle.
NOTICE:
- Hold down the roof outside cover and slowly move the squeegee to prevent misalignment.
- The roof outside cover may be deformed once it is peeled off.
(w) Install the front end of the roof outside cover.
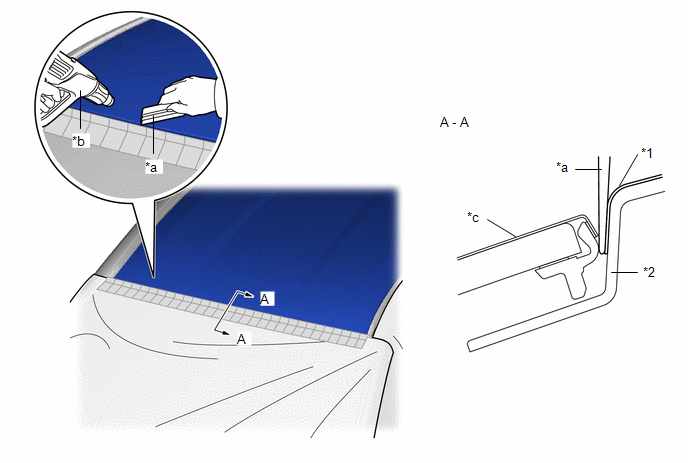
| *1 | Roof Outside Cover | *2 | Roof Panel |
| *a | Squeegee | *b | Heat Gun |
| *c | Trim Tape or equivalent | - | - |
(1) Using a squeegee, install the front end of the roof outside cover between the trim tape or equivalent and the roof panel.
(2) Using the squeegee, while heating the front end of the roof outside cover with a heat gun at 65 to 70 °C (149 to 158 °F), firmly attach it.
CAUTION:
Touching heated parts for a long time may result in burns.
NOTICE:
If stretch or pull the front end of the roof outside cover to install it, air will be caught or lifted.
(x) Remove the trim tape or equivalent and restore the windshield outside moulding to its original shape.
(y) Remove the protective cover.
(z) Check the crimping condition of the roof outside cover.
(1) Using a panel heater, heat the outside roof cover to 70 °C (158 °F) at the center until it reaches 60 °C (140 °F) and check that the roof outside cover does not float.
CAUTION:
Touching heated parts for a long time may result in burns.
NOTICE:
If the roof outside cover is not attached properly, the air will expand and the roof outside cover will stretch when heated, so be sure to perform confirmation work.
HINT:
If there is a float, using a squeegee to gently push the air toward the outside of the roof outside cover to crimp the roof outside cover.
2. INSTALL ROOF ANTENNA ASSEMBLY WITH ANTENNA COVER
Click here
.gif)
3. INSTALL ROOF TOP MOULDING SUB-ASSEMBLY
Click here
4. INSTALL ROOF DRIP SIDE MOULDING LH
Click here
5. INSTALL ROOF DRIP SIDE MOULDING RH
HINT:
Use the same procedure as for the LH side.
6. INSTALL ROOF HEADLINING
Click here
 Removal
REMOVAL CAUTION / NOTICE / HINT NOTICE:
Wash the vehicle to prevent oil and other dirt from remaining on the roof panel, which is the adhesive surface of the roof outside cover...
 Tail Gate Protector
ComponentsCOMPONENTS ILLUSTRATION
*1 ROOF TOP MOULDING SUB-ASSEMBLY - - RemovalREMOVAL PROCEDURE 1. REMOVE ROOF HEADLINING Click here
2...
Other information:
Toyota Yaris XP210 (2020-2026) Reapir and Service Manual: Removal
REMOVAL CAUTION / NOTICE / HINT The necessary procedures (adjustment, calibration, initialization, or registration) that must be performed after parts are removed and installed, or replaced during the central gateway ECU (network gateway ECU) removal/installation are shown below...
Toyota Yaris XP210 (2020-2026) Reapir and Service Manual: Components
C..
Categories
- Manuals Home
- Toyota Yaris Owners Manual
- Toyota Yaris Service Manual
- Removal
- Diagnostic Trouble Code Chart
- Adjustment
- New on site
- Most important about car
Fuel-Filler Lid and Cap
WARNING
When removing the fuel-filler cap, loosen the cap slightly and wait for any hissing to stop, then remove it
Fuel spray is dangerous. Fuel can burn skin and eyes and cause illness if ingested. Fuel spray is released when there is pressure in the fuel tank and the fuel-filler cap is removed too quickly.