Toyota Yaris: Light Bulbs / Replacing Exterior Light Bulbs
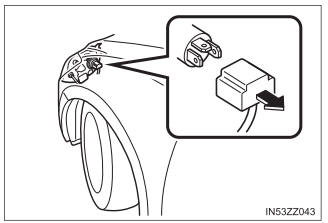
Headlights/Daytime running lights (With halogen headlights)
- Make sure the ignition is switched off, and the headlight switch is off.
- Lift the hood.
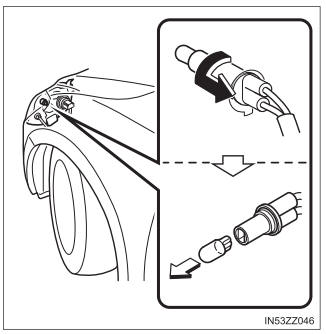
- Disconnect the connector
from the bulb.
- Detach the sealing cover
from the bulb.
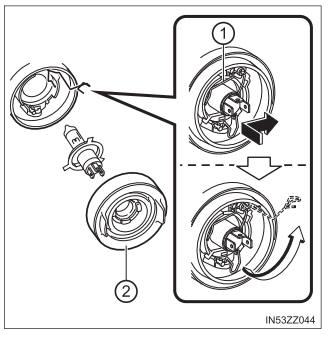
- Retaining spring
- Sealing cover
- Unhook the bulb retaining spring.
- Swing the retaining spring out and away to free the headlight bulb.
- Carefully remove the headlight bulb from the socket by pulling it straight back.
- Replace the bulb.
- Install the new bulb in the reverse order of the removal procedure.
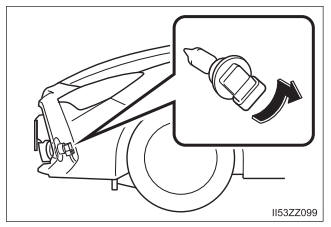
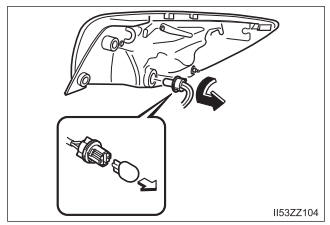
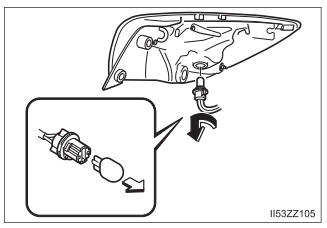
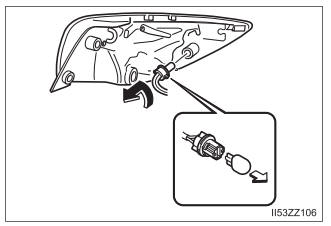
Front turn signal lights/Parking lights, Front side-marker lights
- Make sure the ignition is switched off, and the headlight switch is off.
- Lift the hood.
- Front turn signal lights/Parking lights: Remove the fuse block cover.
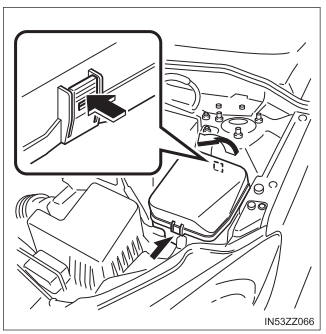
- Turn the socket and bulb assembly counterclockwise and remove it.
- Disconnect the bulb from the socket.
Front turn signal lights/Parking lights
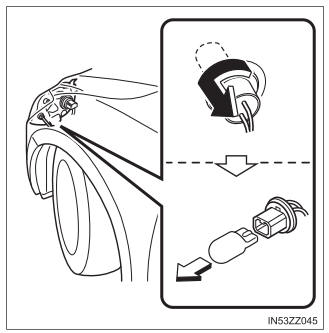
Front side-marker lights
- Install the new bulb in the reverse order of the removal procedure.
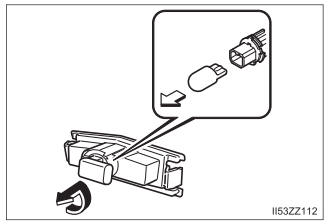
Fog lights (if equipped)
- Make sure the ignition is switched off, and the fog light switch is off.
- Turn the screws counterclockwise and remove them.
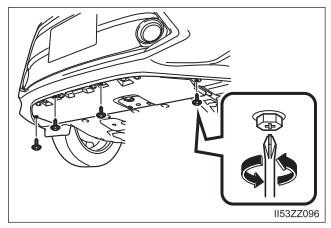
- Pull the center of each retainers and remove them, and
then partially peel back the
front under cover.
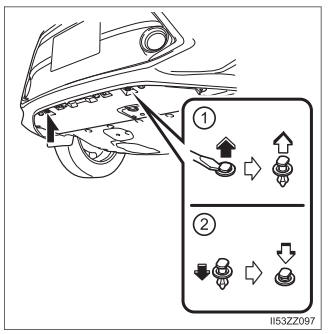
- Removal
- Installation
- Disconnect the connector
from the unit by pressing the
tab on the connector with
your finger and pulling the
connector downward.
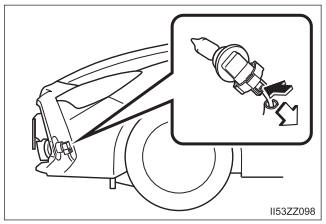
- Turn the socket and bulb
assembly to remove it. Carefully remove the bulb from its
socket in the reflector by
gently pulling it straight backward out of the socket.
- Install the new bulb in the reverse order of the removal procedure.
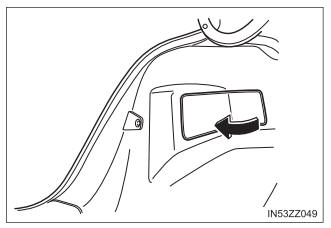
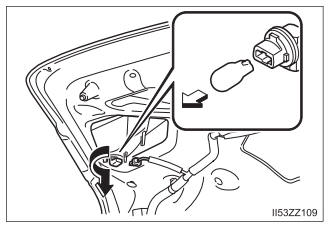
Rear turn signal lights, Brake lights/Taillights/Rear side-marker lights
4-Door
- Make sure the ignition is switched off, and the headlight switch is off.
- Remove the cover.
- Turn the socket and bulb assembly counterclockwise and remove it.
- Disconnect the bulb from the socket.
Rear turn signal lights:
Brake lights/Taillights/Rear sidemarker lights:

- Install the new bulb in the reverse order of the removal procedure.
- Insert the cover tabs and install the cover.
Verify that the cover is securely installed.
5-Door
- Make sure the ignition is switched off, and the headlight switch is off.
- Turn the bolts counterclockwise and remove them.
- Pull the unit rearward to
remove it.

- Turn the socket and bulb assembly counterclockwise and remove it.
- Disconnect the bulb from the socket.
Rear turn signal lights:
Brake lights/Taillights:
Rear side-marker lights:
- Install the new bulb in the reverse order of the removal procedure.
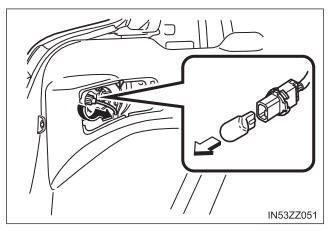
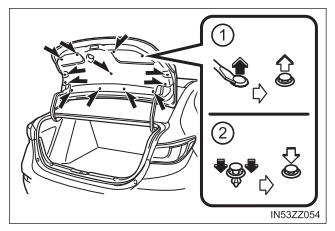
Reverse lights
4-Door
- Make sure the ignition is switched off, and the headlight switch is off.
- Pull the center of each plastic retainers and remove them.
- Removal
- Installation
- Remove the trunk lid trim.
- Disconnect the electrical
connector from the bulb by
pressing the tab on the connector with your finger and
pulling the connector.
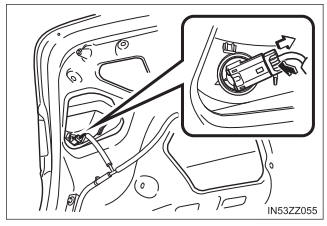
- Turn the socket and bulb assembly counterclockwise and remove it.
- Disconnect the bulb from the
socket.
- Install the new bulb in the reverse order of the removal procedure.
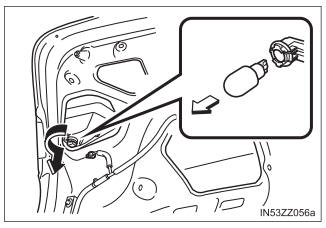
5-Door
- Make sure the ignition is switched off, and the headlight switch is off.
- Pull the center of each plastic
retainer and remove the
retainers.
- Removal
- Installation
- Remove the trunk lid trim.
- Disconnect the connector from the socket.
- Turn the socket and bulb assembly counterclockwise and remove it.
- Disconnect the bulb from the
socket.
- Install the new bulb in the reverse order of the removal procedure.
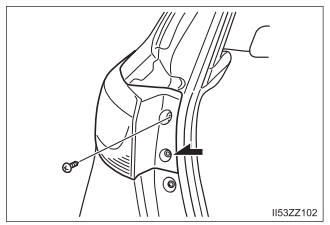
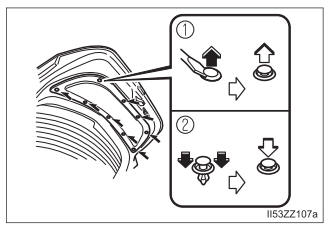
License plate lights
4-Door
- Make sure the ignition is switched off, and the headlight switch is off.
- Pull the center of each plastic
retainers and remove them.
- Removal
- Installation
- Peel back the trunk lid trim.
- Turn the socket and bulb assembly counterclockwise and remove it.
- Disconnect the bulb from the
socket.

- Install the new bulb in the reverse order of the removal proce- dure.
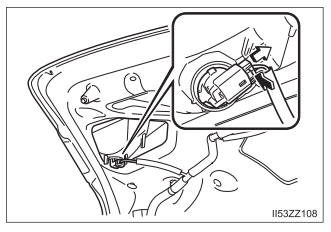
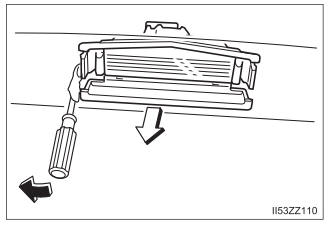
5-Door
- Make sure the ignition is switched off, and the headlight switch is off.
- Wrap a flathead screwdriver with a soft cloth to prevent damage to the light unit.
- Insert a flathead screwdriver
into the position shown in the
figure and pull the light unit
outward.
- Disconnect the connector
from the bulb by pressing the
tab on the connector with
your finger and pulling the
connector.
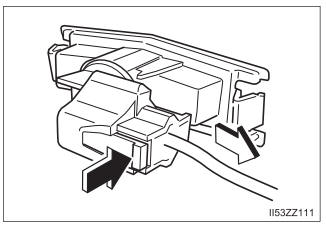
- Turn the socket and bulb assembly counterclockwise and remove it.
- Disconnect the bulb from the
socket.
- Install the new bulb in the reverse order of the removal procedure.
Headlights/Daytime running lights (With LED headlights), Side turn signal lights (if equipped), High-mount brake light
The LED bulb cannot be replaced as a single unit because it is an integrated unit. The LED bulb has to be replaced with the unit. We recommend your Toyota dealer when the replacement is necessary.
Headlights/Daytime running lights
- To replace the bulb, contact your Toyota dealer.
- If the halogen bulb is accidentally touched, it should be cleaned with rubbing alcohol before being used.
- Use the protective cover and carton of the replacement bulb to dispose of the old bulb promptly out of the reach of children.
- When reinstalling the sealing cover, make sure it is fitted correctly.
 Light Bulbs
Front
With Halogen Headlights
Headlights (Low/High beam)/Daytime running lights
Front side-marker lights
Overhead lights/Map lights
Side turn signal lights (if equipped)
Front turn signal lights/Parking lights
Fog lights (if equipped)
With LED Headlights
Headlights (High beam)
Headlights (Low beam)
Front side-marker lights
Overhead lights/Map lights
Side turn signal lights (if equipped)
Front turn signal lights/Parking lights
Daytime running light/Parking light
Fog lights
Rear
4-Door
Trunk light
High-mount brake lights
License plate lights
Reverse lights
Rear turn signal lights
Brake lights/Taillights/Rear side-marker lights
5-Door
High-mount brake light
License plate lights
Reverse lights
Rear turn signal lights
Brake lights/Tail lights
Rear side-marker lights
Luggage compartment light
To replace the bulb, contact your Toyota dealer...
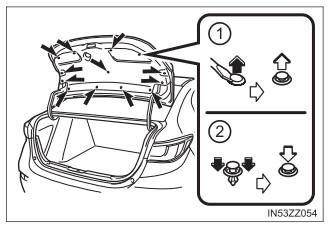
 Replacing Interior Light Bulbs
Overhead lights/Map lights
Wrap a small flathead screwdriver with a soft cloth to prevent damage to
the lens, and
then remove the lens by
carefully prying on the edge
of the lens with the flathead
screwdriver...
Other information:
Toyota Yaris XP210 (2020-2026) Reapir and Service Manual: Precaution
PRECAUTION PRECAUTION FOR REPLACING COMBINATION METER ASSEMBLY When replacing the combination meter assembly, always replace it with a new one. If a combination meter assembly which was installed to another vehicle is used, the information stored in it will not match the information from the vehicle and a DTC may be stored...
Toyota Yaris XP210 (2020-2026) Owner's Manual: Operating the Satellite Radio (if equipped)
What is satellite radio? SiriusXM® Satellite Radio SiriusXM satellite radio is a subscription-based satellite radio service that broadcasts a variety of music, sports, news, weather, traffic and entertainment programming. Your new Toyota vehicle is factory-installed with SiriusXM satellite radio hardware and includes a limited trial subscription term that begins on the date of sale or lease of your vehicle...
Categories
- Manuals Home
- Toyota Yaris Owners Manual
- Toyota Yaris Service Manual
- Removal
- Fuse Panel Description
- Fuel Gauge
- New on site
- Most important about car
Turning the Engine Off
Stop the vehicle completely. Manual transaxle: Shift into neutral and set the parking brake.Automatic transaxle: Shift the selector lever to the P position and set the parking brake.
Press the push button start to turn off the engine. The ignition position is off.