Toyota Yaris: Air Fuel Ratio Sensor (for Sensor 2) / Inspection
INSPECTION
PROCEDURE
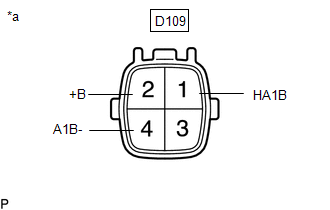
1. INSPECT NO. 2 AIR FUEL RATIO SENSOR
| (a) Measure the resistance according to the value(s) in the table below. Standard Resistance:
If the result is not as specified, replace the No. 2 air fuel ratio sensor. |
|
 Removal
REMOVAL CAUTION / NOTICE / HINT The necessary procedures (adjustment, calibration, initialization, or registration) that must be performed after parts are removed, installed, or replaced during the No...
 Installation
INSTALLATION PROCEDURE 1. INSTALL NO. 2 AIR FUEL RATIO SENSOR (a) Using SST, install the No. 2 air fuel ratio sensor to the front exhaust pipe assembly...
Other information:
Toyota Yaris XP210 (2020-2026) Reapir and Service Manual: Inspection
INSPECTION PROCEDURE 1. INSPECT HEADLIGHT LEVELING SWITCH (a) Check the voltage. (1) Connect a positive (+) lead from the auxiliary battery to terminal 5 (B) and a negative (-) lead to terminal 2 (E). *a Component without harness connected (Headlight Leveling Switch) (2) Measure the voltage according to the value(s) in the table below...
Toyota Yaris XP210 (2020-2026) Owner's Manual: Towing
Trailer Towing Your Toyota is not designed for towing. Never tow a trailer with your Toyota. Recreational Towing An example of “recreational towing” is towing your vehicle behind a motorhome. The transaxle is not designed for towing this vehicle on all 4 wheels...
Categories
- Manuals Home
- Toyota Yaris Owners Manual
- Toyota Yaris Service Manual
- How to connect USB port/Auxiliary jack
- Removal
- Maintenance
- New on site
- Most important about car
Break-In Period
No special break-in is necessary, but a few precautions in the first 600 miles (1,000 km) may add to the performance, economy, and life of the vehicle.
Do not race the engine. Do not maintain one constant speed, either slow or fast, for a long period of time. Do not drive constantly at full-throttle or high engine rpm for extended periods of time. Avoid unnecessary hard stops. Avoid full-throttle starts.
Copyright © 2026 www.toyaris4.com