Toyota Yaris: Maintenance / Gf1a Transfer Oil
Components
COMPONENTS
ILLUSTRATION
| *1 | NO. 1 ENGINE UNDER COVER ASSEMBLY | *2 | TRANSFER FILLER PLUG |
| *3 | TRANSFER DRAIN PLUG | *4 | GASKET |
|
| Tightening torque for "Major areas involving basic vehicle performance such as moving/turning/stopping": N*m (kgf*cm, ft.*lbf) |
| N*m (kgf*cm, ft.*lbf): Specified torque |
| * | For use with SST and union nut wrench | ● | Non-reusable part |
Replacement
REPLACEMENT
CAUTION / NOTICE / HINT
NOTICE:
-
The plug shown in the illustration is not the transfer filler plug, so do not attempt to fill transfer oil via this plug.
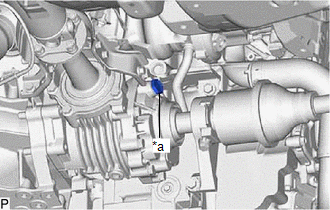
*a
NOT the Transfer Filler Plug
- Filling transfer oil via this plug will cause the transfer oil to be overfilled, resulting in oil leakage.
PROCEDURE
1. REMOVE NO. 1 ENGINE UNDER COVER ASSEMBLY
Click here
![]()
2. DRAIN TRANSFER OIL
(a) Stop the vehicle on a level surface.
| (b) Using a 10 mm straight hexagon wrench and 10 x 12 mm long offset wrench, remove the transfer filler plug and gasket. |
|
(c) Using a 10 mm hexagon socket wrench, remove the transfer drain plug and gasket and drain the transfer oil.
(d) Using a 10 mm hexagon socket wrench, install a new gasket and the drain plug.
Torque:
39 N·m {398 kgf·cm, 29 ft·lbf}
3. ADD TRANSFER OIL
(a) Using a 10 mm straight hexagon wrench and 10 x 12 mm long offset wrench, remove the transfer filler plug and gasket.
(b) Add transfer oil.
Oil grade:
Toyota genuine differential gear oil LT API GL-5 or equivalent
Viscosity:
SAE 75W-85
NOTICE:
Using transfer oil other than the specified oil may cause abnormal noise or vibration, or damage the transfer of your vehicle.
| (c) Pour oil so that the oil level is between 0 to 5.0 mm (0 to 0.197 in.) from the bottom lip of the transfer filler plug hole. NOTICE:
Standard capacity: 0.40 to 0.50 liters (0.43 to 0.52 US qts, 0.36 to 0.44 Imp. qts) |
|
(d) Wait approximately 5 minutes and check that the oil level has not changed.
| (e) Using SST, 10 mm straight hexagon wrench and union nut wrench, install a new gasket into the transfer filler plug, and then install the transfer filler plug. SST: 09961-00950 Torque: Specified tightening torque : 39 N·m {398 kgf·cm, 29 ft·lbf} HINT:
|
|
4. INSTALL NO. 1 ENGINE UNDER COVER ASSEMBLY
Click here
![]()
 Chassis
CHASSIS INSPECT STEERING LINKAGE AND GEAR HOUSING (a) Inspect the steering wheel free play. Click here
(b) Inspect the steering linkage for looseness or damage...
 License Plate Light Bulb
ComponentsCOMPONENTS ILLUSTRATION
*1 LICENSE PLATE LIGHT LENS *2 LICENSE PLATE LIGHT BULB RemovalREMOVAL CAUTION / NOTICE / HINT HINT:
Use the same procedure for the RH and LH sides...
Other information:
Toyota Yaris XP210 (2020-2026) Reapir and Service Manual: Installation
INSTALLATION CAUTION / NOTICE / HINT HINT: Use the same procedure for the RH side and LH side. The following procedure is for the LH side. PROCEDURE 1. INSTALL FRONT AIRBAG SENSOR (a) Check that the ignition switch is off. (b) Check that the cable is disconnected from the negative (-) auxiliary battery terminal...
Toyota Yaris XP210 (2020-2026) Reapir and Service Manual: Reassembly
REASSEMBLY CAUTION / NOTICE / HINT HINT: Use the same procedure for the RH and LH sides. The procedure listed below is for the LH side. PROCEDURE 1. INSTALL LICENSE PLATE LIGHT BULB (a) Install the license plate light bulb. 2. INSTALL LICENSE PLATE LIGHT LENS (a) Engage the claws to install the license plate light lens...
Categories
- Manuals Home
- Toyota Yaris Owners Manual
- Toyota Yaris Service Manual
- How to connect USB port/Auxiliary jack
- Opening and Closing the Liftgate/Trunk Lid
- Diagnostic Trouble Code Chart
- New on site
- Most important about car
Front Seat Belt Pretensioners
The front seat belt pretensioners are designed to deploy in moderate or severe frontal, near frontal collisions.
In addition, the pretensioners operate when a side collision or a rollover accident is detected. The pretensioners operate differently depending on what types of air bags are equipped. For more details about the seat belt pretensioner operation, refer to the SRS Air Bag Deployment Criteria.