Toyota Yaris: Combination Meter / Disassembly
DISASSEMBLY
CAUTION / NOTICE / HINT
NOTICE:
- When removing and installing the combination meter glass, make sure not to touch the display panel.
- Do not allow any dirt (fingerprints, grease, etc.) to adhere to the combination meter glass. If the glass is dirty, wipe it clean with a soft cloth.
PROCEDURE
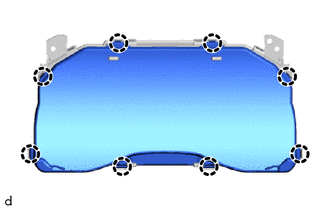
1. REMOVE COMBINATION METER GLASS
| (a) Disengage the claws to remove the combination meter glass. |
|
 Removal
REMOVAL CAUTION / NOTICE / HINT HINT: When the cable is disconnected/reconnected to the auxiliary battery terminal, systems temporarily stop operating...
 Reassembly
REASSEMBLY CAUTION / NOTICE / HINT NOTICE:
When removing and installing the combination meter glass, make sure not to touch the display panel.
Do not allow any dirt (fingerprints, grease, etc...
Other information:
Toyota Yaris XP210 (2020-2026) Reapir and Service Manual: Auto Up Operation does not Fully Close Power Window (Jam Protection Function is Activated)
DESCRIPTION If a door glass does not slide smoothly or a power window regulator motor assembly or door window regulator sub-assembly does not operate smoothly, the jam protection function may be triggered automatically, resulting in the auto up operation being unable to fully close the power window...
Toyota Yaris XP210 (2020-2026) Owner's Manual: SRS Air Bag Deployment Criteria
This chart indicates the applicable SRS equipment that will deploy depending on the type of collision. (The illustrations are the representative cases of collisions.) X:The SRS air bag equipment is designed to deploy in a collision. * 1: The front passenger front and side air bags and the seat belt pretensioner are designed to deploy when the front passenger occupant classification sensor detects a passenger sitting on the front passenger’s seat...
Categories
- Manuals Home
- Toyota Yaris Owners Manual
- Toyota Yaris Service Manual
- Battery Monitor Module General Electrical Failure (P058A01)
- Engine Start Function When Key Battery is Dead
- Headlights
- New on site
- Most important about car
Refueling
Before refueling, close all the doors, windows, and the liftgate/trunk lid, and switch the ignition OFF.
To open the fuel-filler lid, pull the remote fuel-filler lid release.

Copyright © 2026 www.toyaris4.com