Toyota Yaris: Ecm / Components
COMPONENTS
ILLUSTRATION
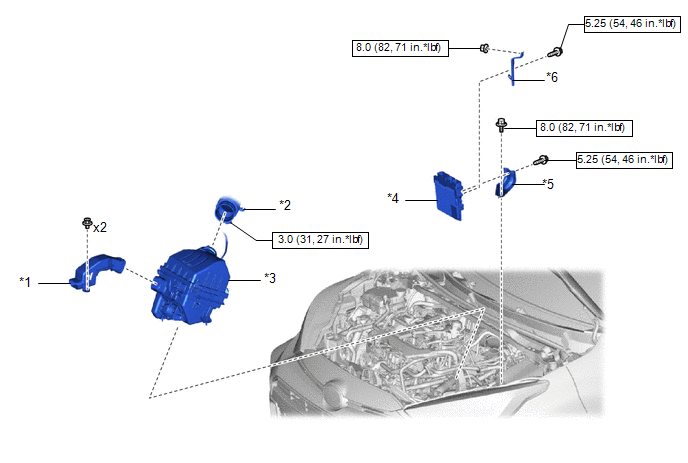
| *1 | NO. 1 AIR CLEANER INLET | *2 | NO. 1 AIR CLEANER HOSE |
| *3 | AIR CLEANER CASE SUB-ASSEMBLY | *4 | ECM |
| *5 | NO. 1 ECM BRACKET | *6 | NO. 2 ECM BRACKET |
 | N*m (kgf*cm, ft.*lbf): Specified torque | - | - |
 Ecm
Ecm
..
 Removal
REMOVAL CAUTION / NOTICE / HINT The necessary procedures (adjustment, calibration, initialization or registration) that must be performed after parts are removed and installed, or replaced during ECM removal/installation are shown below...
Other information:
Toyota Yaris XP210 (2020-2026) Reapir and Service Manual: Internal Control Module Random Access Memory (RAM) Error Data Memory Failure (P060444)
MONITOR DESCRIPTION The ECM continuously monitors its internal memory status. This self-check ensures that the ECM is functioning properly. The ECM memory status is diagnosed by internal mirroring of the main CPU and sub CPU to detect Random Access Memory (RAM) errors...
Toyota Yaris XP210 (2020-2026) Reapir and Service Manual: High Mounted Stop Light Assembly
ComponentsCOMPONENTS ILLUSTRATION *1 CENTER STOP LIGHT ASSEMBLY - - RemovalREMOVAL PROCEDURE 1. REMOVE REAR SPOILER ASSEMBLY Click here 2. REMOVE CENTER STOP LIGHT ASSEMBLY (a) Remove the 2 screws to remove the center stop light assembly...
Categories
- Manuals Home
- Toyota Yaris Owners Manual
- Toyota Yaris Service Manual
- Opening and Closing the Liftgate/Trunk Lid
- Headlights
- Brake System Control Module "A" System Voltage System Voltage Low (C137BA2)
- New on site
- Most important about car
Refueling
Before refueling, close all the doors, windows, and the liftgate/trunk lid, and switch the ignition OFF.
To open the fuel-filler lid, pull the remote fuel-filler lid release.

Copyright © 2026 www.toyaris4.com