Toyota Yaris: Sfi System / Turbocharger Oil Leak and White Smoke
DESCRIPTION
| Type of Oil Leak | Outline | Major Trouble Area |
|---|---|---|
| Internal oil leak (white smoke) | Oil leak from the bearing housing into the compressor housing (intake side) or turbine housing (exhaust side) through the seal ring. Internal oil leaks cannot be seen from outside the turbocharger. If an oil leak occurs from the turbine seal, a large amount of white smoke is emitted from the exhaust pipe. |
|
| External oil leak | Oil leak from inside to outside the turbocharger. (Example: FIPG seal, oil pipe flange, or oil pipe union) Includes oil leaks that are visible outside the turbocharger. |
|
HINT:
- Turbocharger oil leaks are classified into two types, internal oil leaks and external oil leaks.
- The following illustration shows the parts of the turbocharger.
- If an oil leak or white smoke occurs, sometimes the turbocharger is replaced even though it is not the cause of the problem.
- Oil may leak from the seal ring if the turbocharger is placed with its shaft vertical. However, this is unrelated to oil leaks during operation.
- Oil traces on the compressor housing surface or oil at the compressor inlet or outlet can mistakenly be evaluated as a leak from the turbocharger.

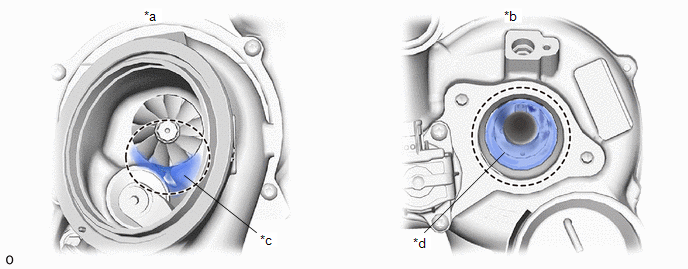
| *1 | Bearing Housing | *2 | Seal Ring |
| *3 | Compressor Inlet | *4 | Compressor Impeller |
| *5 | Compressor Housing | *6 | Turbine Housing |
| *7 | Turbine Wheel | *8 | Turbine Shaft |
| *9 | Oil Drain | - | - |
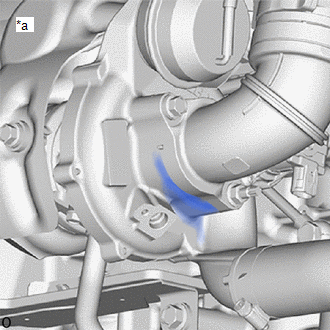
| *a | Internal oil leak to compressor housing | *b | Internal oil leak to turbine housing |
| *c | FIPG Sealing Part | - | - |
| *a | Fig. 1 |
HINT:
Oil staining, as shown in Illustration 1, may result from oil sprayed from turbocharger peripheral parts or oil leaks from the air cleaner hose. Oil staining on the outer surface of the turbocharger does not indicate an oil leak from the turbocharger. It is also unrelated to white smoke. To identify actual turbocharger external oil leaks, check only the seal areas shown in Illustrations 2 and 3.
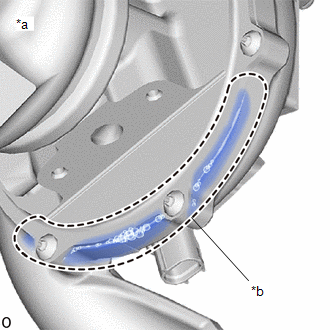
| *a | Fig. 2 | *b | Fig. 3 |
| *c | Oil Existence at Compressor Inlet (Max. 5 cm3) | *d | Oil Existence at Compressor Outlet |
HINT:
- As the blowby gas containing oil mist is returned to the intake system by the PCV, a certain amount of oil enters the intake system. The amount of oil at the compressor inlet shown in Illustration 2 is the normal amount and does not indicate an oil leak (internal oil leak) from the turbocharger. The amount of oil shown at the compressor outlet in Illustration 3 is also the normal amount.
- The surface of the compressor impeller may be blackened by the blowby gas. This does not indicate a malfunction.
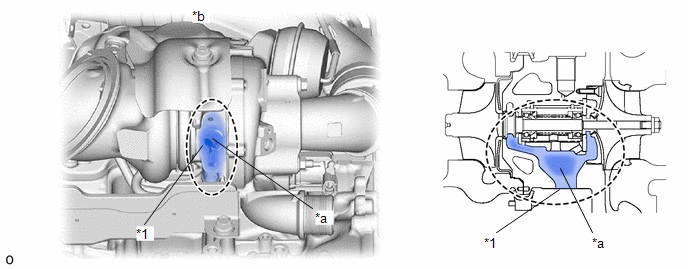
| *a | Fig. 4 |
| *b | In an actual oil leak, oil leaks from the FIPG seal. |
HINT:
Illustration 4 shows how to check for air leaks from the position of an oil leak using soapy water. Bubbles form where the leak is occurring.
Faults and Symptoms of Turbocharger Parts
Compressor Side Seal Ring| Main fault | Seal ring damage |
| Symptom |
|
| Note |
|
| Main fault | Seal ring damage |
| Symptom |
|
| Note |
|
| Main fault | Blocked oil drain due to oil coking |
| Symptom | Large amount of white smoke emitted from the exhaust pipe |
HINT:
- Oil coking results due to inadequate oil management
- If the oil drain is blocked due to oil coking, the oil cannot be removed smoothly. Oil leaking from the bearing housing into the compressor housing and turbine housing generates a large amount of white smoke in the exhaust pipe.
| *1 | Oil Drain | - | - |
| *a | Coked Oil | *b | Oil Drain Clogged with Coked Oil |
| Main fault |
|
| Symptom |
|
| Note |
|
| Main fault | Damage |
| Symptom |
|
| Note |
|
| Main fault | Oil leak from the FIPG seal |
| Symptom |
|
| Main fault | Oil leak from the compressor inlet elbow and intake hose connector. |
| Symptom | If oil stain traces exist at the hose or flange connector, it may be evaluated as a defective hose or flange connection. |
PROCEDURE
| 1. | CHECK TURBOCHARGER SUB-ASSEMBLY (OIL LEAK CHECK) |
(a) Check whether the oil leak is internal or external.
HINT:
White smoke is unrelated to external oil leaks.
| Type of Oil Leak | Outline |
| Internal oil leak (white smoke) | An internal oil leak from the bearing housing into the compressor housing (intake side) or turbine housing (exhaust side) through the seal ring cannot be seen from outside the turbocharger. If an oil leak occurs from the turbine seal, a large amount of white smoke is emitted from the exhaust pipe. |
| External oil leak | Oil leak from inside to outside the turbocharger. (Example: FIPG seal, oil pipe flange, or oil pipe union) Includes oil leaks that are visible outside the turbocharger. |
| Result | Proceed to |
|---|---|
| External oil leak (Oil leak from the contact surface between the compressor housing and the seal plate or between the seal plate and the bearing housing) | A |
| External oil leak (Oil leak from the contact surface between the compressor inlet elbow or the compressor outlet elbow and the compressor housing) | B |
| Internal oil leak | C |
HINT:
Perform "Inspection After Repair" after replacing the turbocharger sub-assembly.
Click here

| A |
 | REPLACE TURBOCHARGER SUB-ASSEMBLY |
| C |
 | GO TO STEP 3 |
|

| 2. | REPAIR OR REPLACE DEFECTIVE PARTS (PARTS LEAKING OIL) |
(a) Repair or replace the parts that are leaking oil.
HINT:
- If oil leaks from the contact surface between the compressor inlet elbow and the compressor housing, the installation may be incorrect due to loose nuts or a defective gasket. Check the installation or replace the gasket.
- If oil leaks from the contact surface between the compressor outlet elbow and the compressor housing, the installation may be incorrect due to loose nuts or a defective gasket. Check the installation or replace the gasket.
| NEXT |
 | END |
| 3. | CHECK TURBOCHARGER SUB-ASSEMBLY (SPECIFIED OIL LEAK POSITION) |
(a) Remove the compressor inlet elbow from the turbocharger sub-assembly.
(b) Check for excessive oil or oil deposits at the compressor inlet.
HINT:
- The PCV gas contains a certain amount of oil mist. This can accumulate in front of the compressor inlet, creating a certain amount of oil, as shown in Illustration 2.
- Excessive oil at the compressor inlet may cause a malfunction in the PCV system.
- A certain amount of oil on the compressor housing surface results from oil mist in the blowby gas and is not a malfunction.
(c) Remove the compressor outlet elbow from the turbocharger sub-assembly.
(d) Check for excessive oil or oil deposits at the compressor outlet.
HINT:
The PCV gas contains a certain amount of oil mist. This can create a certain amount of oil, as shown in Illustration 3.
(e) Remove the converter assembly.
(f) Check for excessive oil or oil deposits in the turbine housing.
HINT:
- Do not mistake carbon soot for oil.
- If the turbocharger shaft is tilted, a small amount of oil flows out of the bearing housing. Do not mistake oil that flows out of the bearing housing during and after removal of the turbocharger sub-assembly for oil that existed before the turbocharger assembly was removed.
- Excessive oil or oil deposits in the turbine inlet comes from a cylinder exhaust port and may indicate a problem with one or more cylinders.
| Result | Proceed to |
|---|---|
| No excessive oil in the compressor inlet or outlet or the turbine housing | A |
| Excessive oil in the compressor inlet or outlet | B |
| Excessive oil in the turbine housing | C |
| A |
 | END (CAUSE CHECK EXCEPT THE TURBO CHARGER) |
| C |
 | GO TO STEP 8 |
|

| 4. | CHECK TURBOCHARGER SUB-ASSEMBLY |
(a) Check for damage to the compressor impeller.
(b) Check for interference between the compressor impeller and the compressor housing.
| Result | Proceed to |
|---|---|
| No damage or interference | A |
| Damage or interference exists | B |
| B |
 | GO TO STEP 7 |
|

| 5. | CHECK TURBOCHARGER SUB-ASSEMBLY |
(a) Check that the turbine shaft rotates smoothly, without catching.
Click here

(b) Check for loose turbine mounting nuts and for axial play in the turbine shaft.
Click here

HINT:
If the turbine shaft catches or if there is no play or excessive play, it could indicate a seal problem due to seizing or poor sliding due to a deposit build up.
Standard value:
0.10 mm (0.00394 in.) or less
| Result | Proceed to |
|---|---|
| No turbine shaft malfunction | A |
| Turbine shaft malfunction | B |
HINT:
Perform "Inspection After Repair" after replacing the turbocharger sub-assembly.
Click here

| B |
 | REPLACE TURBOCHARGER SUB-ASSEMBLY |
|

| 6. | CHECK TURBO OIL INLET PIPE SUB-ASSEMBLY |
(a) Remove the turbo oil inlet pipe sub-assembly.
(b) Check for blockage of the turbo oil inlet pipe sub-assembly due to accumulated deposits or deformation.
HINT:
If no malfunction exists in the turbo oil inlet pipe sub-assembly, there may be a seal defect due to oil coking in the bearing housing.
| Result | Proceed to |
|---|---|
| No clogging | A |
| Clogging | B |
HINT:
Perform "Inspection After Repair" after replacing the turbocharger sub-assembly.
Click here

| A |
 | REPLACE TURBOCHARGER SUB-ASSEMBLY |
| B |
 | REPLACE TURBO OIL INLET PIPE SUB-ASSEMBLY |
| 7. | CHECK TURBOCHARGER SUB-ASSEMBLY |
(a) Check for interference between the turbine wheel and the turbine housing.
| Result | Proceed to |
|---|---|
| No damage or interference | A |
| Damage or interference exists | B |
HINT:
Perform "Inspection After Repair" after replacing the turbocharger sub-assembly.
Click here

| A |
 | REPLACE TURBOCHARGER SUB-ASSEMBLY (BEARING HOUSING) |
| B |
 | REPLACE TURBOCHARGER SUB-ASSEMBLY (BEARING HOUSING AND TURBINE HOUSING) |
| 8. | CHECK TURBOCHARGER SUB-ASSEMBLY |
(a) Check for damage to the turbine wheel.
(b) Check for interference between the turbine wheel and the turbine housing.
| Result | Proceed to |
|---|---|
| The turbine wheel is not damaged and there is no interference between the turbine wheel and turbine housing | A |
| Turbine wheel is damaged (there is no interference between the turbine wheel and turbine housing) | B |
| There is interference between the turbine wheel and turbine housing |
HINT:
Perform "Inspection After Repair" after replacing the turbocharger sub-assembly.
Click here

| A |
 | GO TO STEP 5 |
| B |
 | REPLACE TURBOCHARGER SUB-ASSEMBLY |
 Lost Communication with Stop and Start Control Module Missing Message (U110387)
DESCRIPTION The ECM and engine stop and start ECU send and receive signals via CAN communication. If a communication error occurs between the ECM and engine stop and start ECU, the ECM stores this DTC...
 Turbocharger Noise
DESCRIPTION HINT: Turbocharger noise is classified into two types. These are whistling sound and chattering sound. During troubleshooting, first determine the type of noise...
Other information:
Toyota Yaris XP210 (2020-2026) Reapir and Service Manual: Installation
INSTALLATION PROCEDURE 1. INSTALL MAIN BODY ECU (MULTIPLEX NETWORK BODY ECU) NOTICE: Make sure that the connecting surfaces are free of foreign matter. Do not touch the main body ECU (multiplex network body ECU) connector. (a) Set the main body ECU (multiplex network body ECU) to the position where the guide of the main body ECU (multiplex network body ECU) contacts the housing sidewall of the power distribution box assembly as shown in the illustration...
Toyota Yaris XP210 (2020-2026) Owner's Manual: Warranties for Your Toyota
New Vehicle Limited Warranty Powertrain Limited Warranty Safety Restraint System Limited Warranty Anti-perforation Limited Warranty Federal Emission Control Warranty/California Emission Control Warranty Emission Defect Warranty Emission Performance Warranty Emission Control Warranty Replacement Parts and Accessories Limited Warranty Tire Warranty Warranty information varies depending on the country...
Categories
- Manuals Home
- Toyota Yaris Owners Manual
- Toyota Yaris Service Manual
- Adjustment
- Power Integration No.1 System Missing Message (B235287,B235587,B235787-B235987)
- Engine Start Function When Key Battery is Dead
- New on site
- Most important about car
Refueling
Before refueling, close all the doors, windows, and the liftgate/trunk lid, and switch the ignition OFF.
To open the fuel-filler lid, pull the remote fuel-filler lid release.
