Toyota Yaris: Seat Belt / Tongue Plate Stopper
Components
COMPONENTS
ILLUSTRATION
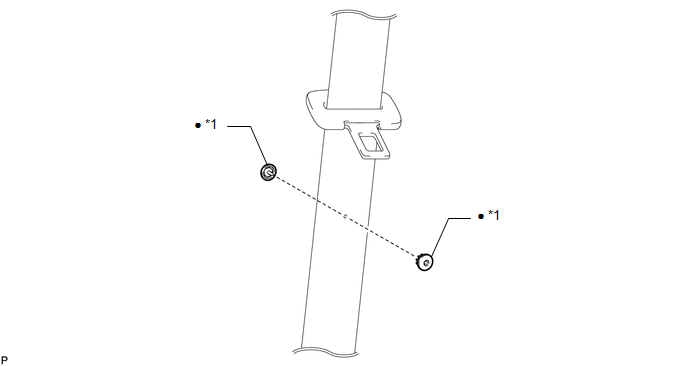
| *1 | TONGUE PLATE STOPPER | - | - |
| ● | Non-reusable part | - | - |
Replacement
REPLACEMENT
PROCEDURE
1. REMOVE TONGUE PLATE STOPPER
| (a) Slide the tongue plate above the installation position of the tongue plate stopper, and temporarily hold it with adhesive tape. |
|
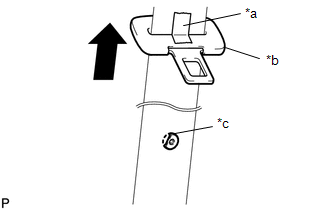
(b) Remove any pieces of the original tongue plate stopper in the belt webbing with a pair of pliers.
NOTICE:
Be careful not to damage the belt webbing during repair.
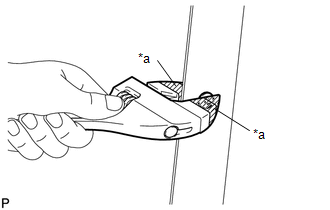
2. INSTALL TONGUE PLATE STOPPER
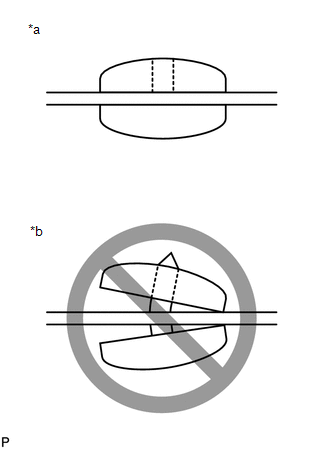
| (a) Position a new tongue plate stopper in the hole of the belt webbing. HINT: Make sure that the installation direction of the tongue plate stopper is as shown in the illustration. |
|

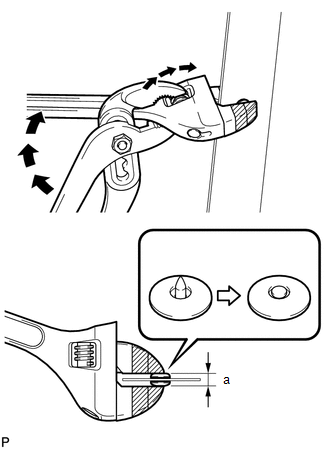
| (b) Hold the tongue plate stopper in the hole of the belt webbing using an adjustable wrench, and turn the adjustment screw of the adjustable wrench by hand to compress the tongue plate stopper. NOTICE:
HINT: Tape the jaws of the adjustable wrench before use. |
|
| (c) When the adjustment screw of the adjustable wrench can no longer be turned by hand, tighten the adjustment screw using a pair of adjustable joint pliers until the tongue plate stopper thickness is 4.5 to 5.0 mm (0.177 to 0.197 in.). (Refer to the illustrations.) Standard Clearance
|
|
| (d) Make sure that the pin of male side of the tongue plate stopper has expanded evenly in the hole of the female part and is firmly held to the belt webbing. (Refer to the illustrations.) |
|
 Rear Seat Belt Warning Light Malfunction
DESCRIPTION The main body ECU (multiplex network body ECU) detects whether either the rear doors are open or closed based on the courtesy light switch condition and then sends the rear door status signal to the combination meter assembly...

Other information:
Toyota Yaris XP210 (2020-2026) Reapir and Service Manual: Freeze Frame Data
FREEZE FRAME DATA DESCRIPTION The ECM records vehicle and driving condition information as Freeze Frame Data the moment a DTC is stored. When troubleshooting, Freeze Frame Data can be helpful in determining whether the vehicle was moving or stationary, whether the engine was warmed up or not, whether the air fuel ratio was lean or rich, as well as other data recorded at the time of a malfunction...
Toyota Yaris XP210 (2020-2026) Owner's Manual: Child-Restraint System Installation
In this owner’s manual, explanation of child-restraint systems is provided for the following three types of popular child-restraint systems: infant seat, child seat, booster seat. Infant seat An infant seat provides restraint by bracing the infant’s head, neck and back against the seating surface...
Categories
- Manuals Home
- Toyota Yaris Owners Manual
- Toyota Yaris Service Manual
- Diagnostic Trouble Code Chart
- Power Integration No.1 System Missing Message (B235287,B235587,B235787-B235987)
- Fuse Panel Description
- New on site
- Most important about car
Key Suspend Function
If a key is left in the vehicle, the functions of the key left in the vehicle are temporarily suspended to prevent theft of the vehicle.
To restore the functions, press the unlock button on the functions-suspended key in the vehicle.