Toyota Yaris: Supplemental Restraint Systems / Telltale Light Assembly
Components
COMPONENTS
ILLUSTRATION
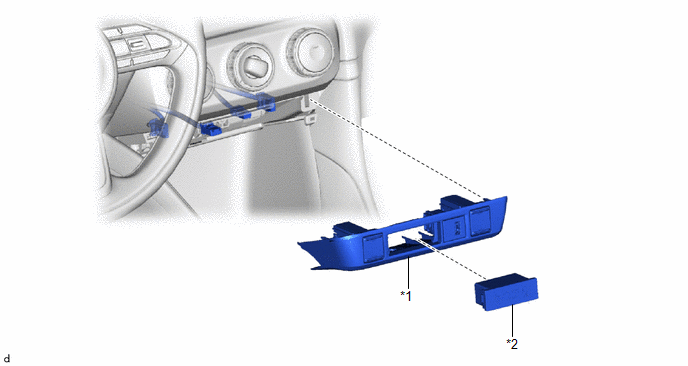
| *1 | SWITCH HOLE BASE SUB-ASSEMBLY | *2 | TELLTALE LIGHT ASSEMBLY |
Removal
REMOVAL
PROCEDURE
1. REMOVE SWITCH HOLE BASE SUB-ASSEMBLY
Click here

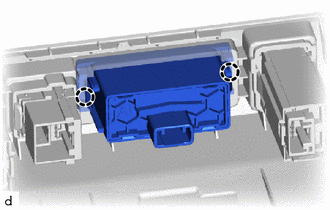
2. REMOVE TELLTALE LIGHT ASSEMBLY
| (a) Disengage the 2 claws to remove the telltale light assembly. |
|
Inspection
INSPECTION
PROCEDURE
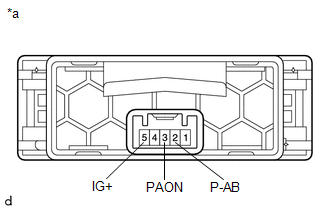
1. INSPECT PASSENGER AIRBAG ON/OFF INDICATOR (TELLTALE LIGHT ASSEMBLY)
| (a) Apply auxiliary battery voltage to the connector and check the passenger airbag ON/OFF indicator (telltale light assembly) condition. OK:
If the result is not as specified, replace the passenger airbag ON/OFF indicator (telltale light assembly). |
|
Installation
INSTALLATION
PROCEDURE
1. INSTALL TELLTALE LIGHT ASSEMBLY
(a) Engage the 2 claws to install the telltale light assembly.
2. INSTALL SWITCH HOLE BASE SUB-ASSEMBLY
Click here

 Disposal
DISPOSAL CAUTION / NOTICE / HINT CAUTION: Before performing pre-disposal deployment of any SRS part, review and closely follow all applicable environmental and hazardous material regulations...

Other information:
Toyota Yaris XP210 (2020-2026) Reapir and Service Manual: Fuel Pump Control Module Internal Electronic Failure (P064A49)
MONITOR DESCRIPTION The fuel pump control ECU has a self-diagnosis function. If there is an internal malfunction, the fuel pump control ECU sends a malfunction signal to the ECM via the FPC drive circuit. Based on the signal, the ECM judges that there is a malfunction in the fuel pump control ECU stores a DTC...
Toyota Yaris XP210 (2020-2026) Reapir and Service Manual: Inspection
INSPECTION PROCEDURE 1. INSPECT ENGINE COOLANT TEMPERATURE SENSOR CAUTION: Do not put your hands into the water that has been heated for the inspection. Touching the heated water could result in burns. (a) Measure the resistance according to the value(s) in the table below...
Categories
- Manuals Home
- Toyota Yaris Owners Manual
- Toyota Yaris Service Manual
- How to connect USB port/Auxiliary jack
- To Set Speed
- Opening and Closing the Liftgate/Trunk Lid
- New on site
- Most important about car
Refueling
Before refueling, close all the doors, windows, and the liftgate/trunk lid, and switch the ignition OFF.
To open the fuel-filler lid, pull the remote fuel-filler lid release.
