Toyota Yaris: Rear Seat Inner Belt Assembly / Removal
REMOVAL
PROCEDURE
1. REMOVE BENCH TYPE REAR SEAT CUSHION ASSEMBLY
Click here

2. REMOVE REAR SEAT CUSHION LOCK HOOK
Click here

3. REMOVE REAR SEAT INNER BELT ASSEMBLY LH
| (a) Disconnect the connector. |
|
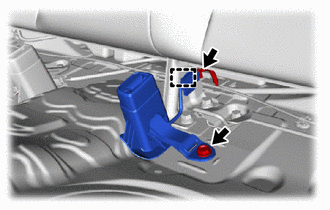
(b) Disengage the connector clamp.
(c) Remove the bolt and rear seat inner belt assembly LH.
4. REMOVE REAR SEAT INNER BELT ASSEMBLY RH
| (a) Disconnect the connector. |
|
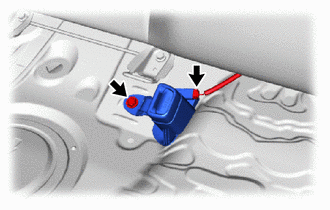
(b) Remove the bolt and rear seat inner belt assembly RH.
 Components
COMPONENTS ILLUSTRATION
*1 BENCH TYPE REAR SEAT CUSHION ASSEMBLY *2 REAR SEAT CUSHION LOCK HOOK *3 REAR SEAT INNER BELT ASSEMBLY LH *4 REAR SEAT INNER BELT ASSEMBLY RH
Tightening torque for "Major areas involving basic vehicle performance such as moving/turning/stopping" : N*m (kgf*cm, ft...
 Inspection
INSPECTION PROCEDURE 1. INSPECT REAR SEAT INNER BELT ASSEMBLY LH (a) Measure the resistance according to the value(s) in the table below. Standard Resistance: Tester Connection Condition Specified Condition
If the result is not as specified, replace the rear seat inner belt assembly LH...
Other information:
Toyota Yaris XP210 (2020-2026) Owner's Manual: Fuel Economy Data Reset and Trip Meter (TRIP A) Synchronization (Linking)
Because the average fuel economy indication on the instrument cluster display is linked with the “Average Fuel Economy History” (Current) indication on the center display, when one is reset the other is also reset. In addition, switching between reset and no reset of the average fuel economy indication on the instrument cluster display and the “Average Fuel Economy History” (Current) indication on the center display when resetting the trip meter (Trip A) is possible...
Toyota Yaris XP210 (2020-2026) Reapir and Service Manual: A/F (O2) Sensor Signal Biased/Stuck Lean Bank 1 Sensor 1 Circuit Current Above Threshold (P219519,P219524,P219618,P219623)
DESCRIPTION Refer to DTC P003012. Click here DTC No. Detection Item DTC Detection Condition Trouble Area MIL Note P219519 A/F (O2) Sensor Signal Biased/Stuck Lean Bank 1 Sensor 1 Circuit Current Above Threshold While the fuel-cut operation is performed (during vehicle deceleration), the air fuel ratio sensor (sensor 1) current is 2...
Categories
- Manuals Home
- Toyota Yaris Owners Manual
- Toyota Yaris Service Manual
- G16e-gts (engine Mechanical)
- Adjustment
- Opening and Closing the Liftgate/Trunk Lid
- New on site
- Most important about car
Refueling
Before refueling, close all the doors, windows, and the liftgate/trunk lid, and switch the ignition OFF.
To open the fuel-filler lid, pull the remote fuel-filler lid release.

Copyright © 2026 www.toyaris4.com