Toyota Yaris: Air Conditioning Panel / Removal
REMOVAL
PROCEDURE
1. REMOVE CENTER LOWER INSTRUMENT COVER
Click here

2. REMOVE LOWER INSTRUMENT PANEL FINISH PANEL
Click here

3. REMOVE SWITCH HOLE BASE SUB-ASSEMBLY
Click here

4. REMOVE SHIFT LEVER KNOB SUB-ASSEMBLY
Click here

5. REMOVE CONSOLE BOX ASSEMBLY
Click here

6. REMOVE FRONT DOOR SCUFF PLATE LH
Click here

7. REMOVE COWL SIDE TRIM BOARD LH
Click here

8. DISCONNECT FRONT DOOR OPENING TRIM WEATHERSTRIP LH
Click here

9. REMOVE NO. 1 INSTRUMENT SIDE PANEL
Click here

10. REMOVE NO. 1 INSTRUMENT PANEL UNDER COVER SUB-ASSEMBLY
Click here

11. REMOVE LOWER INSTRUMENT PANEL FINISH PANEL ASSEMBLY
Click here

12. REMOVE AIR CONDITIONING CONTROL ASSEMBLY
| (a) Disengage the clips. |
|
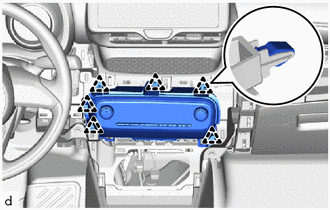
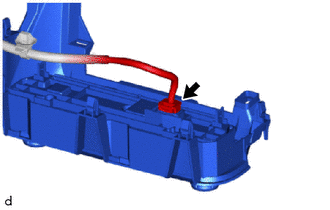
| (b) Disconnect the connector to remove the air conditioning control assembly. |
|
 Components
COMPONENTS ILLUSTRATION
*1 CENTER LOWER INSTRUMENT COVER *2 SWITCH HOLE BASE SUB-ASSEMBLY *3 SHIFT LEVER KNOB SUB-ASSEMBLY *4 LOWER INSTRUMENT PANEL FINISH PANEL *5 FRONT DOOR SCUFF PLATE LH *6 COWL SIDE TRIM BOARD LH *7 FRONT DOOR OPENING TRIM WEATHERSTRIP LH *8 NO...
 Inspection
INSPECTION PROCEDURE 1. INSPECT AIR CONDITIONING CONTROL ASSEMBLY (a) Check the illumination. (1) Apply auxiliary battery voltage to the air conditioning control assembly and check that the illumination...
Other information:
Toyota Yaris XP210 (2020-2026) Reapir and Service Manual: Problem Symptoms Table
PROBLEM SYMPTOMS TABLE NOTICE: If the main body ECU (multiplex network body ECU) is replaced, refer to the Registration. Click here HINT: Use the table below to help determine the cause of problem symptoms. If multiple suspected areas are listed, the potential causes of the symptoms are listed in order of probability in the "Suspected Area" column of the table...
Toyota Yaris XP210 (2020-2026) Reapir and Service Manual: Security Indicator Light Does not Blink
DESCRIPTION The certification ECU (smart key ECU assembly) blinks the security indicator light (combination meter assembly) when the immobiliser is set (engine switch off). The certification ECU (smart key ECU assembly) receives the security indicator light signal from the main body ECU (multiplex network body ECU) via CAN communication when the theft deterrent system is in the arming preparation state or alarm sounding state...
Categories
- Manuals Home
- Toyota Yaris Owners Manual
- Toyota Yaris Service Manual
- How to use USB mode
- Headlights
- Fuse Panel Description
- New on site
- Most important about car
Front Seat Belt Pretensioners
The front seat belt pretensioners are designed to deploy in moderate or severe frontal, near frontal collisions.
In addition, the pretensioners operate when a side collision or a rollover accident is detected. The pretensioners operate differently depending on what types of air bags are equipped. For more details about the seat belt pretensioner operation, refer to the SRS Air Bag Deployment Criteria.