Toyota Yaris: Name Plate / Removal
REMOVAL
CAUTION / NOTICE / HINT
HINT:
When removing the name plates, heat the vehicle body, back door outside garnish and name plates using a heat light.
Heating Temperature| Item | Temperature |
|---|---|
| 40 to 60°C (104 to 140°F) |
| 20 to 30°C (68 to 86°F) |
CAUTION:
- Do not touch the heat light and heated parts, touching the heat light may result in burns.
- Touching heated parts for a long time may result in burns.
.png)
| *a | Heated Part |
| *b | Heat Light |
NOTICE:
Do not heat the vehicle body, back door outside garnish or name plates excessively.
PROCEDURE
1. REMOVE SYMBOL EMBLEM
(a) Apply protective tape around the symbol emblem as shown in the illustration.
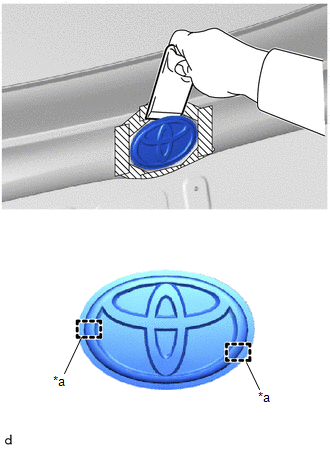
| *a | Location Pin |
.png) | Protective Tape |
(b) Using a moulding remover D, separate the double-sided tape and disengage the location pins to remove the symbol emblem.
NOTICE:
Be careful not to damage the back door outside garnish.
(c) Remove the protective tape.
2. REMOVE NO. 4 BACK DOOR NAME PLATE
(a) Apply protective tape around the No. 4 back door name plate as shown in the illustration.
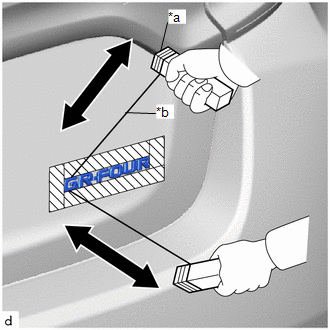
| *a | Wooden Block |
| *b | Piano Wire |
.png) | Protective Tape |
(b) Insert a piano wire between the back door panel and No. 4 back door name plate.
(c) Tie objects that can serve as handles (for example, wooden blocks) to both wire ends.
(d) Pull the piano wire and cut the double-sided tape that holds the No. 4 back door name plate to the back door panel to remove the No. 4 back door name plate.
NOTICE:
Be careful not to damage the back door panel.
(e) Remove the protective tape.
3. REMOVE NO. 2 BACK DOOR NAME PLATE
(a) Apply protective tape around the No. 2 back door name plate as shown in the illustration.
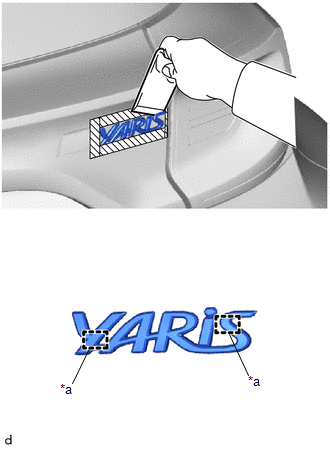
| *a | location pin |
.png) | Protective Tape |
(b) Using a moulding remover D, separate the double-sided tape and disengage the location pins to remove the No. 2 back door name plate.
NOTICE:
Be careful not to damage the back door outside garnish.
(c) Remove the protective tape.
4. REMOVE NO. 1 BACK DOOR NAME PLATE
(a) Apply protective tape around the No. 1 back door name plate as shown in the illustration.
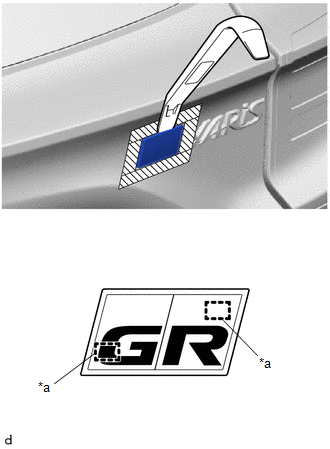
| *a | location pin |
.png) | Protective Tape |
(b) Using a moulding remover A, separate the double-sided tape and disengage the location pins to remove the No. 1 back door name plate.
NOTICE:
Be careful not to damage the back door outside garnish.
(c) Remove the protective tape.
5. REMOVE NO. 1 FRONT FENDER NAME PLATE
HINT:
Use the same procedure for the RH side and LH side.
(a) Apply protective tape around the No. 1 front fender name plate as shown in the illustration.
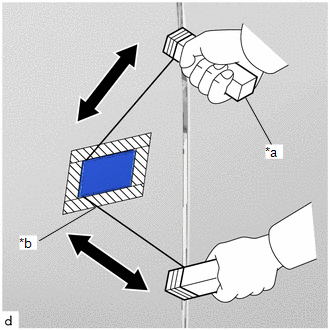
| *a | Wooden Block |
| *b | Piano Wire |
.png) | Protective Tape |
(b) Insert a piano wire between the vehicle body and No. 1 front fender name plate.
(c) Tie objects that can serve as handles (for example, wooden blocks) to both wire ends.
(d) Pull the piano wire and cut the double-sided tape that holds the No. 1 front fender name plate to the vehicle body to remove the No. 1 front fender name plate.
NOTICE:
Be careful not to damage the vehicle body.
(e) Remove the protective tape.
 Components
COMPONENTS ILLUSTRATION
*1 SYMBOL EMBLEM *2 NO. 4 BACK DOOR NAME PLATE *3 NO. 2 BACK DOOR NAME PLATE - - ● Non-reusable part - - ILLUSTRATION
*1 NO...
 Rear Bumper
..
Other information:
Toyota Yaris XP210 (2020-2026) Reapir and Service Manual: Steering Angle Sensor Module Signal Stuck In Range (C05262A)
DESCRIPTION The skid control ECU (brake actuator assembly) receives signals from the steering sensor via CAN communication. HINT: When a malfunction occurs in the communication line to the steering sensor, U012687 is output. If a DTC related to the CAN communication line is output, first troubleshoot the CAN communication line...
Toyota Yaris XP210 (2020-2026) Reapir and Service Manual: Installation
INSTALLATION PROCEDURE 1. INSTALL STEERING WHEEL SWITCH HOUSING (a) When reusing the steering wheel switch housing: (1) Using pliers, expand the clamp and temporarily install the steering wheel switch housing as shown in the illustration. (2) While holding the clamp expanded, engage the claw to install the steering wheel switch housing as shown in the illustration...
Categories
- Manuals Home
- Toyota Yaris Owners Manual
- Toyota Yaris Service Manual
- Adjustment
- Diagnostic Trouble Code Chart
- To Set Speed
- New on site
- Most important about car
Liftgate/Trunk Lid
WARNING
Never allow a person to ride in the luggage compartment/trunk
Allowing a person to ride in the luggage compartment/trunk is dangerous. The person in the luggage compartment/trunk could be seriously injured or killed during sudden braking or a collision.
Do not drive with the liftgate/trunk lid open
