Toyota Yaris: Rear Shock Absorber / Removal
REMOVAL
CAUTION / NOTICE / HINT
The necessary procedures (adjustment, calibration, initialization, or registration) that must be performed after parts are removed and installed, or replaced during rear shock absorber assembly removal/installation are shown below.
Necessary Procedures After Parts Removed/Installed/Replaced| Replaced Part or Performed Procedure | Necessary Procedure | Effect/Inoperative Function when Necessary Procedure not Performed | Link |
|---|---|---|---|
| Rear wheel alignment adjustment | ECU Data Initialization | Active torque split AWD system |
|
| Calibration |
|
|
HINT:
- Use the same procedure for the RH side and LH side.
- The following procedure is for the LH side.
PROCEDURE
1. REMOVE REAR WHEEL
Click here

2. LOOSEN REAR SHOCK ABSORBER ASSEMBLY
| (a) Loosen the nut of the rear shock absorber assembly. NOTICE: Hold the rear axle carrier pin while rotating the nut. |
|
3. REMOVE REAR STABILIZER LINK ASSEMBLY
Click here

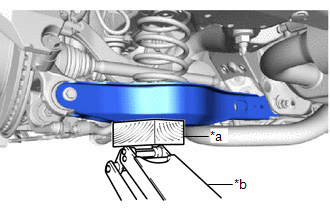
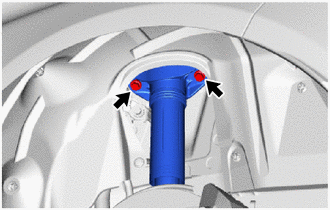
4. SEPARATE REAR SHOCK ABSORBER ASSEMBLY
| (a) Using a jack and a wooden block, support the rear No. 2 suspension arm assembly. NOTICE:
|
|
| (b) Remove the 2 bolts and separate the rear shock absorber assembly from the vehicle body. |
|
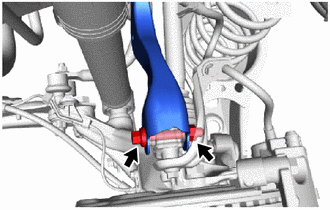
5. SEPARATE REAR UPPER CONTROL ARM ASSEMBLY
| (a) Remove the bolt and nut, and separate the rear upper control arm assembly from the rear axle carrier sub-assembly. NOTICE: Loosen the bolt with the nut secured. |
|
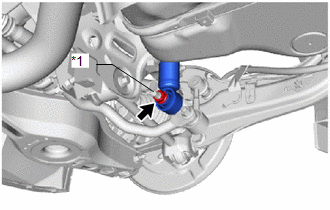
6. REMOVE REAR SHOCK ABSORBER ASSEMBLY
| (a) Remove the nut, plate washer and rear shock absorber assembly from the rear axle carrier sub-assembly. NOTICE: Hold the rear axle carrier pin while rotating the nut. |
|
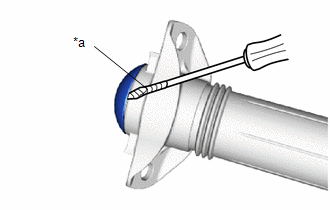
7. REMOVE REAR SHOCK ABSORBER CAP
| (a) Using a screwdriver with its tip wrapped with protective tape, remove the rear shock absorber cap from the rear shock absorber assembly. |
|
8. REMOVE REAR SUSPENSION SUPPORT ASSEMBLY
(a) Secure the rear shock absorber assembly in a vise using aluminum plates.
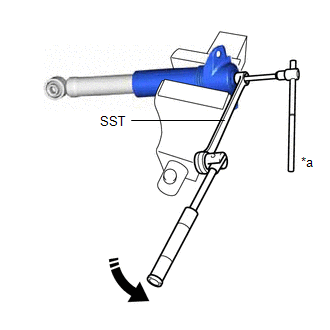
| *a | Hold |
 | Turn |
NOTICE:
Do not overtighten the vise.
(b) Using SST and a 6 mm hexagon socket wrench, hold the rear shock absorber rod and remove the rear support to rear shock absorber nut.
SST: 09729-00170
(c) Remove the rear suspension support assembly from the rear shock absorber assembly.
 Components
COMPONENTS ILLUSTRATION
*1 REAR SHOCK ABSORBER ASSEMBLY *2 REAR STABILIZER LINK ASSEMBLY *3 REAR UPPER CONTROL ARM ASSEMBLY *4 REAR STABILIZER BAR *5 CAP - -
Tightening torque for "Major areas involving basic vehicle performance such as moving/turning/stopping" : N*m (kgf*cm, ft...
 Inspection
INSPECTION PROCEDURE 1. INSPECT REAR SHOCK ABSORBER ASSEMBLY (a) Compress and extend the rear shock absorber rod 4 times or more. Standard: When compressed and extended at a constant speed, the stroke of the shock absorber rod is smooth with no abnormal resistance or sounds...
Other information:
Toyota Yaris XP210 (2020-2026) Reapir and Service Manual: Electrical Key Oscillator (for Rear Floor)
ComponentsCOMPONENTS ILLUSTRATION *1 DECK BOARD ASSEMBLY *2 DECK FLOOR BOX LH *3 DECK FLOOR BOX RH *4 NO. 2 INDOOR ELECTRICAL KEYANTENNA ASSEMBLY RemovalREMOVAL PROCEDURE 1. REMOVE DECK BOARD ASSEMBLY Click here 2. REMOVE DECK FLOOR BOX RH Click here 3...
Toyota Yaris XP210 (2020-2026) Reapir and Service Manual: Inspection
INSPECTION PROCEDURE 1. INSPECT REAR SEAT OUTER BELT ASSEMBLY (a) Before installing the rear seat outer belt assembly, check the ELR function. NOTICE: Do not disassemble the retractor. (1) When the inclination of the retractor is 12° or less, check that the belt can be pulled from the retractor...
Categories
- Manuals Home
- Toyota Yaris Owners Manual
- Toyota Yaris Service Manual
- Headlights
- Auto Lock/Unlock Function
- Engine & Hybrid System
- New on site
- Most important about car
Front Seat Belt Pretensioners
The front seat belt pretensioners are designed to deploy in moderate or severe frontal, near frontal collisions.
In addition, the pretensioners operate when a side collision or a rollover accident is detected. The pretensioners operate differently depending on what types of air bags are equipped. For more details about the seat belt pretensioner operation, refer to the SRS Air Bag Deployment Criteria.


