Toyota Yaris: Active Torque Split Awd System / Parts Location
PARTS LOCATION
ILLUSTRATION
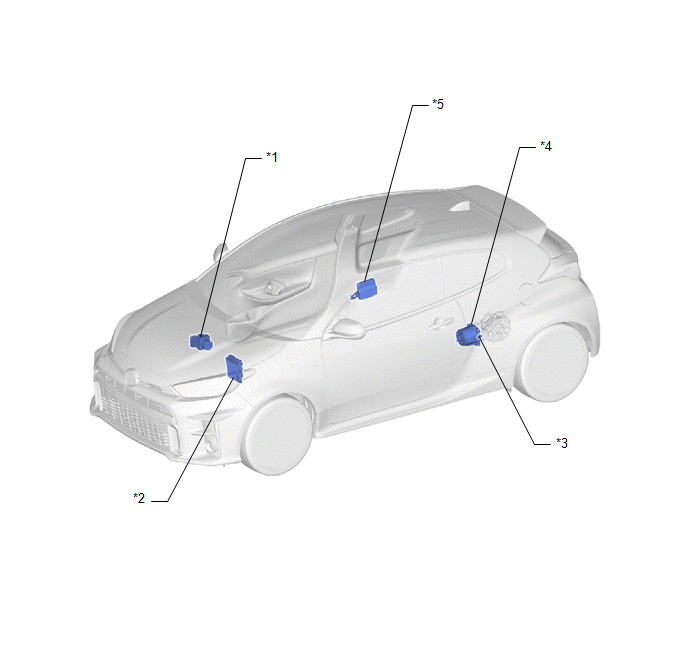
| *1 | BRAKE ACTUATOR ASSEMBLY - SKID CONTROL ECU | *2 | ECM |
| *3 | TEMPERATURE SENSOR | *4 | AWD LINEAR SOLENOID (TRANSMISSION COUPLING ASSEMBLY) |
| *5 | AWD ECU ASSEMBLY | - | - |
ILLUSTRATION
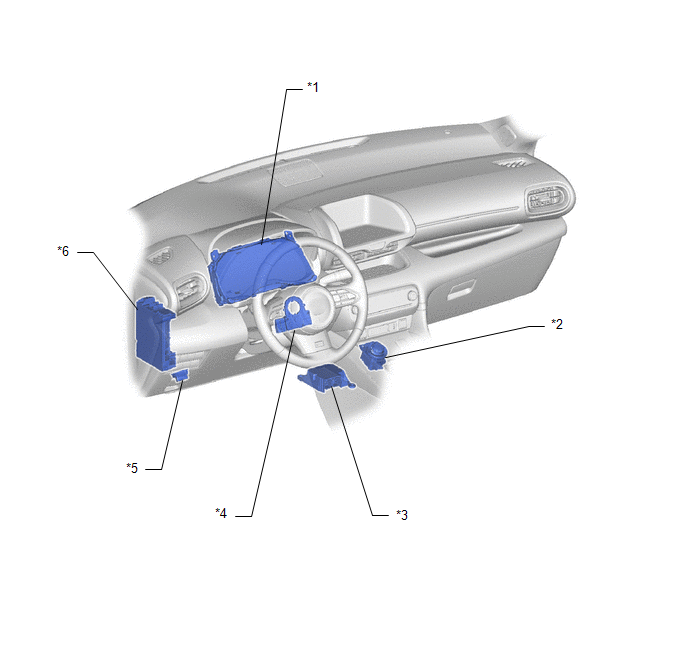
| *1 | COMBINATION METER ASSEMBLY - AWD WARNING (MULTI-INFORMATION DISPLAY) | *2 | AWD CONTROL SWITCH (NO. 2 COMBINATION SWITCH ASSEMBLY) |
| *3 | YAW RATE AND ACCELERATION SENSOR (AIRBAG SENSOR ASSEMBLY) | *4 | STEERING SENSOR |
| *5 | DLC3 | *6 | POWER DISTRIBUTION BOX ASSEMBLY - ECU-B NO. 3 FUSE - ECU-IGR NO. 3 FUSE |
 Precaution
PRECAUTION TROUBLESHOOTING PRECAUTION NOTICE:
Since the Active Torque Split AWD System may be influenced by a malfunction in other systems, be sure to check for DTCs in the other systems...
 System Diagram
S..
Other information:
Toyota Yaris XP210 (2020-2026) Reapir and Service Manual: Diagnostic Trouble Code Chart
D..
Toyota Yaris XP210 (2020-2026) Reapir and Service Manual: Inspection
INSPECTION PROCEDURE 1. INSPECT PROPELLER SHAFT WITH CENTER BEARING ASSEMBLY (a) Using a dial indicator, measure the propeller shaft runout for the front side. Maximum Runout: 0.4 mm (0.0157 in.) If the runout is more than the maximum, replace the propeller shaft with center bearing assembly...
Categories
- Manuals Home
- Toyota Yaris Owners Manual
- Toyota Yaris Service Manual
- Opening and Closing the Liftgate/Trunk Lid
- Fuel Gauge
- Adjustment
- New on site
- Most important about car
Refueling
Before refueling, close all the doors, windows, and the liftgate/trunk lid, and switch the ignition OFF.
To open the fuel-filler lid, pull the remote fuel-filler lid release.

Copyright © 2026 www.toyaris4.com