Toyota Yaris: Brake Master Cylinder / Installation
INSTALLATION
PROCEDURE
1. INSTALL BRAKE MASTER CYLINDER O-RING
(a) Install a new brake master cylinder O-ring to the brake master cylinder sub-assembly.
2. INSTALL BRAKE MASTER CYLINDER SUB-ASSEMBLY
NOTICE:
When installing a new brake master cylinder sub-assembly, remove the protectors from the master cylinder piston and outlet ports.
(a) When installing a new brake master cylinder reservoir assembly or a new brake master cylinder sub-assembly, remove the protector from the brake master cylinder reservoir assembly.
(b) Install the brake master cylinder sub-assembly to the brake booster assembly with the 2 nuts.
Torque:
12.5 N·m {127 kgf·cm, 9 ft·lbf}
NOTICE:
- The brake master cylinder sub-assembly requires careful handling. Do not drop or subject the brake master cylinder sub-assembly to any impact. Do not reuse a brake master cylinder sub-assembly that has been dropped.
- Do not hold the brake master cylinder sub-assembly by the master cylinder piston. Hold the brake master cylinder sub-assembly by its body or its reservoir when carrying it.
- Do not pull out the master cylinder piston.
- Do not strike or pinch the master cylinder piston, or cause any damage to the master cylinder piston by any other means.
- When installing the brake master cylinder sub-assembly to the brake booster assembly, or when removing the brake master cylinder sub-assembly from the brake booster assembly, make sure that the brake master cylinder sub-assembly is kept horizontal or with its tip facing downward (the master cylinder piston is facing upward) to prevent the master cylinder piston from falling out.
- Do not allow any foreign matter to contaminate the master cylinder piston. If any foreign matter gets on the master cylinder piston, remove it by using a piece of new and dry cloth. Do not use water or detergent. Then apply an even layer of lithium soap base glycol grease around the circumference (sliding part) of the master cylinder piston.
- Do not use any other types of grease.
- Do not kink or damage the brake lines.
- Do not allow the brake lines to twist or interfere with other parts or the vehicle body during tightening.
- Do not allow any foreign matter such as dirt or dust to enter the brake lines from the connecting parts.
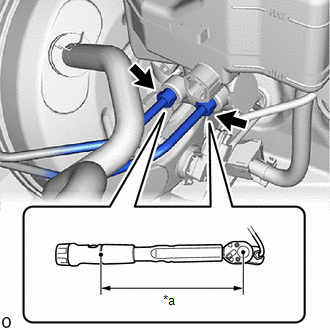
| (c) Using a union nut wrench, connect the 2 brake lines to the brake master cylinder sub-assembly. Torque: Specified tightening torque : 19.5 N·m {199 kgf·cm, 14 ft·lbf} NOTICE:
HINT:
|
|

(d) Engage the 2 clamps to the brake master cylinder reservoir assembly.
(e) Connect the connector to the brake master cylinder reservoir assembly.
3. CONNECT NO. 1 CLUTCH RESERVOIR HOSE
(a) Connect the No. 1 clutch reservoir hose to the brake master cylinder reservoir assembly and slide the clip to secure it.

| *a | Paint Mark |
 | Up |
NOTICE:
- When connecting the No. 1 clutch reservoir hose, face the paint mark up.
- Make sure that the tabs of the clip are aligned as shown in the illustration.
4. BLEED BRAKE SYSTEM
Click here

5. BLEED CLUTCH LINE
Click here

6. INSTALL ECM
Click here

7. INSTALL OUTER COWL TOP PANEL SUB-ASSEMBLY
Click here

8. INSTALL WATER GUARD PLATE RH
Click here

9. INSTALL FRONT NO. 1 VENTILATOR SEAL
Click here

10. INSTALL WINDSHIELD WIPER MOTOR AND LINK
Click here

 Reassembly
REASSEMBLY PROCEDURE 1. INSTALL BRAKE MASTER CYLINDER RESERVOIR STRAINER (a) Install the brake master cylinder reservoir strainer to the brake master cylinder reservoir assembly...
 Brake Pedal
..
Other information:
Toyota Yaris XP210 (2020-2026) Reapir and Service Manual: Freeze Frame Data
FREEZE FRAME DATA FREEZE FRAME DATA (a) When a DTC is stored, the AWD ECU assembly stores the current vehicle state as Freeze Frame Data. HINT: Freeze Frame Data at the time a DTC is stored: When the AWD ECU assembly stores data at the time a DTC is stored, no updates will be performed until the data is cleared...
Toyota Yaris XP210 (2020-2026) Reapir and Service Manual: On-vehicle Inspection
ON-VEHICLE INSPECTION CAUTION / NOTICE / HINT CAUTION: When working near the engine room while the engine has started or the power source mode is engine switch on (IG), do not touch the fan and generator V belt or rotating components such as the fan, etc...
Categories
- Manuals Home
- Toyota Yaris Owners Manual
- Toyota Yaris Service Manual
- Fuel Gauge
- How to use USB mode
- How to connect USB port/Auxiliary jack
- New on site
- Most important about car
Front Seat Belt Pretensioners
The front seat belt pretensioners are designed to deploy in moderate or severe frontal, near frontal collisions.
In addition, the pretensioners operate when a side collision or a rollover accident is detected. The pretensioners operate differently depending on what types of air bags are equipped. For more details about the seat belt pretensioner operation, refer to the SRS Air Bag Deployment Criteria.