Toyota Yaris: Front Seat Assembly / Installation
INSTALLATION
CAUTION / NOTICE / HINT
CAUTION:
Wear protective gloves. Sharp areas on the parts may injure your hands.
HINT:
- Use the same procedure for the driver side and front passenger side.
- The procedure listed below is for the driver side.
PROCEDURE
1. INSTALL FRONT SEAT ASSEMBLY
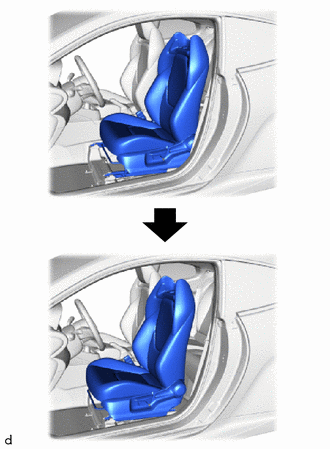
| (a) Place the front seat assembly in the cabin. NOTICE:
|
|

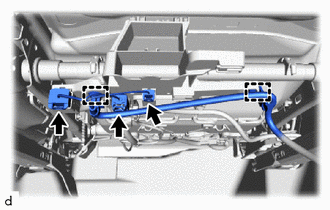
| (b) for Driver Side: (1) Engage the clamps. (2) Connect the connectors. (3) Connect the airbag connector. NOTICE: When connecting any airbag connector, take care not to damage the airbag wire harness. HINT: Refer to How to Connect or Disconnect Airbag Connector: Click here
|
|

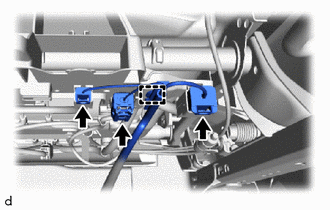
| (c) for Front Passenger Side: (1) Engage the clamp. (2) Connect the connectors. (3) Connect the airbag connector. NOTICE: When connecting any airbag connector, take care not to damage the airbag wire harness. HINT: Refer to How to Connect or Disconnect Airbag Connector: Click here
|
|

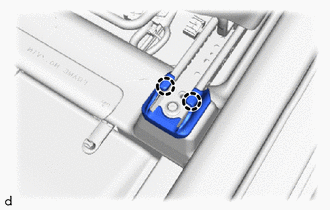
(d) Temporarily install the front seat assembly with the 4 bolts.
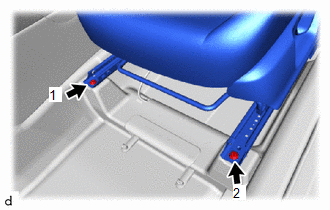
| (e) Operate the seat track adjusting handle to move the front seat assembly to the frontmost position. NOTICE: Make sure to keep the seat track locked. |
|

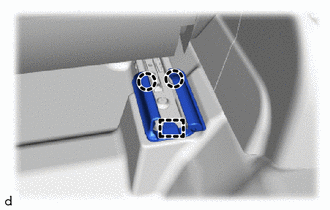
| (f) Using a T50 "TORX" socket wrench, tighten the 2 bolts on the rear side of the front seat assembly. Torque: 37 N·m {377 kgf·cm, 27 ft·lbf} NOTICE: Tighten the bolts in the order shown in the illustration. |
|
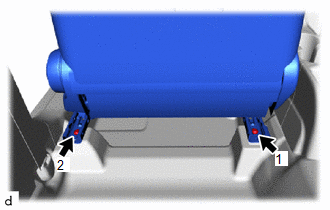
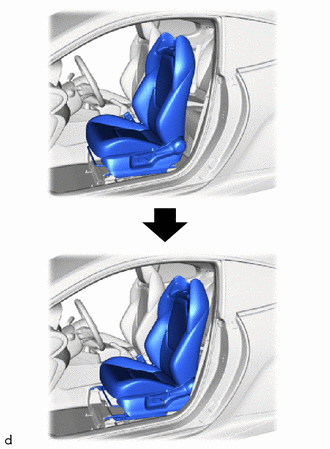
| (g) Operate the seat track adjusting handle to move the front seat assembly to the rearmost position. NOTICE: Make sure to keep the seat track locked. |
|

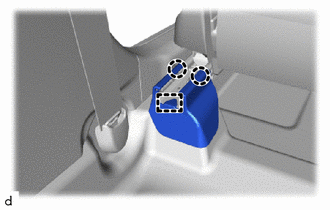
| (h) Using a T50 "TORX" socket wrench, tighten the 2 bolts on the front side of the front seat assembly. Torque: 37 N·m {377 kgf·cm, 27 ft·lbf} NOTICE: Tighten the bolts in the order shown in the illustration. |
|
2. INSPECT SEAT SLIDE ADJUSTER LOCK
(a) While performing a sliding operation of the front seat assembly, check that the left and right adjusters move together smoothly and lock simultaneously. If the seat adjusters do not lock simultaneously, loosen the front seat assembly installation bolts and adjust the adjuster position.
3. INSTALL INNER SEAT TRACK BRACKET COVER
| (a) Operate the seat track adjusting handle and move the front seat assembly to the frontmost position. |
|
| (b) Engage the claws and guide to install the rear outer seat track bracket cover. |
|
4. INSTALL OUTER SEAT TRACK BRACKET COVER
| (a) Engage the claws and guide to install the rear inner seat track bracket cover. |
|
5. INSTALL FRONT INNER SEAT TRACK BRACKET COVER
| (a) Operate the seat track adjusting handle and move the front seat assembly to the rearmost position. |
|
| (b) Engage the claws to install the front inner seat track bracket cover. |
|

6. INSTALL FRONT OUTER SEAT TRACK BRACKET COVER
| (a) Engage the claws to install the front outer seat track bracket cover. |
|
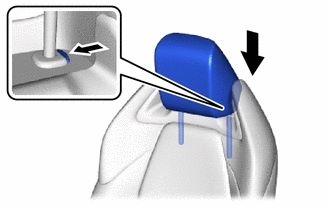
7. INSTALL FRONT SEAT HEADREST ASSEMBLY
| (a) Install the front seat headrest assembly. |
|
8. CONNECT CABLE TO NEGATIVE AUXILIARY BATTERY TERMINAL
Click here

9. INITIALIZATION AFTER RECONNECTING AUXILIARY BATTERY TERMINAL
HINT:
When disconnecting and reconnecting the auxiliary battery, there is an automatic learning function that completes learning when the respective system is used.
Click here

10. PERFORM DIAGNOSTIC SYSTEM CHECK
Click here

11. INSPECT SRS WARNING LIGHT
Click here

 Reassembly
REASSEMBLY CAUTION / NOTICE / HINT CAUTION: Wear protective gloves. Sharp areas on the parts may injure your hands.
HINT:
Use the same procedure for the driver side and front passenger side...

Other information:
Toyota Yaris XP210 (2020-2026) Reapir and Service Manual: Installation
INSTALLATION CAUTION / NOTICE / HINT NOTICE: This procedure includes the installation of small-head bolts. Refer to Small-Head Bolts of Basic Repair Hint to identify the small-head bolts. Click here PROCEDURE 1. INSTALL FUEL PRESSURE SENSOR HINT: Perform "Inspection After Repair" after replacing the fuel pressure sensor...
Toyota Yaris XP210 (2020-2026) Reapir and Service Manual: Restarting after a Short Period of Time from an Idling Stop
DESCRIPTION Perform this procedure if the engine restarts after an abnormally short period of time after being stopped by the stop and start system. Regarding explanations of the features of stop and start system control: Click here PROCEDURE 1...
Categories
- Manuals Home
- Toyota Yaris Owners Manual
- Toyota Yaris Service Manual
- Adjustment
- Power Integration No.1 System Missing Message (B235287,B235587,B235787-B235987)
- Battery Monitor Module General Electrical Failure (P058A01)
- New on site
- Most important about car
Refueling
Before refueling, close all the doors, windows, and the liftgate/trunk lid, and switch the ignition OFF.
To open the fuel-filler lid, pull the remote fuel-filler lid release.
